How to Paint a Pumpkin on Canvas- Easy Beginner Fall Painting
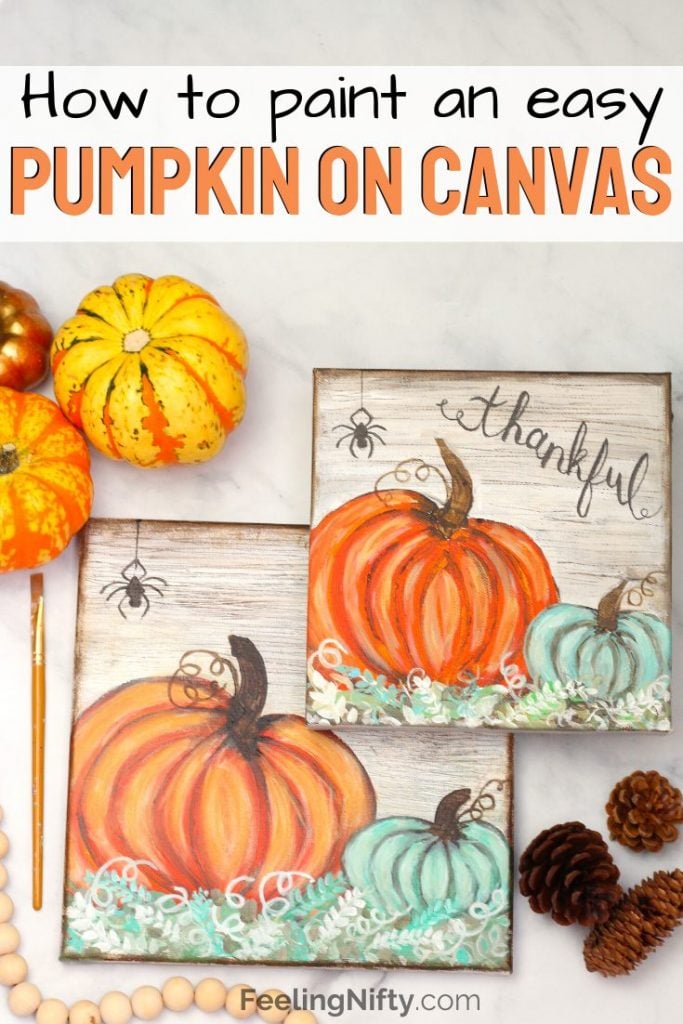
Fall is my fave! And this fall, I was feeling inspired to paint some lovely orange and teal pumpkins for a cute fall painting. I've put together a step by step tutorial (including a full length video tutorial on YouTube) to show you how to paint a pumpkin on canvas, yourself!
This easy fall pumpkin painting is a perfect project for beginners or even older kids! It makes a cute thanksgiving, fall or halloween painting on canvas idea that you can decorate your house with too!
The tutorial will show you how to draw a pumpkin on canvas followed by painting a beautiful textured wood background. Finally, you'll learn how to paint a pumpkin on canvas with a double loading brush technique.
Hope you have a gourd time making this painting (haha) ! And be warned, more pumpkin puns to follow....
Oh, and if you love this tutorial, check out my learn to paint series for other fun step by step paintings. If you're looking for other fall crafts check out this pumpkin painting ideas post.
How To Draw a Pumpkin on Canvas
How do you draw a pumpkin on canvas?
Easy as pumpkin pie!
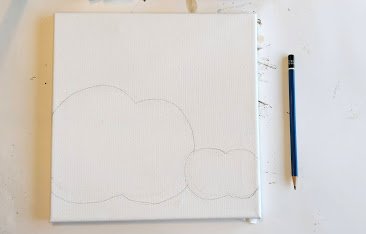
The first step is to grab any pencil and draw your pumpkin(s). You can draw your pumpkins symmetrically, but I like to make them a bit asymmetrical to make them more interesting. And in reality, many of them are not perfect, which I actually prefer.
Here's my sketch with 2 pumpkins- one large one (my focal point) and one smaller one.

Once you are happy with your pumpkin shapes, you can also take you pencil and sketch in the pumpkin ridges. This will help know how to move your paintbrush when painting them in the steps below.

It's that simple to draw your pumpkins! Nothing to it! And now you are ahead of the carve! 😀
How To Make a "Faux" Wood Background
Making a texturized "faux" wood background is super fun and was my favorite part of this painting! Yes- I love my pumpkins, but this texture technique really struck a gourd with me. 🙂
I experimented with the different ways to make the background look like a piece of vintage/rustic painted wood.
The technique I ended up choosing doesn't use any special mediums or tools that you need buy. I'm a big believer on getting creative with texture and looking around your home for things to use before buying.
For this technique you'll need a fork (plastic or metal), some dark brown(burnt umber) and white paint (titanium white).
Faux Chipped Wood Method using a Fork
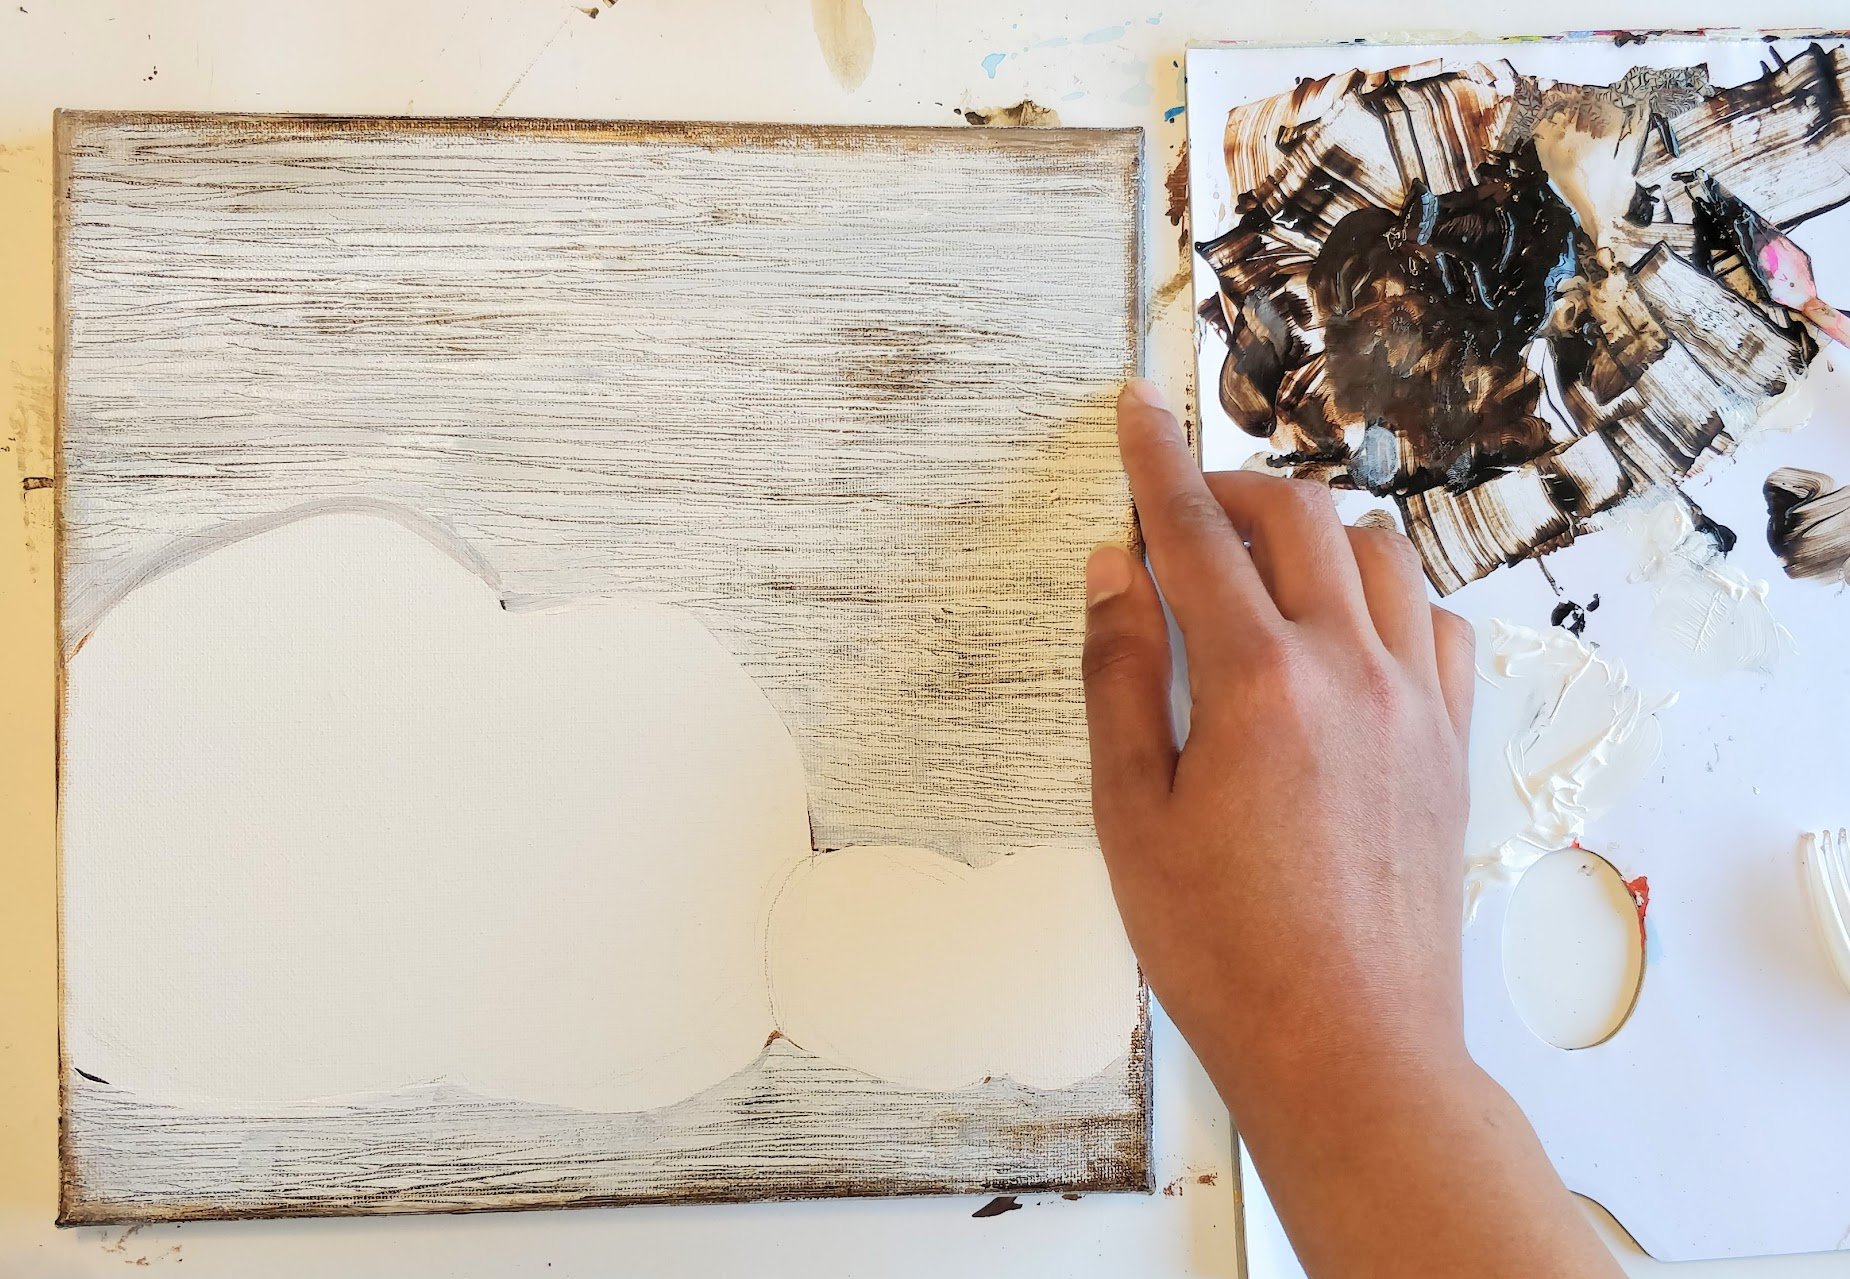
The first step is covering your canvas( outside of your pumpkin shapes) with your dark brown paint. No need to get the strokes to look perfect, it's going to be covered up in the next step. I used a 1" flat wash brush to paint on the brown.
Leave the brown paint to dry fully.

Make sure you have some white paint and a fork ready for the next step . Take your 1" flat wash brush and white paint (titanium white) and paint over the brown.

While the white paint is wet (this is key), take your fork and make horizontal scratch marks across the canvas. You will have to work fast in this step. As a tip, try to make your white paint layer thick, so the paint takes longer to dry.

Since the white paint is still wet, the fork will make some texturized marks and the brown will show underneath. This will imitate the texture or look of wood grain.
When the paint dries it will also feel and look bumpy which brings the background to life!
My biggest tip for this step is to do it standing up. You'll have more range of motion. Loosen up, have fun, and do it without thinking too much! The more imperfect and loose/free you make the marks, the more character it will have.
Painting Wood Edges with you Fingers
After the white paint is fully dried, it's time to add the finishing step to our rustic/vintage "faux" wood. You'll be getting your fingers into the paint and getting a bit messy! It's something that all artists and crafters should try at least once!
Dip your finger in some of your brown paint (not too much just a bit). You can dab your finger on the palette to make sure you don't have a huge glob of paint. Now take your finger and smooth it along all 4 edges of your canvas.
Enjoy this step and don't aim for perfection. The beauty in vintage/aged wood is that it's worn, much of the time unevenly worn. Paint with that in mind.

Tip: Don't be scared to use your finger and add some brown areas on your white background. It will make the faux wood look more "chipped" and aged.
How to Paint a Pumpkin On Canvas with One Stroke Technique
Once you've sketched your pumpkins and you've painted your wood background(see above), you're ready to paint your pumpkins!
For this pumpkin painting technique you'll learn a really fun paintbrush technique called double loading. Simply put, your brush will have 2 colors on it as the same time (orange and brown). This will help make the orange "bumps" on the pumpkin with brown shadows that separate each bump in one stroke.
Add orange paint (cadmium orange hue) and some dark brown paint (burnt umber) on your palette.
Tip: If your orange/brown paint is very thick, thin it down a bit by mixing in a bit of water. This will make it flow better from the brush.
Using a 1/2" flat brush (or smaller if your canvas is small), load your brush with orange paint. Use a sweeping back and forth motion to load paint. And make sure that the paint is loaded all the way up the metal ferrule.
Next, dip one corner of your flat brush in the dark brown paint. It should look like the picture below.

With the dark brown corner of the brush nearest to the outer edge of the pumpkin, in one stroke paint a "C" shape (see picture below). You'll notice that the brown and orange blend and the brown is focused on the outer edge of the pumpkin.
Tip: If you run out of paint half way through the stroke, no worries. Simply flip your brush on the other side and paint bottom up towards the center. You want to make sure that the dark brown corner of the brush is closest to the outer edge of the pumpkin.

We are going to repeat the same "double loading C" stroke for each pumpkin ridge across. The brown will create shadows where the ridges are so it will automatically give your pumpkin dimension. And the "C" shape will give the illusion of curvature across your pumpkin.

Tips on Finishing your Pumpkin
To finish off your pumpkin, here are some additional tips:
- If you want darker shadows on each pumpkin bump, you can touch up afterwards. Use your flat brush to pick up some brown paint and go back in and define your shadow lines.
- Use the pencil marks as a guideline for your paint strokes,. It will make it easier to know how round to make your "C" shapes.
- Repeat the same "C" strokes on the opposite side of your pumpkin until both sides join in the middle. The middle of the pumpkin should look like a sideways ellipse shape.
- Don't worry about perfecting the bottom edge of the pumpkin, it'll be covered with foliage in the later steps.

Pumpkin Highlights & Stem
Once your pumpkin paint is dried, you are going to go back in with some lighter colors and highlight it. This will really bring your pumpkin to life!
First, take your orange paint and create 2 piles. Mix a bit of white paint into each piles. Make sure one of your piles is a lighter orange and one is slightly darker orange.
We are going to use a "dry brush" technique to apply the highlights. For the technique to work you will need to make sure your brush is completely dry. Use a paper towel to dry your brush so there isn't any moisture on it.
Next, dip your brush(same ½" flat brush we used for the pumpkin above) into the darker of the 2 orange piles (just a little bit of paint). Using your brush paint a few highlights on each pumpkin "C" stroke on your pumpkin.
Next, take your lightest orange color and add more highlights to each "C" pumpkin stroke. However, this time don't add as many highlights. To help visualize where focus these highlights, imagine a light shinning from the top corner of your canvas down onto your pumpkins. Try to imagine where the light would hit on your pumpkin, and add your highlights there.

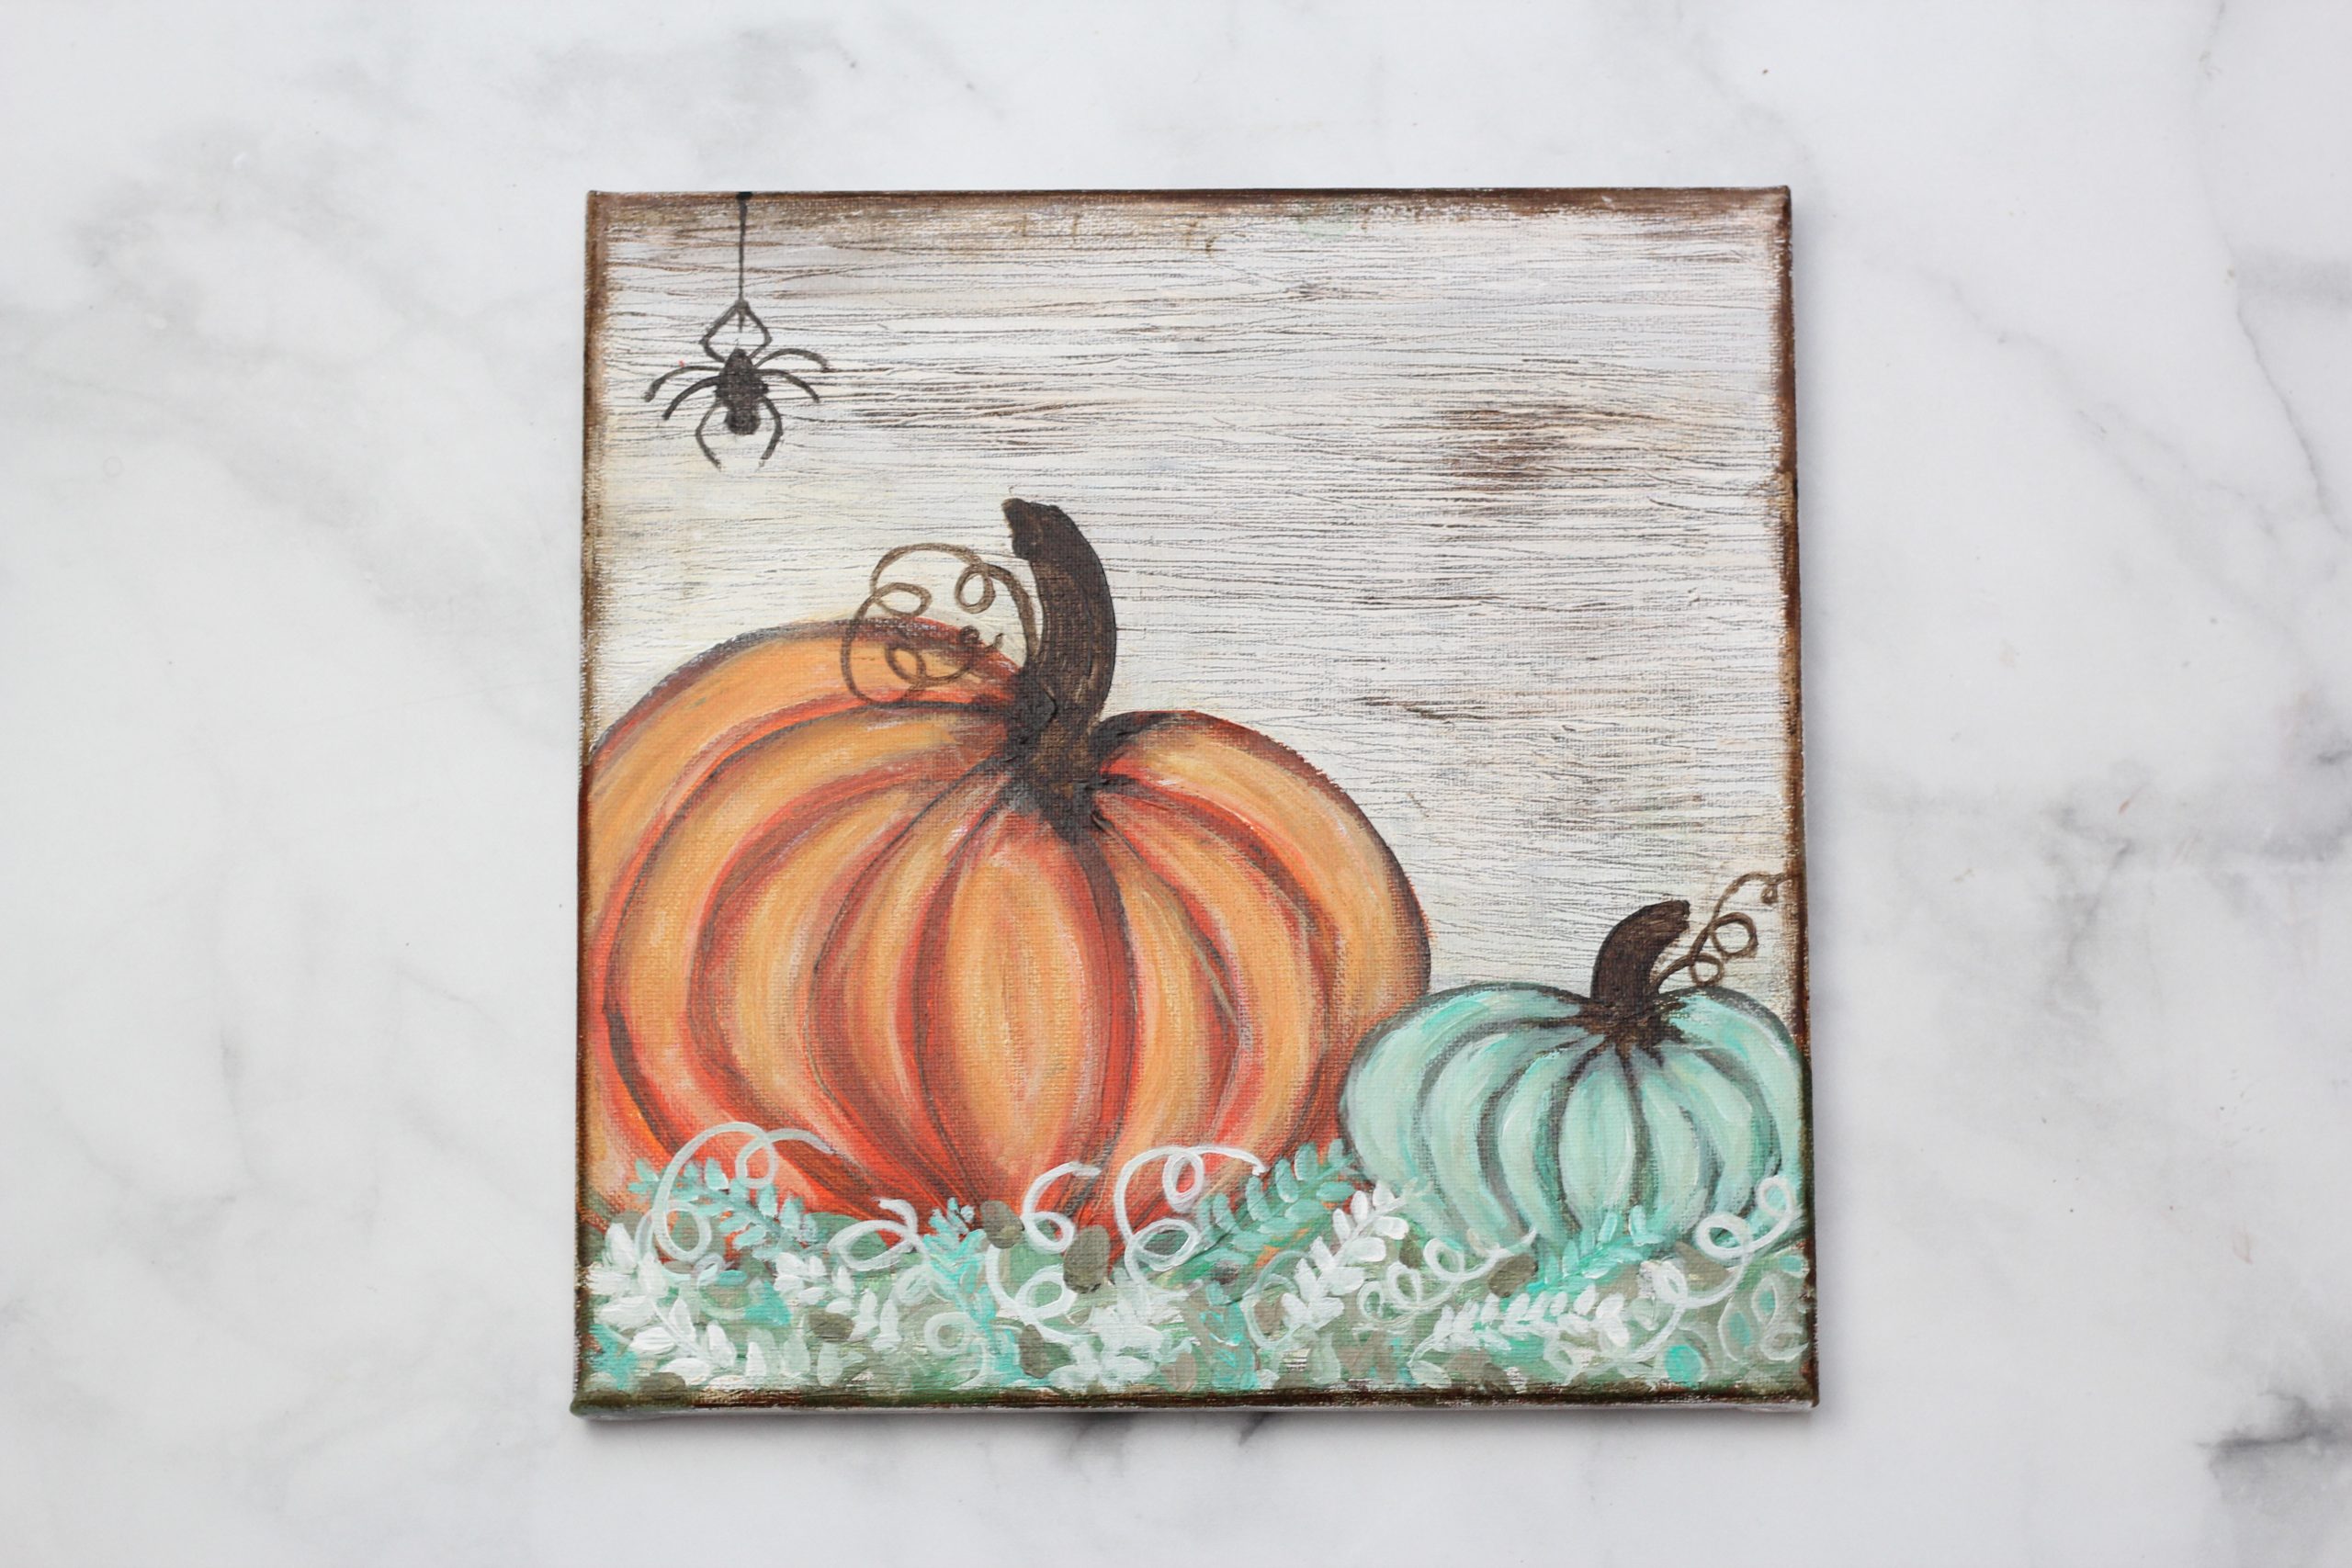
Next you will use your flat brush and paint in a stem with your same dark brown paint. I used a ¼" flat brush since the stem isn't very wide (but feel free to use what ever brushes you already have). If you want to add in a curly branch to the stem, you can use a size 0 round brush ( or any small round brush you can have). You'll also want to thin down your dark brown paint with water so that it's easier for the paint to flow from the brush. It should be the consistency of a thick ink.
You can repeat the same steps as above for the smaller pumpkin. I decided to make the smaller pumpkin with a teal/ aqua green color. But you can choose any color you'd like!

How to Paint a Pumpkin On Canvas - Time Lapse
How to Paint a Pumpkin with a Vintage Wood Background

Learn how to draw and how to paint a pumpkin on canvas with a nifty brush technique! Also learn how to paint a vintage rustic wood background.
Materials
- Cadmium Orange Hue
- Burnt Umber
- Titanium White
- Mars Black
- Aqua Green
- Light Green Permanent (optional)
- Plastic cutlery fork
- 1" flat brush
- ½" flat brush
- Liner brush
Instructions
- To watch the full length step by step video tutorial, you can watch on youtube.
- Draw your pumpkin shapes onto you canvas.

- Use the directions above for creating the "faux wood" background.

- Now time to paint some orange pumpkins! Using your cadmium orange hue and burnt umber colors, follow the steps in the section above to paint your orange pumpkin. First you'll fill in the pumpkin with the double loading one stroke technique, then apply highlights to you pumpkin, and finally add the stem and a curly tendril.

- Follow the same steps as above for your teal pumpkin, but instead of orange use aqua green paint.

- Once the pumpkins are done, use your liner brush and some mars black paint to draw on your spider hanging down from a web. Think of your spider in terms of simple shapes: a diamond shaped body, a circle head and 8 long legs 🙂 Tip: thin out your black paint quite a bit with water before loading it onto your liner brush (like a thick ink consistency). This will make the brush strokes and lines smoother and more crisp.

- The last step is to add some pretty foliage and leaves at below the pumpkins. Take your burnt umber, white, aqua green and another green paint of your choice. Using these 4 colors create a few different hues. This is a great exercise to get you enjoying paint mixing and seeing what interesting colors you can create. You can't go wrong here, so enjoy! These colors will work well together to create some nice earthy tones. Use a variety of brushes of your choice to make interesting leaves, branches, etc with the colors your created. It will look very 1 dimension and flat at this stage, not to worry- we will bring it to life in the next step!


- Once you have filled in the bottom with your folliage. Take some titanium white mixed with the tinniest bit of any green. This will create a pale, near white color. Thin the paint with water (thick ink consistency) so it flows easier from the brush. Create some more "highlight" folliage with this paint color and a size 0 round brush. This step will add beautiful dimension to the bottom of your painting. I added some interesting curly branches and other leaves like "wheat ears", but feel free to use your imagination.

- Optional:Feel free to add some handwritten inspiring words or text to the top right hand corner of your painting. I made 2 paintings to show you the difference (one with wording, one without). To get the placement just right, I first used a pencil to trace in my wording onto the canvas, then went over it with some black paint and a liner brush. Alternatively you can used a black Sharpie for more control.


Recommended Products
As an Amazon Associate and member of other affiliate programs, I earn from qualifying purchases.
-
 Winsor & Newton Cotman Water Colour Series 111 Short Handle Synthetic Brush - Round #0
 -
Strathmore 365-9 300 Series Palette Pad, 9"x12" Tape Bound, 40 Sheets
-
PHOENIX White Blank Cotton Stretched Canvas Artist Painting - 8x8 Inch / 7 Pack - ⅝ Inch Profile Triple Primed for Oil & Acrylic Paints
-
Princeton Velvetouch Artiste, Mixed-Media Brush for Acrylic, Watercolor & Oil, Series 3950 Wash Luxury Synthetic, Size ½
-
Santa Fe Art Supply Best Quality Artist Paintbrush Flat Wide 1 Inch. Acrylic Oil Watercolor & Face Paint. Long Handle Replacement Paint Brushes with
-
Liquitex BASICS Acrylic Paint, 4-oz tube, Light Green Permanent
-
Liquitex BASICS Acrylic Paint, 8.45-oz tube, Bright Aqua Green, 8 Fl
-
Liquitex BASICS Acrylic Paint, 4-oz tube, Mars Black
-
Liquitex BASICS Acrylic Paint, 8.45-Oz Tube, Titanium White
-
Liquitex 4385720 BASICS Acrylic Paint, 8.45-oz tube, Cadmium Orange Hue
-
Liquitex BASICS Acrylic Paint, 4-oz tube, Burnt Umber


Enjoy friends, and hope you carve out some time to make this fun fall pumpkin art!
xoxo,
Jasmine
If you liked this tutorial, please pin it!


Hi! I am going to attempt this painting tomorrow as a gift for a friend, whish me luck! I only have one question. What size canvas did you use? I didn't see the canvas size in the materials list. I have a 10 by 10. Thank you in advance!
Hi Tammy, that's very exciting andI hope you enjoy painting the pumpkins! In terms of the canvas size, I used both a 10x10 canvas and a x8- both worked great.Goodluck and enjoy!
Cheers,
Jasmine
@Jasmine Khinda, So far I have the pumpkins and the brown. Im sorry for all the questions. I just was wondering which paints you thinned down with water? I tried doing the brown by wetting it down but it didnt look right so I did it without wetting it down. Again, any help you can give me is appreciated