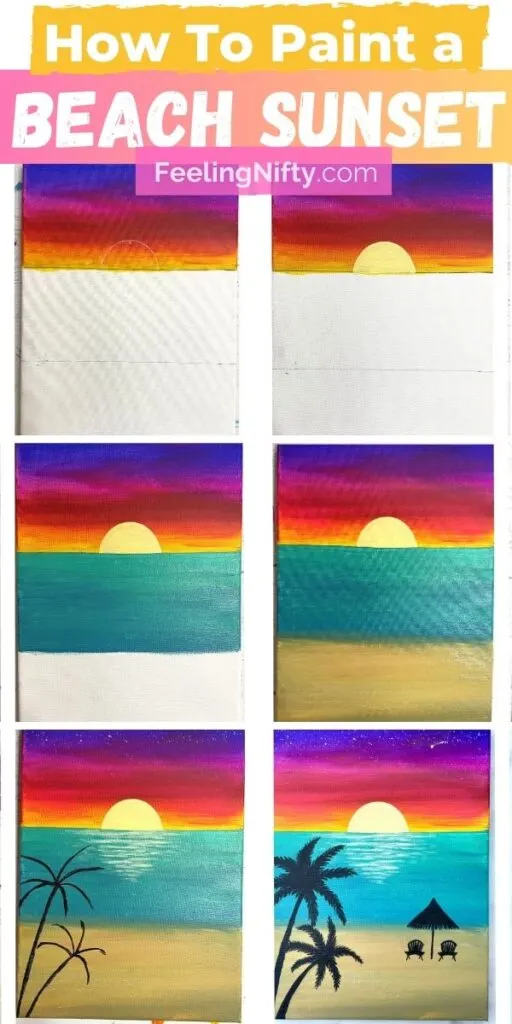
Welcome to my step-by-step, beginner-friendly beach sunset painting tutorial, where I’ll guide you in creating a stunning tropical sunset scene that radiates tranquility. In this comprehensive tutorial, I’ll walk you through the process of capturing the beauty of a beach sunset on canvas. From blending vibrant colors to mastering the technique of painting silhouetted palm trees, this tutorial is designed to empower artists of all levels to create their own breathtaking beach sunset paintings.
In addition to these popular beach seascape painting and sunset cityscape painting tutorials, I’m thrilled to present a range of captivating 65 + painting ideas that will inspire artists of all levels. Whether you’re drawn to serene beach scenes or the enchanting beauty of city sunsets, these tutorials provide step-by-step guidance to help you bring your artistic visions to life on canvas.

What primary colors to use for sunset painting?
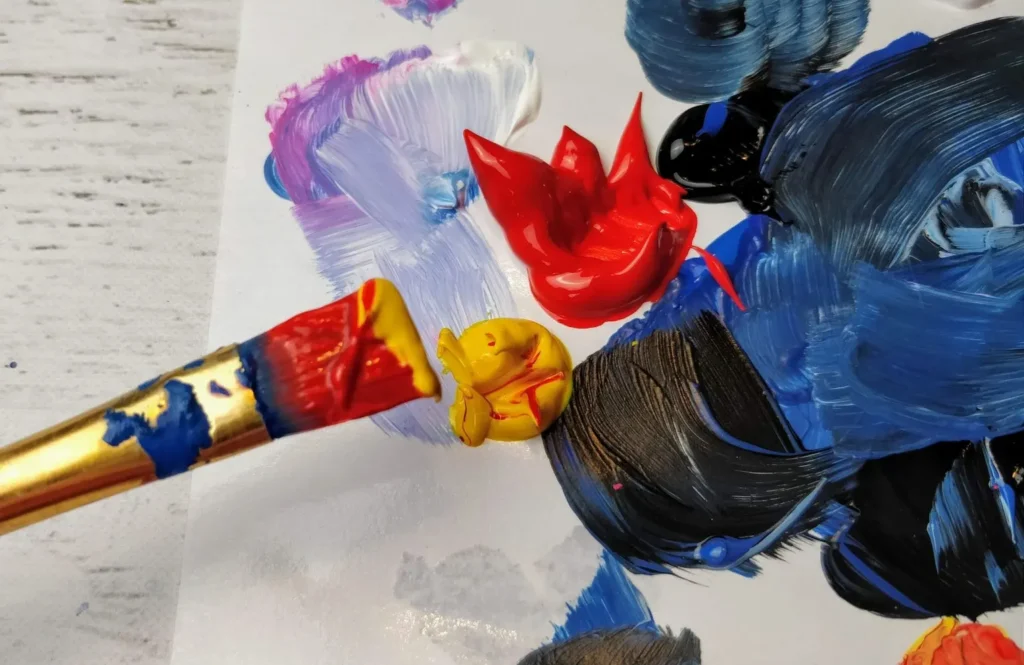
When it comes to capturing the vibrant beauty of a sunset in your painting, understanding which primary colors to use is essential. For a captivating sunset, you can start with a combination of ultramarine blue, fluorescent pink, cadmium red medium hue, and cadmium yellow medium hue.
But why do these colors work so well in depicting sunsets?
The science behind the colors of a sunset is fascinating.
When the sun sets, its light has to travel through a thicker layer of the Earth’s atmosphere. This causes the light to scatter, or spread out, in different directions. The shorter wavelengths of blue and green light scatter more easily, leaving behind longer wavelengths like red, orange, and yellow.
So, in a sunset, the sky appears to be a beautiful mix of warm hues. The ultramarine blue captures the depth and intensity of the sky, while the cadmium red medium hue and cadmium yellow medium hue replicate the rich oranges and yellows that dominate the horizon. Adding a touch of fluorescent pink can enhance the vibrant and dreamy qualities often seen in a sunset.

How do you blend paint for a sunset?
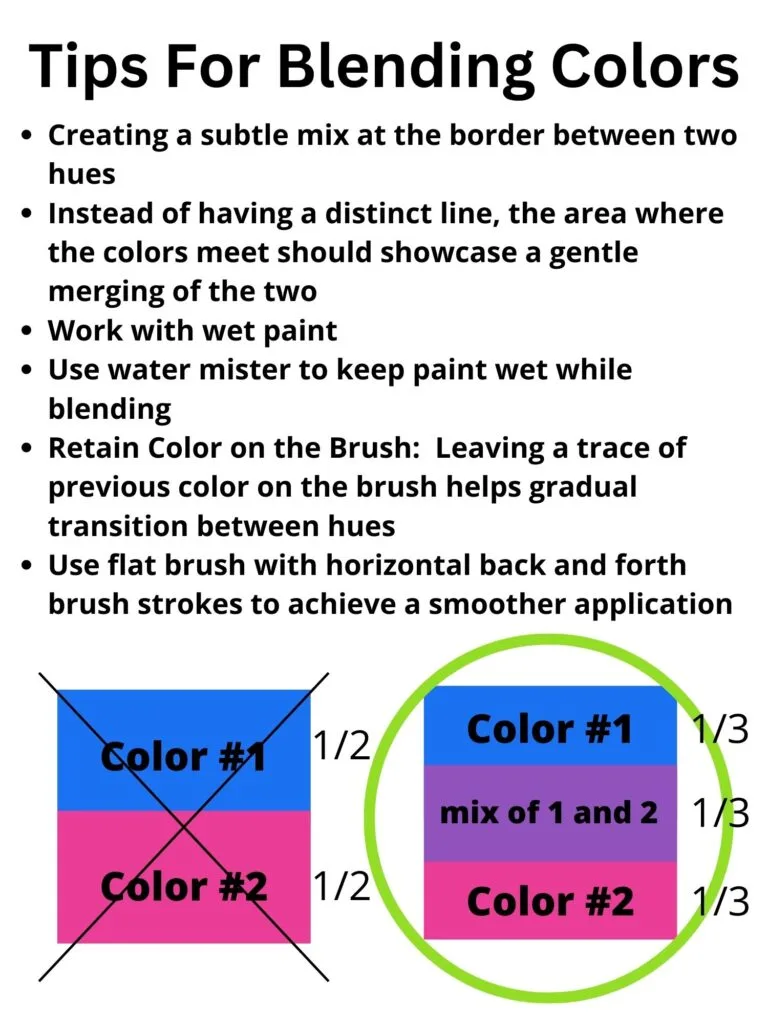
To achieve a captivating and seamless gradient-like effect in your sunset painting, mastering the art of blending colors is crucial. The key lies in ensuring that each color transitions smoothly into its neighboring hue.
Here are some techniques to help you achieve this desired effect:
- Keep the Colors Wet: It’s important to work with wet paint when blending colors in a sunset. This allows the pigments to mix and merge more easily. You can add a glazing liquid to slow down drying time or mist with water.
- Misting with Water: To prevent the paint from drying out too quickly while blending, you can mist the surface with a water mister. Lightly spraying a fine mist of water with a mini mister on the paint keeps it moist and workable, allowing you more time to blend the colors smoothly.
- Retain Color on the Brush: When moving from one color to another, resist the urge to clean off your brush entirely. Leaving a trace of the previous color on the brush (double loading method) helps facilitate a gradual transition between the hues. This way, the colors blend naturally on the canvas.
- Mix at the Border: As you blend colors, focus on creating a subtle mix at the border between two hues. This means that instead of having a distinct line, the area where the colors meet should showcase a gentle merging of the two. Take your time to ensure a smooth transition without abrupt color shifts.
- Employ Horizontal Back and Forth Strokes with a Flat Brush: Utilize horizontal back and forth brush strokes with a flat brush to achieve a smoother and more cohesive color application. This technique helps distribute the paint evenly and promotes a seamless blend from one color to the next.
How To Paint A Beach Sunset
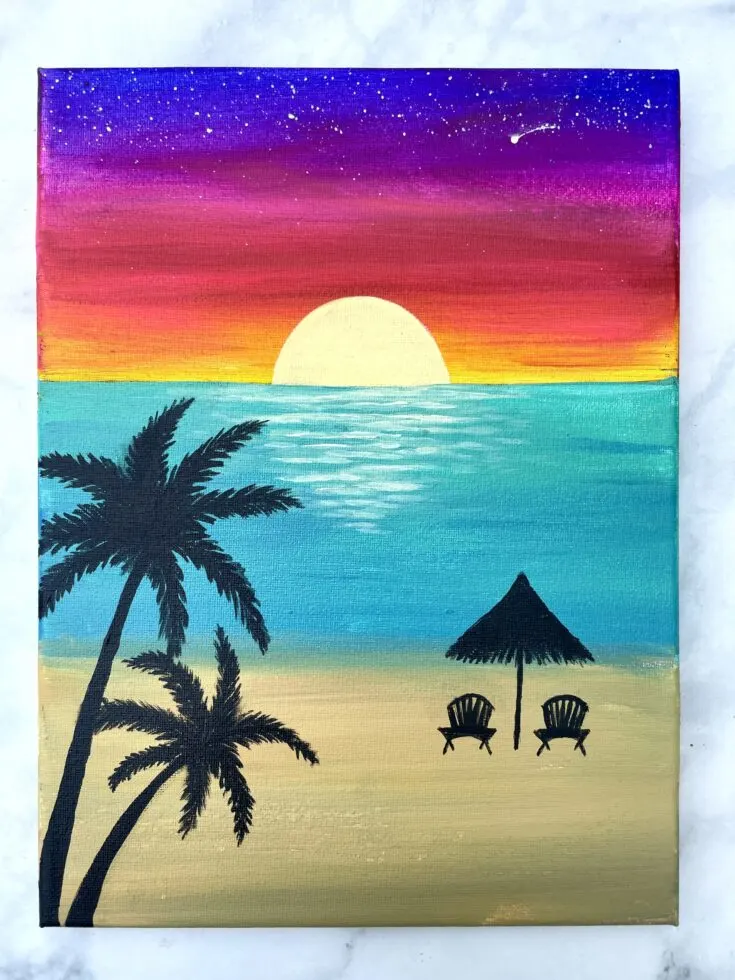
Learn how to create a breathtaking beach sunset painting with our step-by-step tutorial. Perfect for beginners, this tutorial guides you through blending vibrant colors, painting silhouetted palm trees, and capturing the serene ambiance of a tropical sunset on canvas.
Materials
- 9x12" stretched canvas
- Ultramarine Blue
- Fluorescent Pink
- Cadmium Red Medium Hue
- Cadmium Yellow Medium Hue
- Titanium White
- Teal
- Mars Black
- 3/4" Flat wash brush
- Size 5 round brush (small round brush)
- 1/4" flat brush
- Water mister
- Palette
- Jar of clean water
- Rag/paper towel
Instructions
- Follow the YouTube tutorial here.
- Divide the canvas up into thirds using a ruler and a pencil. The top third will be the sky (horizon line), middle will be the ocean and bottom third will be the sand. This will make the composition of the painting more appealing to the eye and balanced.

- To paint the sunset, pick up your 3/4" flat brush and some ultramarine blue. Using horizontal back and forth strokes paint the blue about 1 inch down from the top of the canvas.
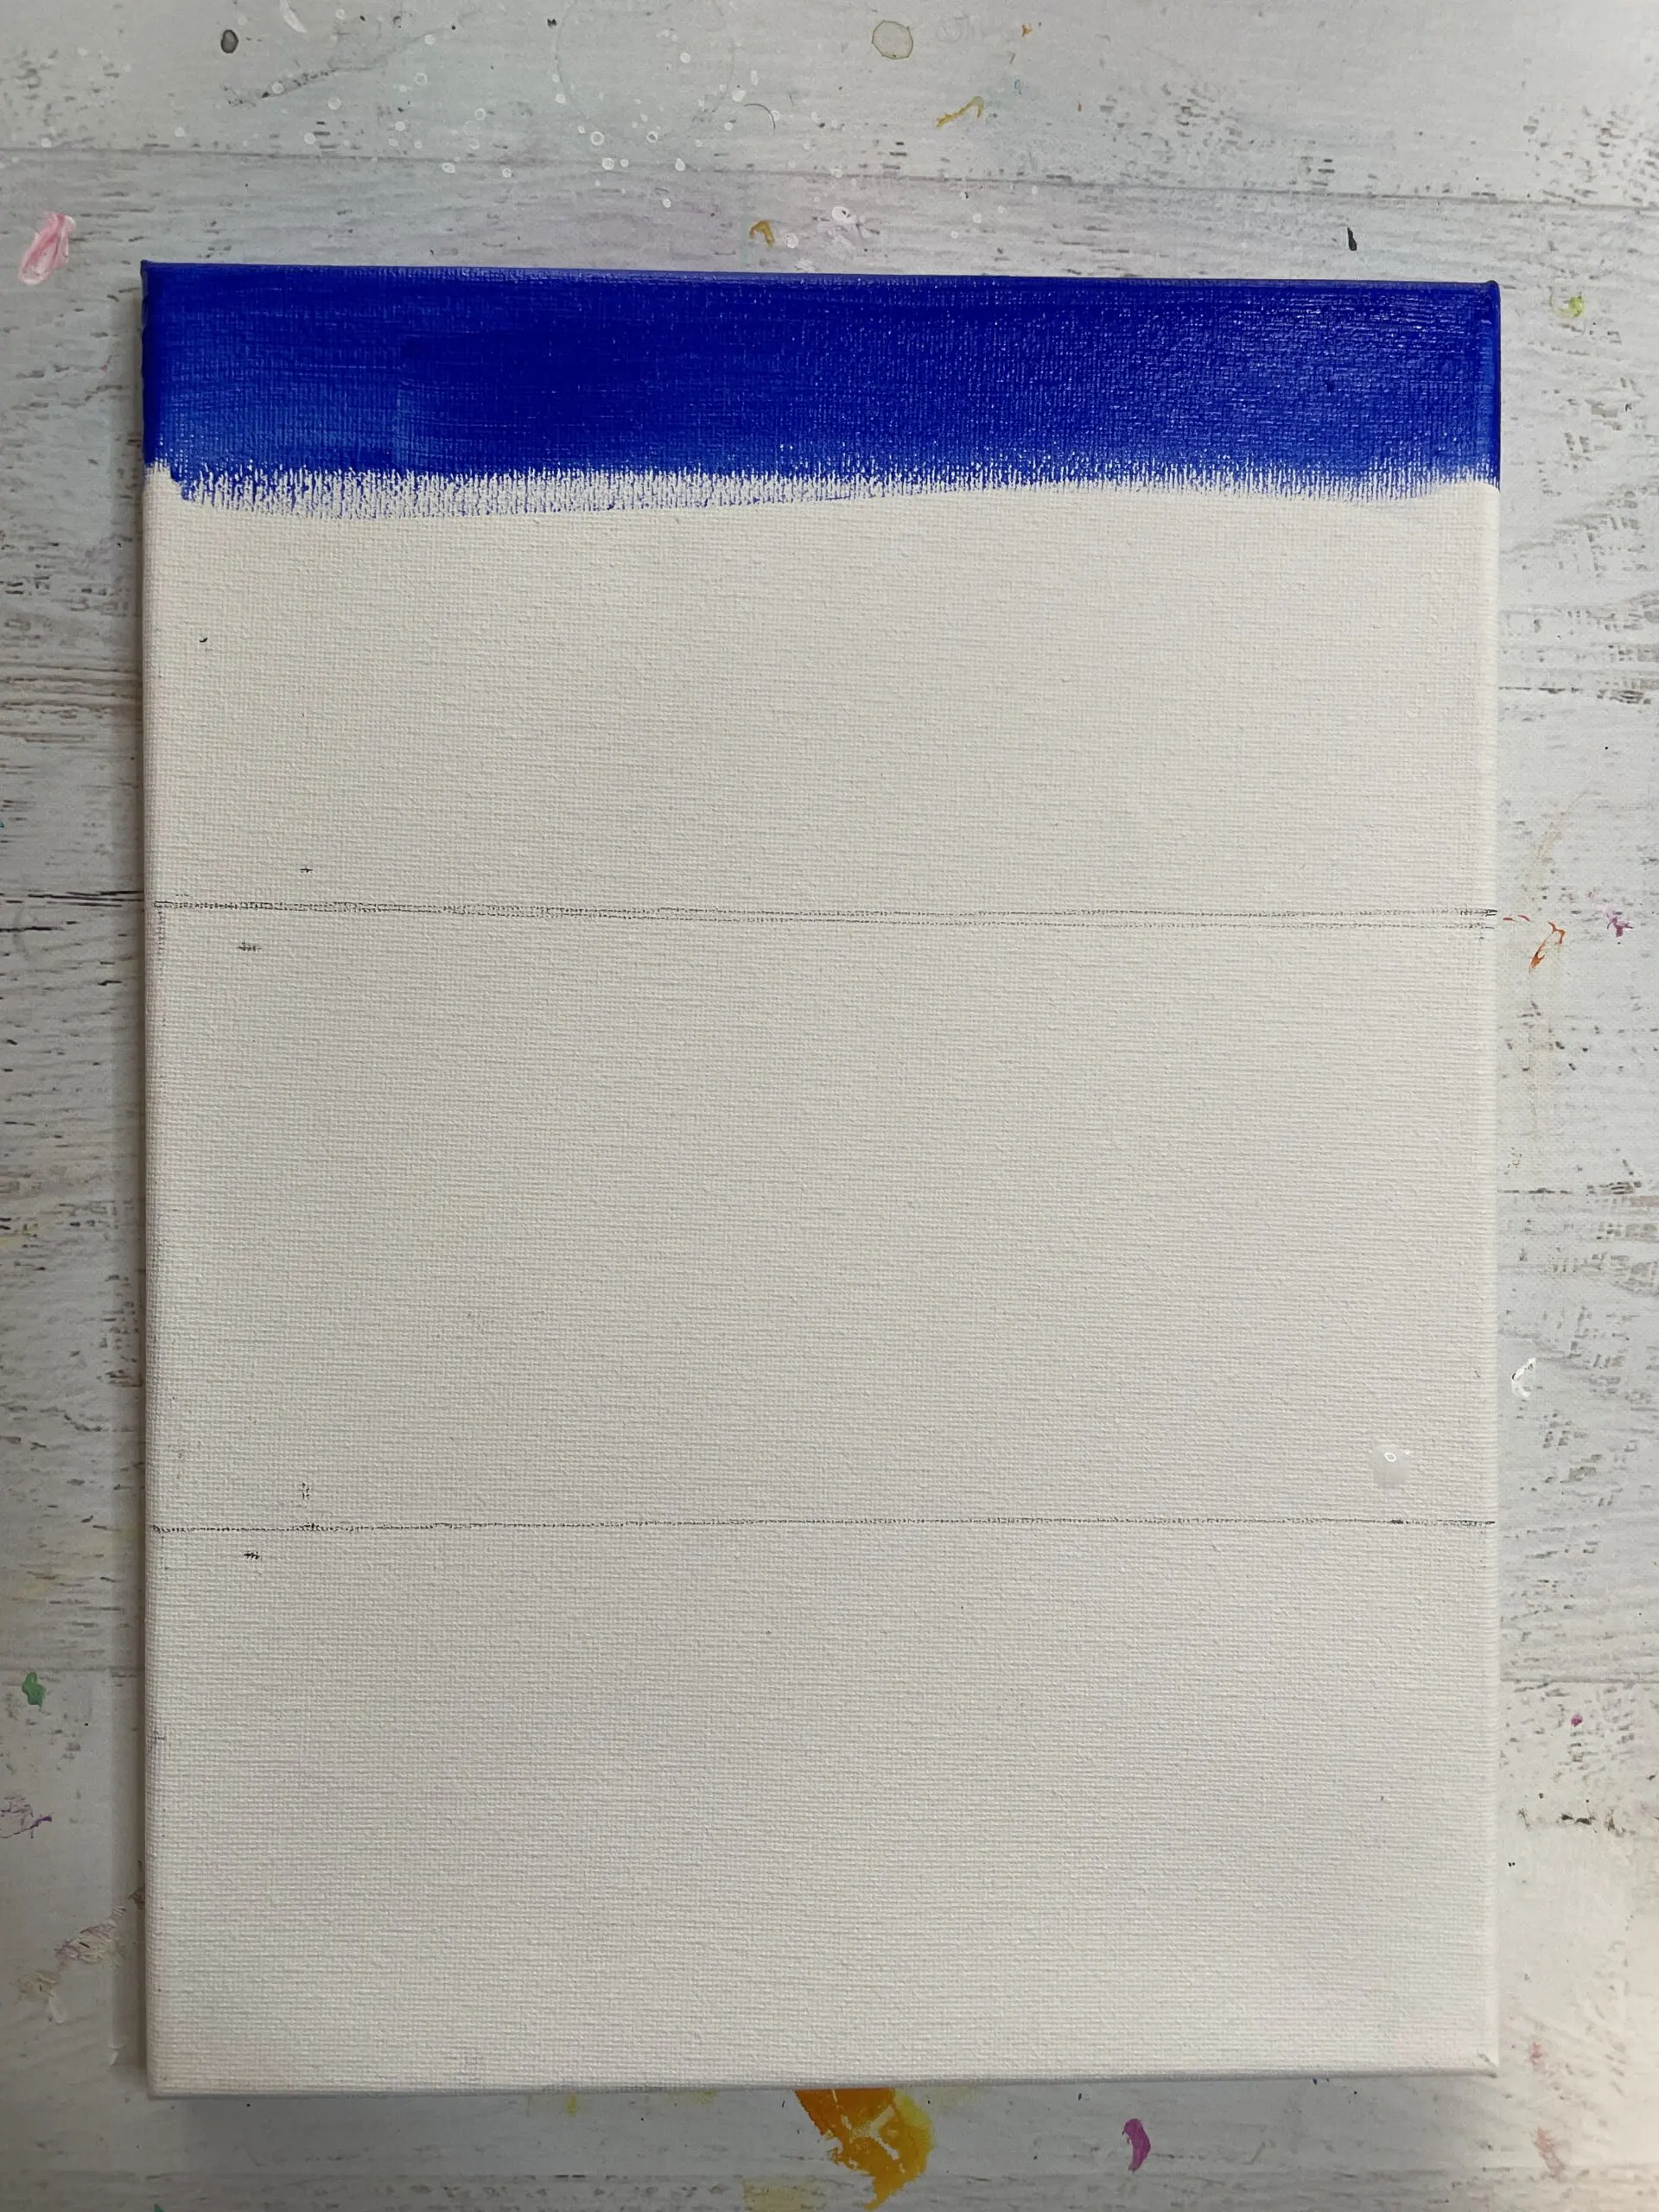
- Without cleaning off the brush and while blue paint is still wet, pick up some fluorescent pink paint. Using horizontal strokes paint the pink down 1 inch from where you left off with the blue. See sunset blending tips section above to blend the 2 colors.
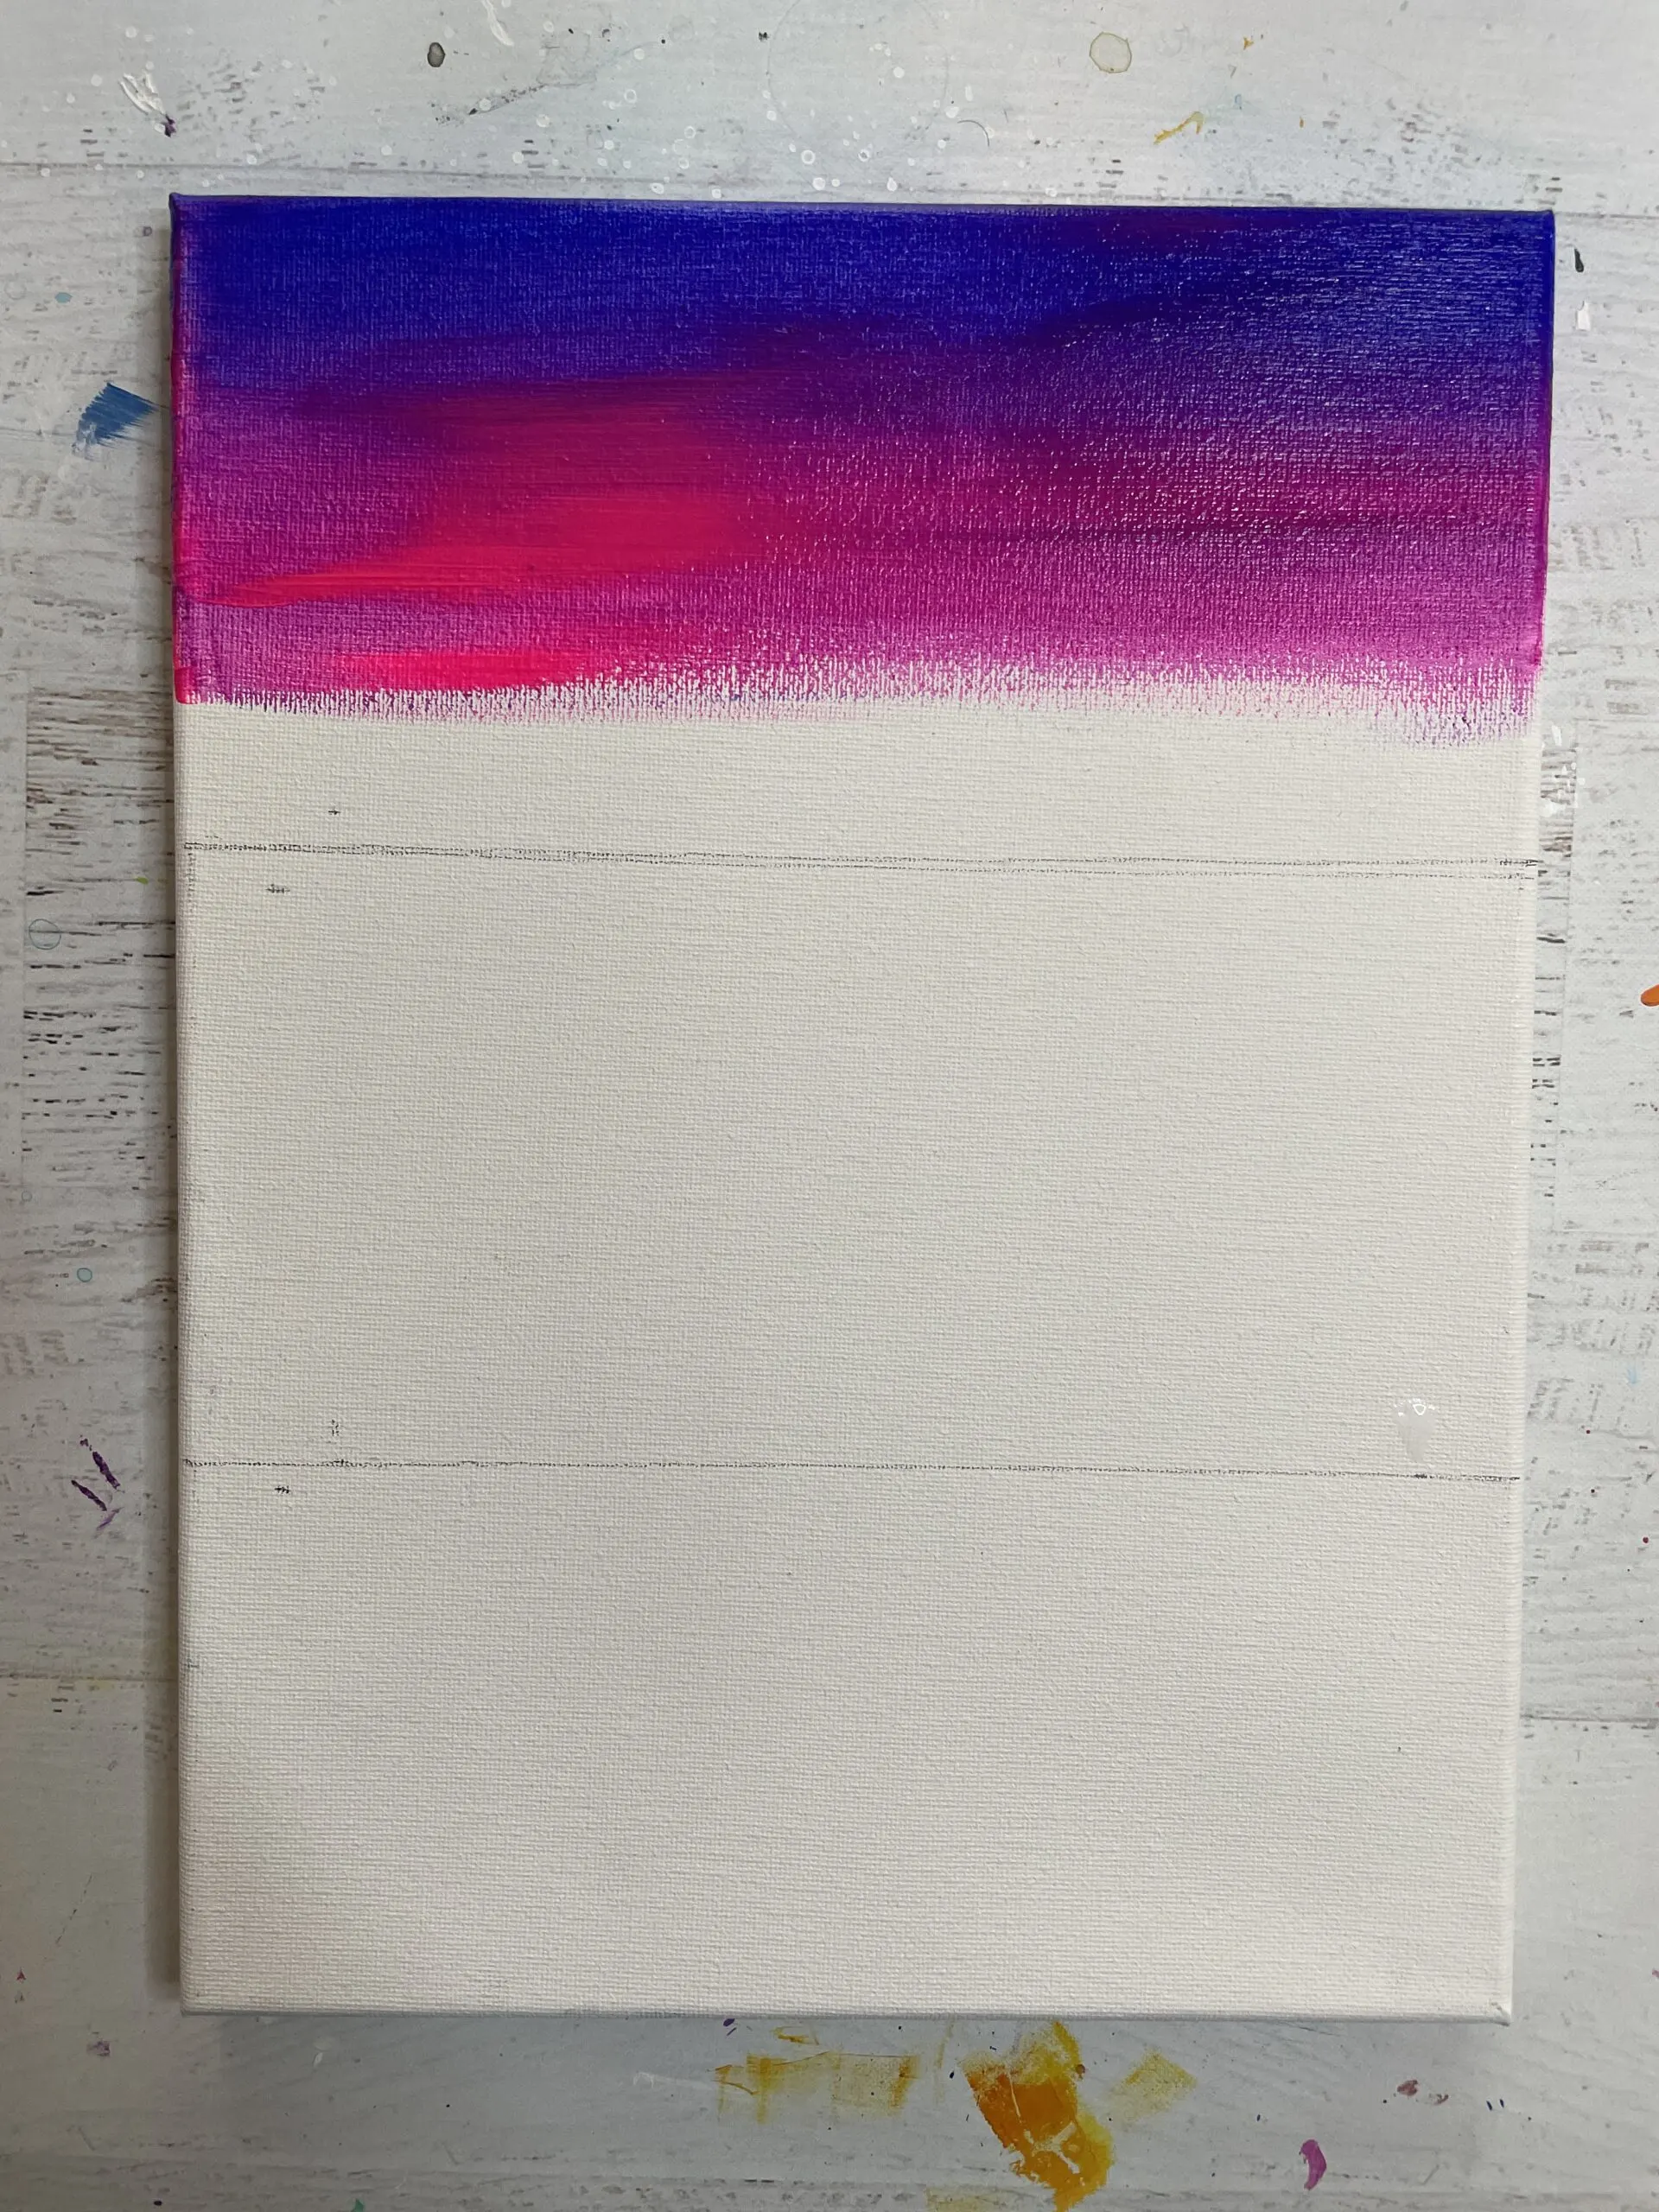
- Clean off your brush and then pick up some cadmium red paint. Blend the red into the pink with the same horizontal stroke and blending technique. Paint the red another 1 inch down.
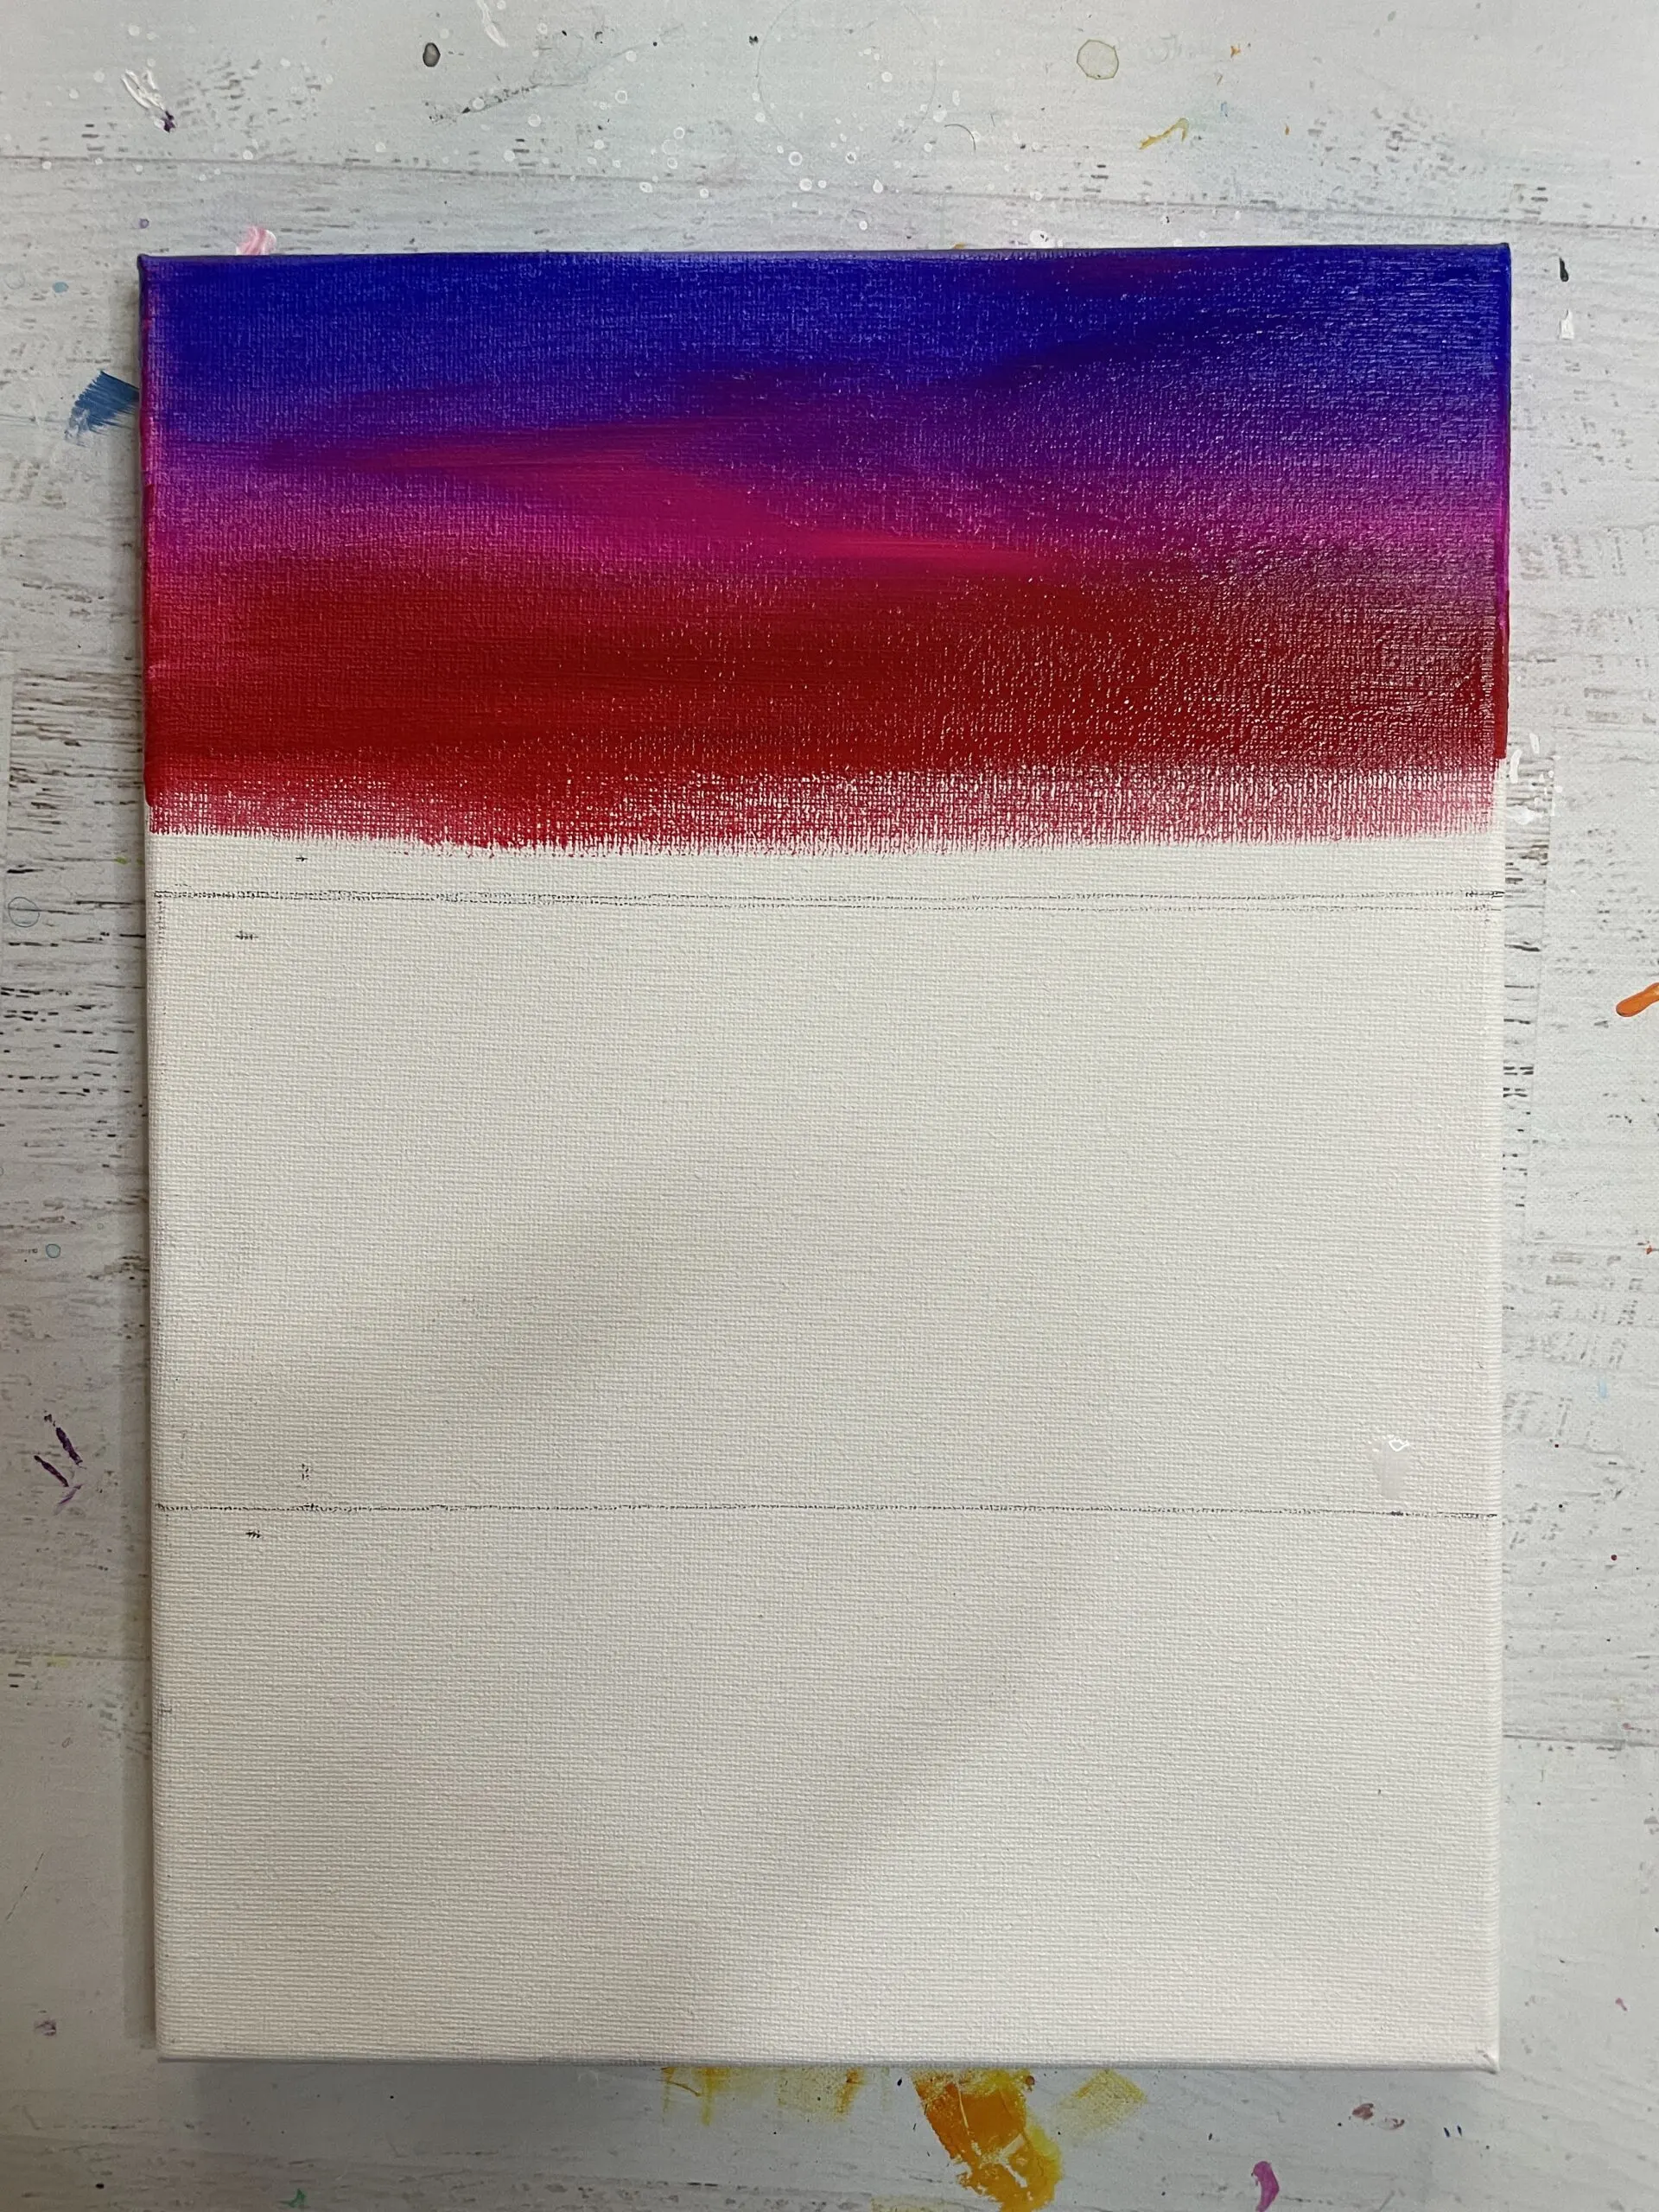
- Finally pick up some cadmium yellow paint and blend the yellow into the red with the blending technique and horizontal stroke. Paint the yellow all the way down to the horizon pencil line. Wait for the paint to dry.

- Mix a pale yellow color using 4 parts titanium white and 1 part yellow. You want a pastel like yellow color so that it contrasts against the already yellow portion in the sunset.
- Take a small round object and trace a half a circle at the horizon (which will be your set setting half above and half below the horizon line)
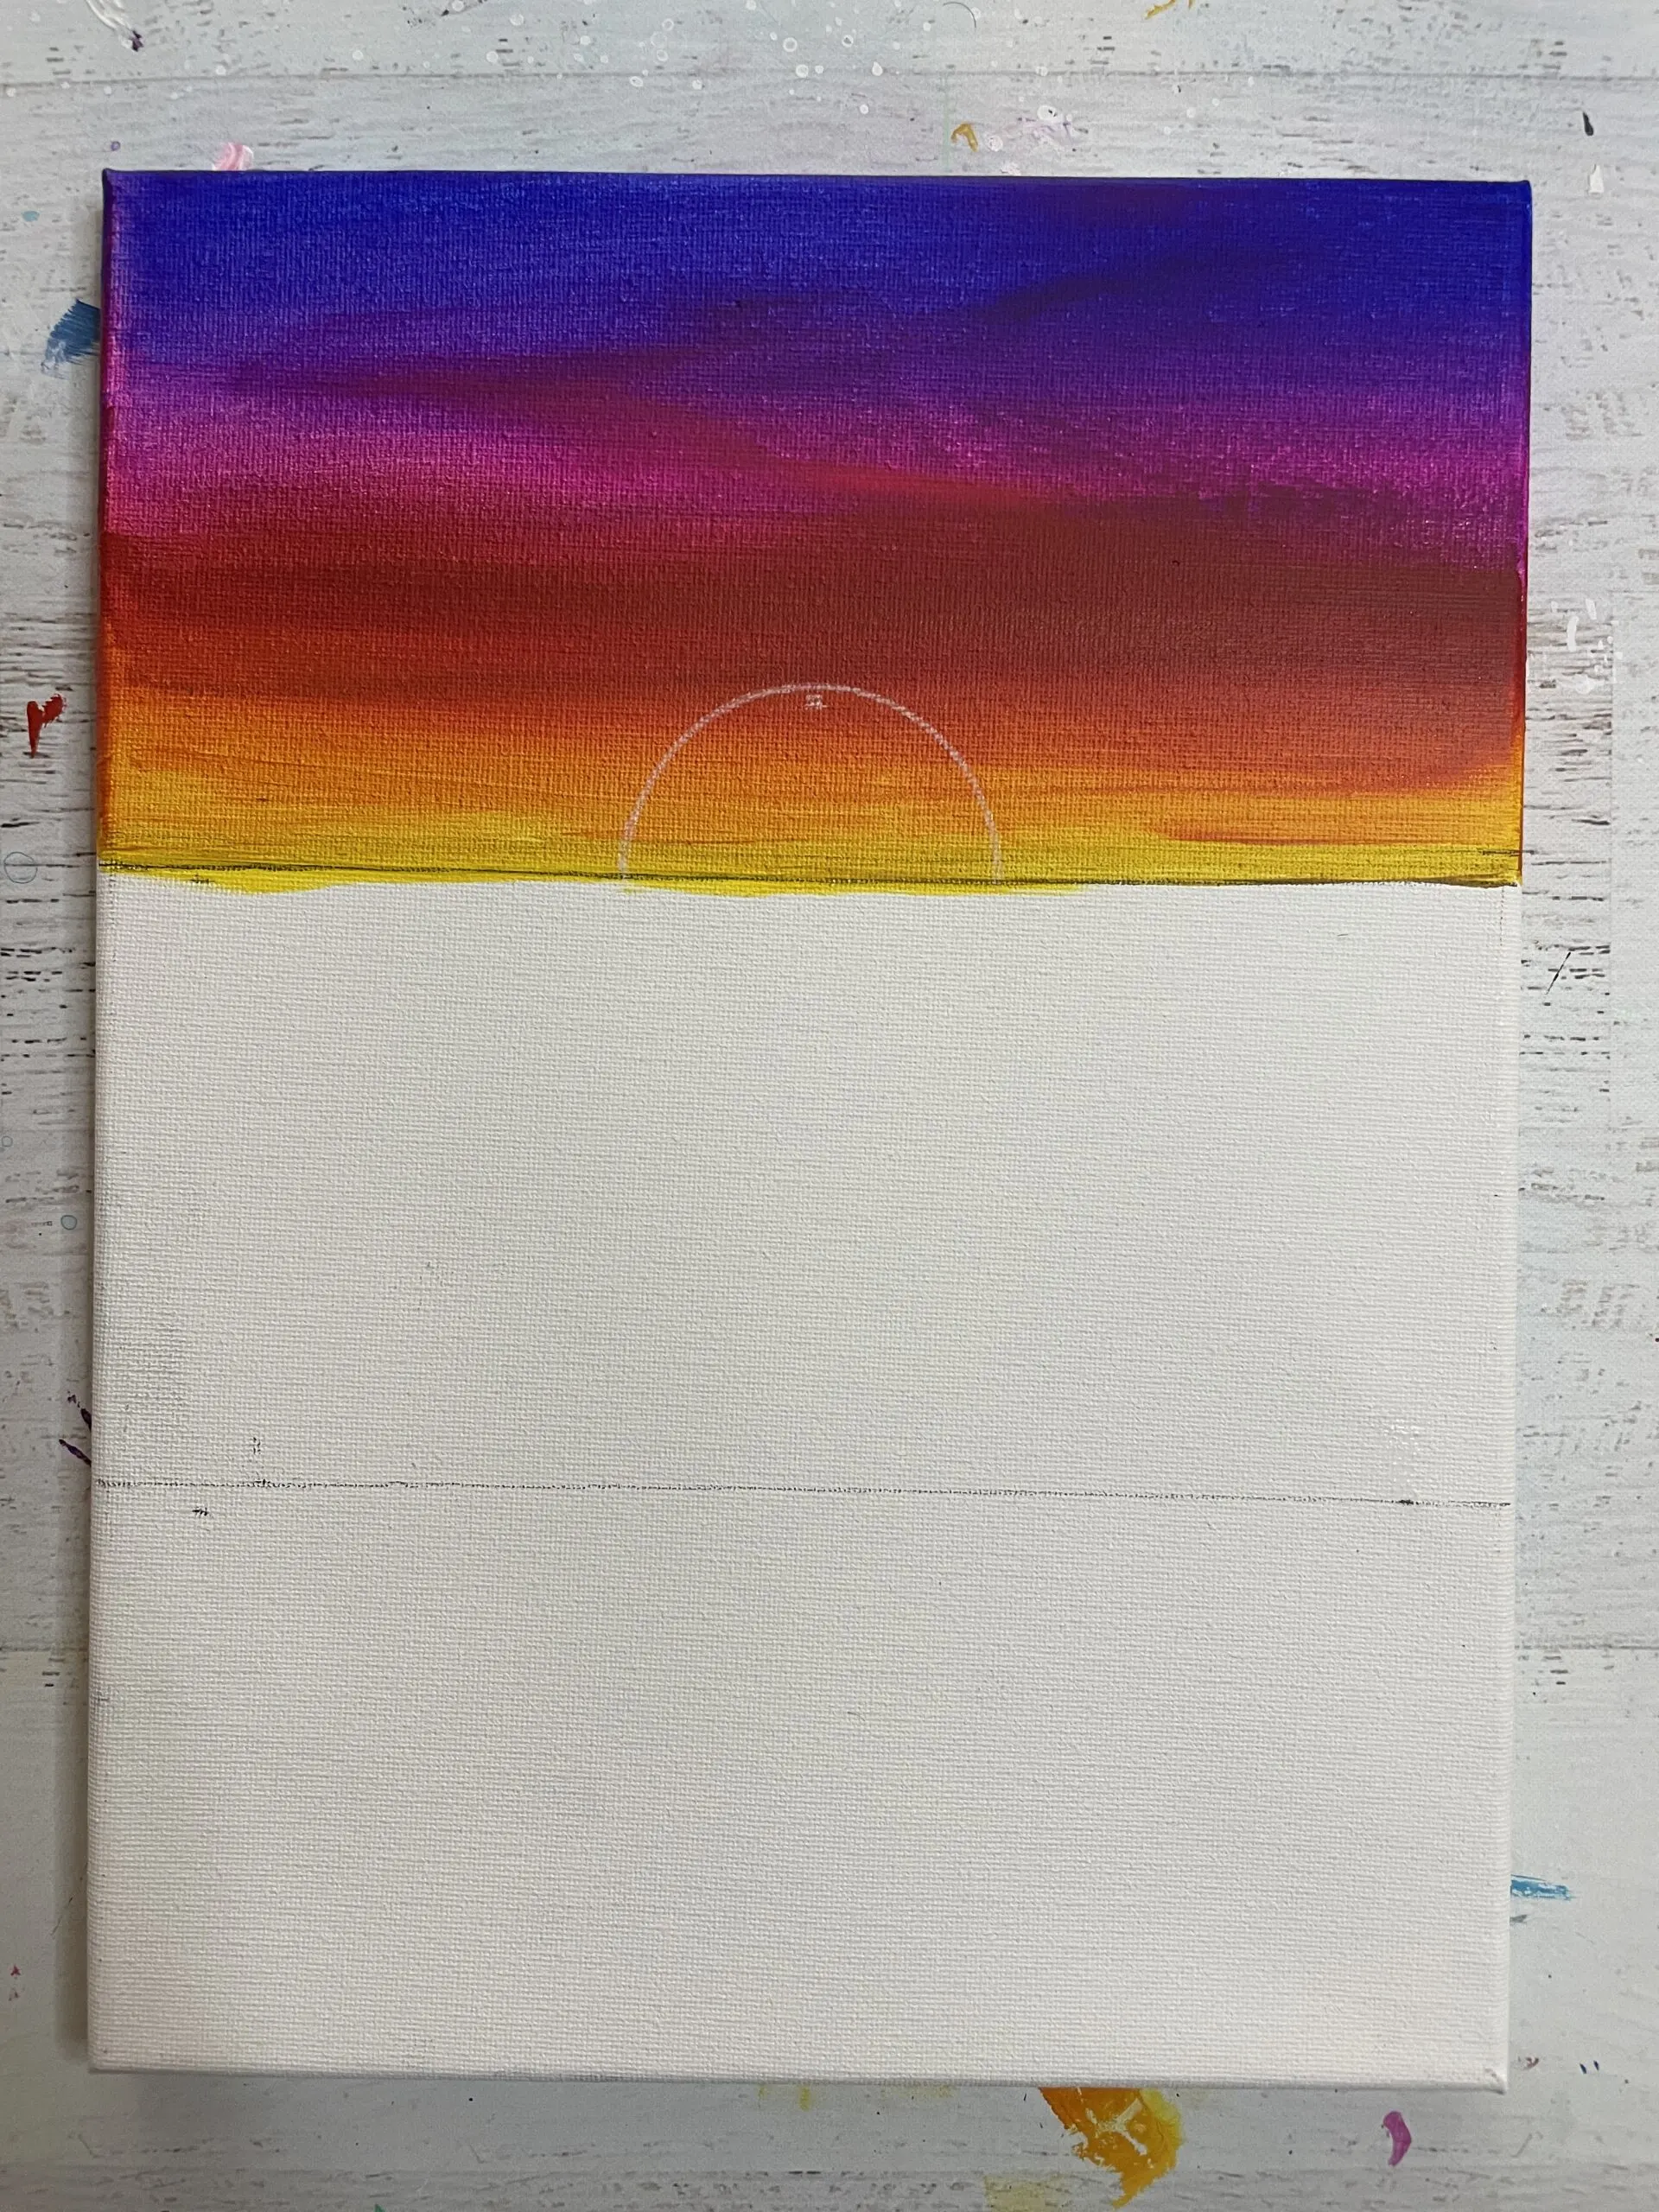
- Fill in the sun with your pale yellow mixture. Wait for the paint to dry.
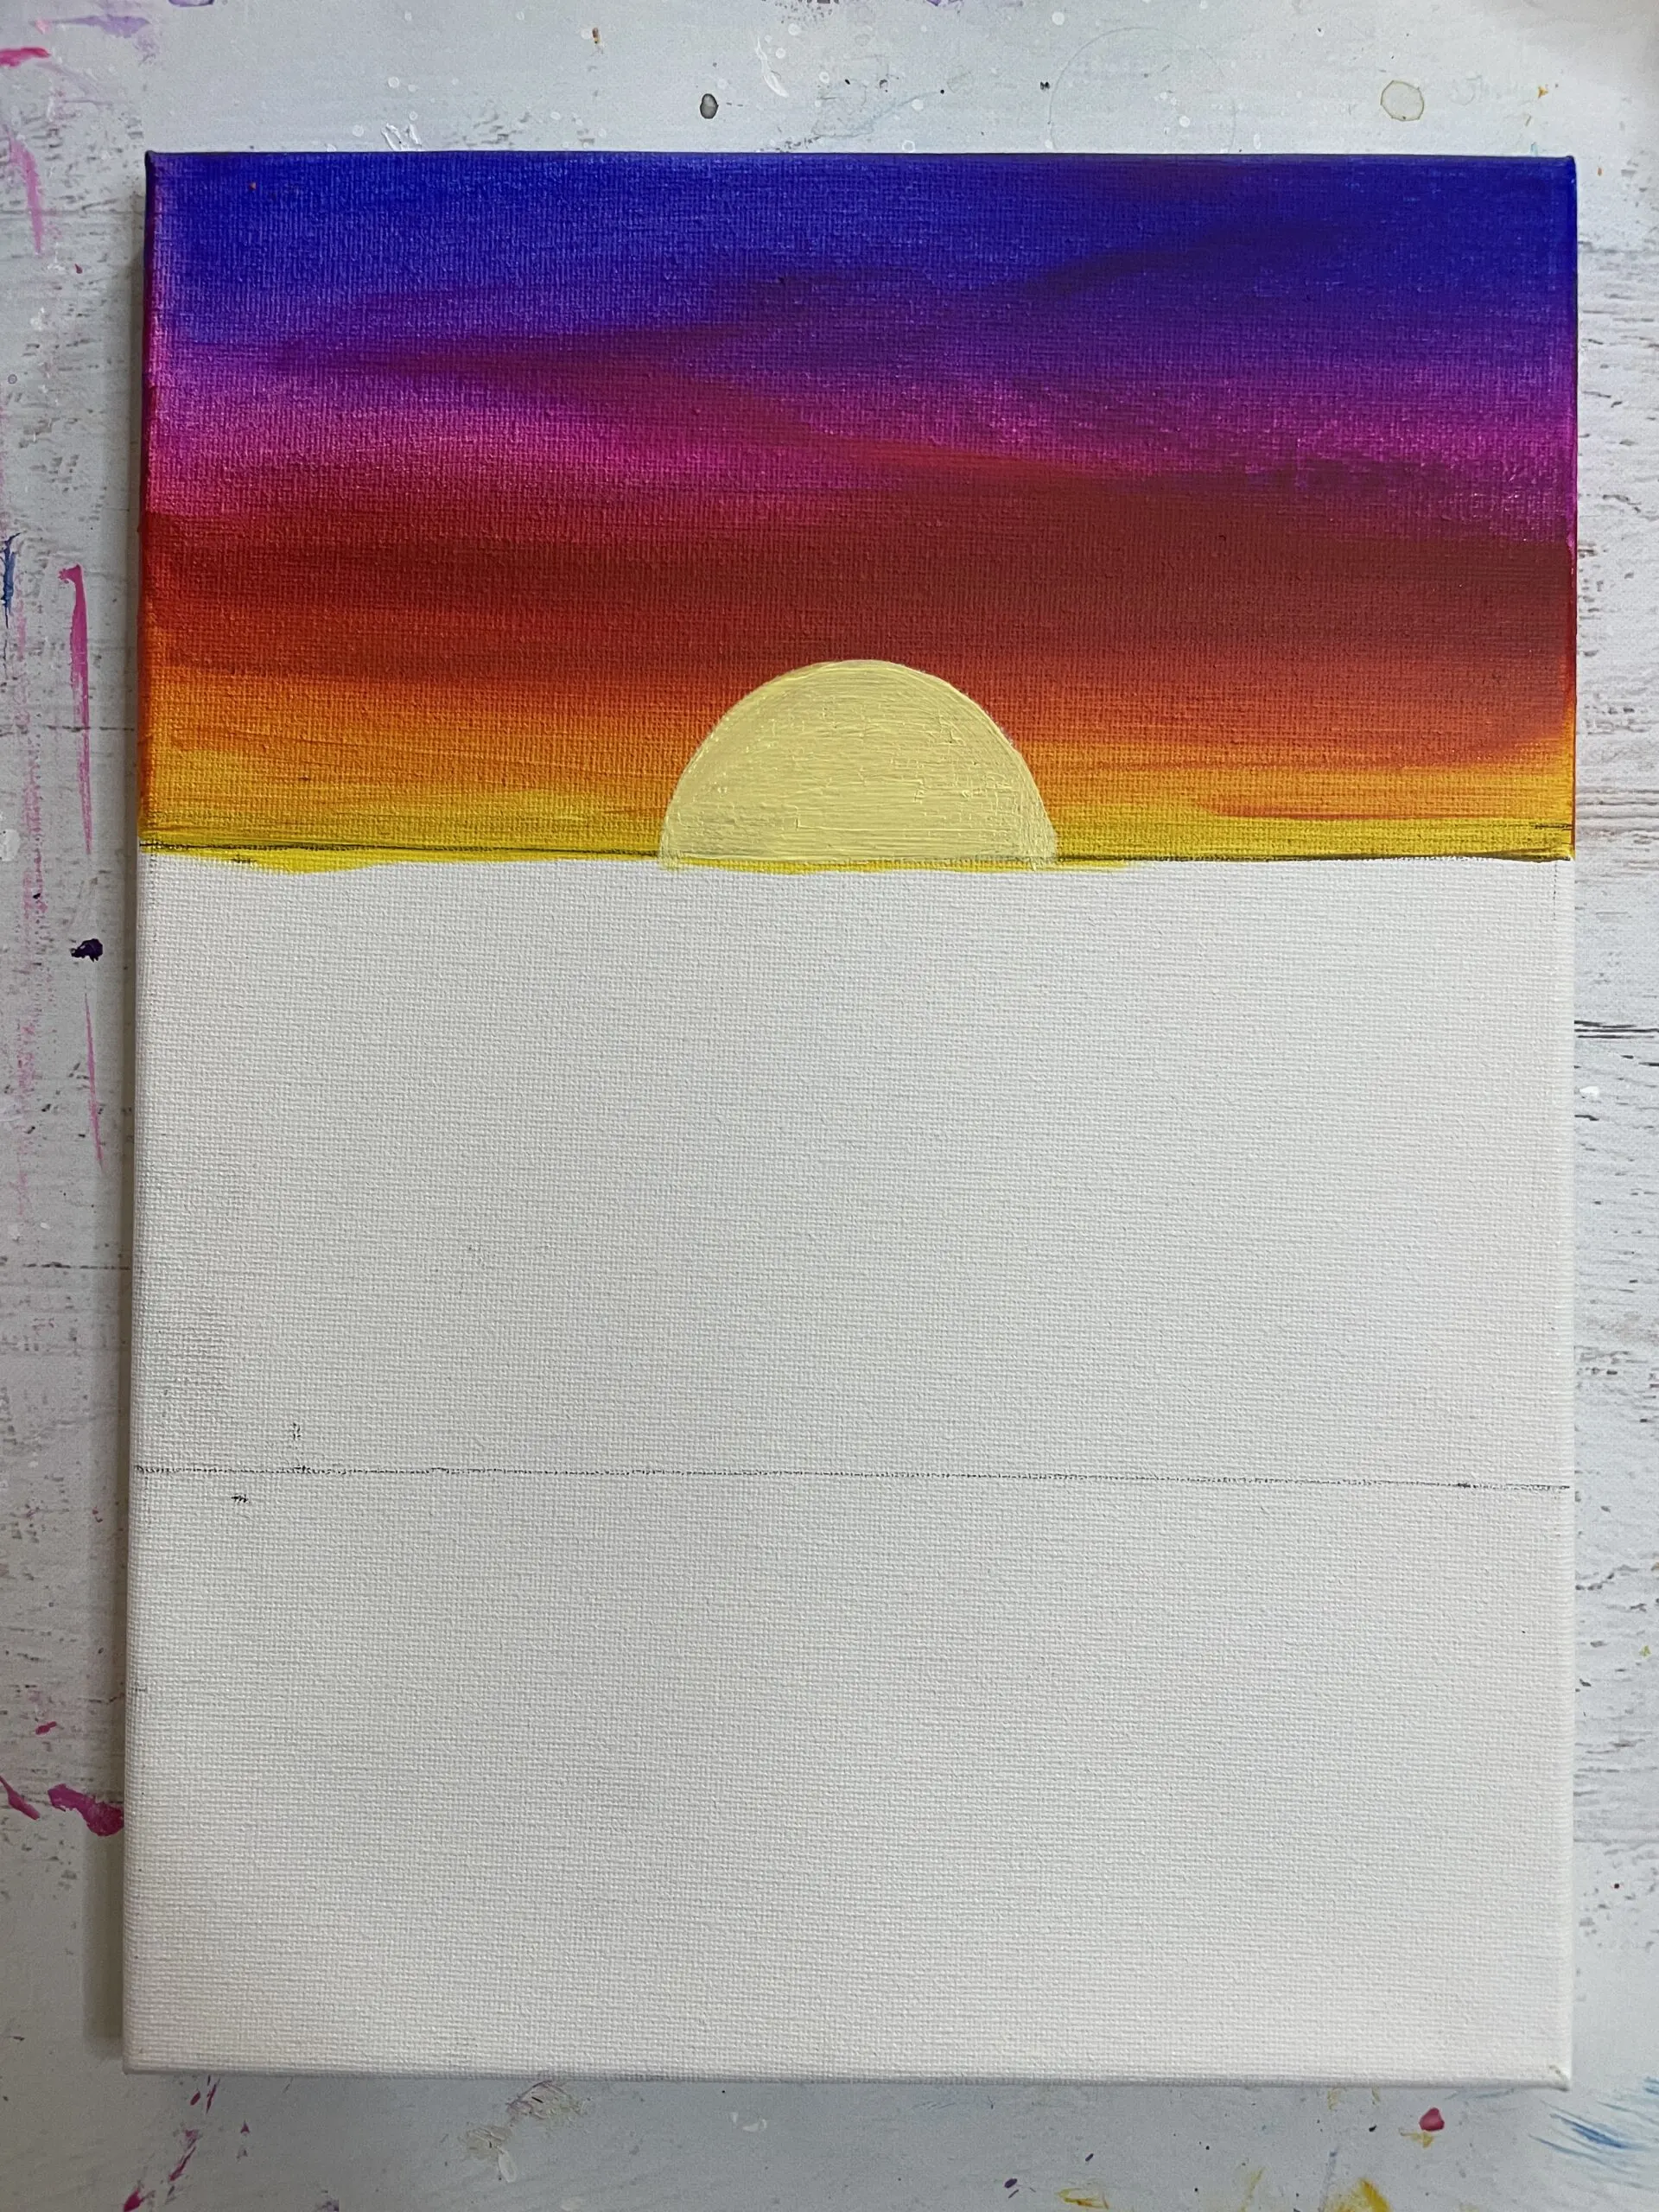
- Mix a desaturated teal color for your ocean by adding a little bit of yellow (blue's complementary color) to the teal. To desaturate any color (I.e. tone down the vibrancy of a color) just mix in it's complementary. The reason we want to do this with the ocean is colors appear more grey and lose their intensity in dim lighting such as a sunset.
- Using your 3/4" flat brush paint the entire middle section of your canvas with the desaturated teal color. Use horizontal back and forth strokes for even application. Lightly spray the blue with a water mister to keep it from drying while we mix our sand color in the next step.

- Mix your sand color with 2 parts yellow, 2 parts red and 1 part blue to first create a dark brown color. Then mix in white to create a nice pale sandy color. You can adjust the amount of white you add in to your liking depending on how dark or light you want your sand color to be.

- Using your 3/4 (size" flat brush pick up this sand color and apply it to the bottom third of the canvas using horizontal back and forth strokes. You also want to to blend the sand color in with the ocean color where they meet, using the same blending technique (section above).

- While you wait for your sand color to dry we can paint the subtle reflection of the sun in the water. Use the same pale yellow color you used to paint the sun in the step above. Using a 1/4" flat brush pick up some color and paint thin horisontal lines in the middle of the canvas. To mimic the shape of the sun, make sure the horizontal lines are longer at the horizon and get smaller as you go lower down (similar to a triangle).

- Now it's time to paint the splatter stars! Thin down some white paint by adding in some water. You want it to be a thin soupy consistency. Then load up any brush with this thin white paint and start tapping it on another brush at the very top of your canvas. You can use a paper to cover the bottom of the sunset if you don't want stars to splatter there.

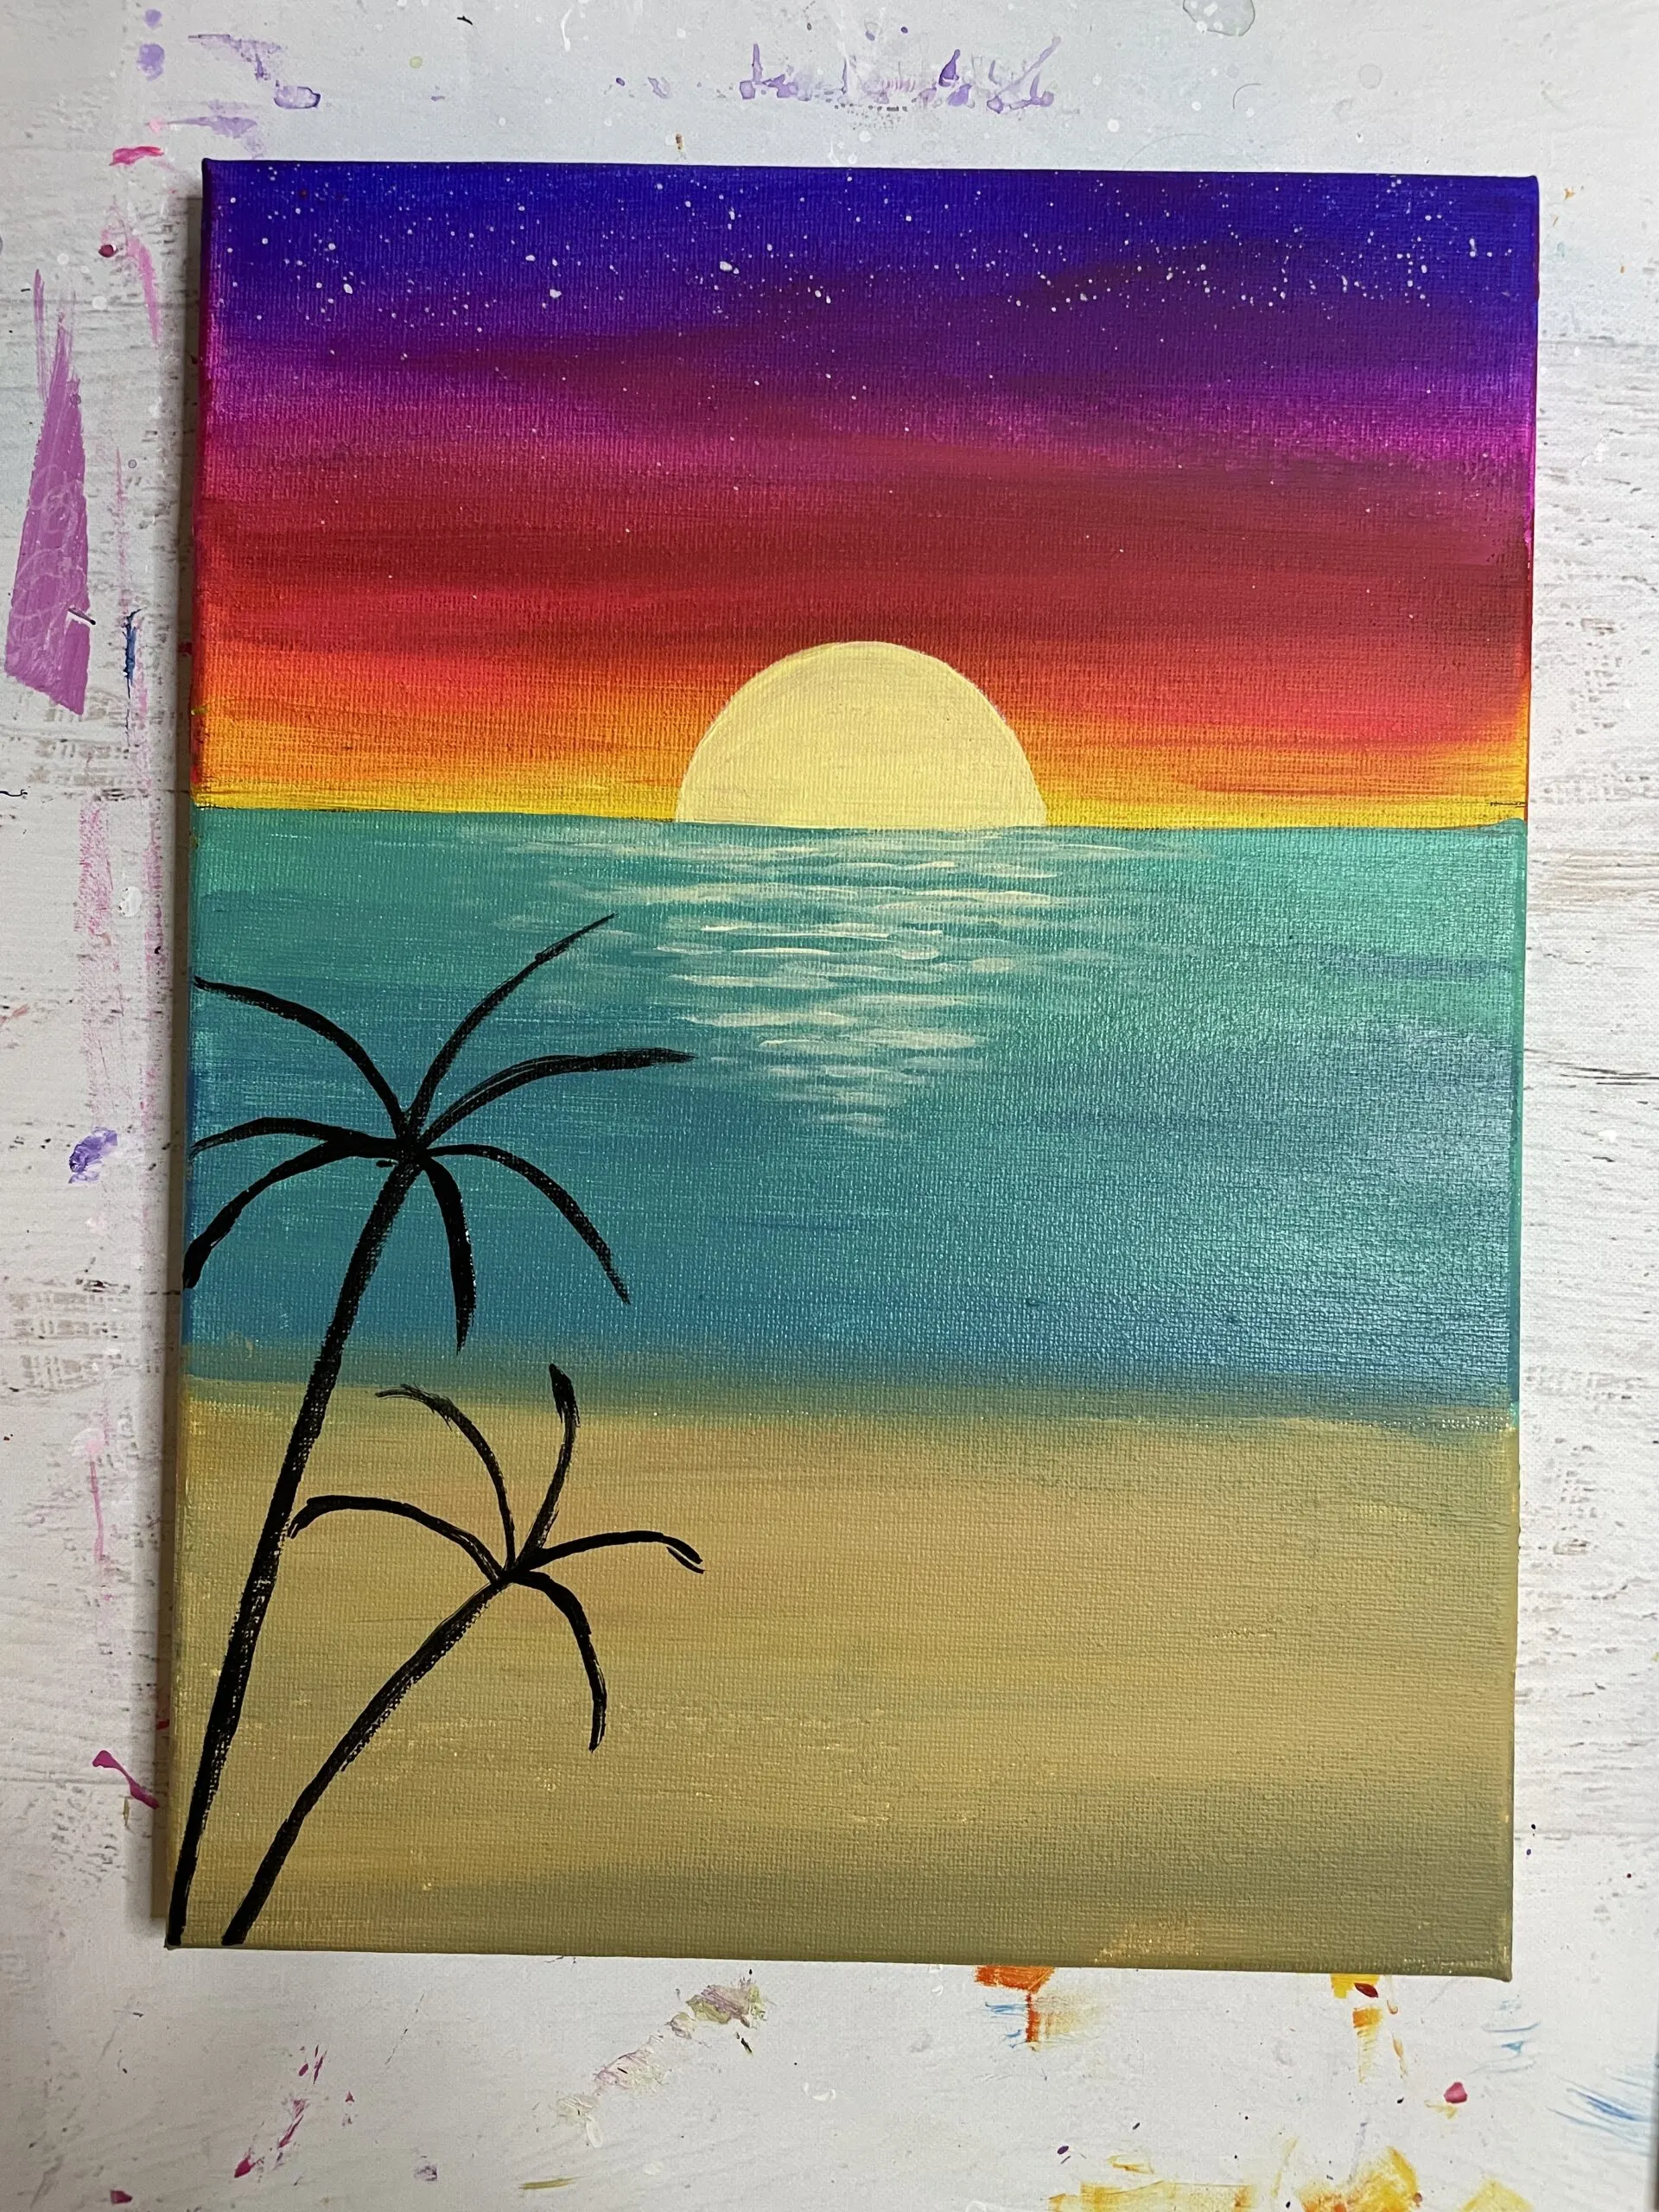
- When the sand color is fully dry it's time to paint some palm trees! Use a small round brush (size 5 or equivalent) paint 2 thin black lines starting from the bottom left corner of your canvas to towards the middle. These will be your palm tree stumps.

- Add 5-7 thin curved lines at the top of each palm tree stump. These will be your palm tree fronds.
- To fill in each palm tree frond, use small and quick strokes. Start painting these small strokes from the frond line outward (both top and bottom). The lines of the fronds will also have a slight curve to them. Do this for all the palm fronds.
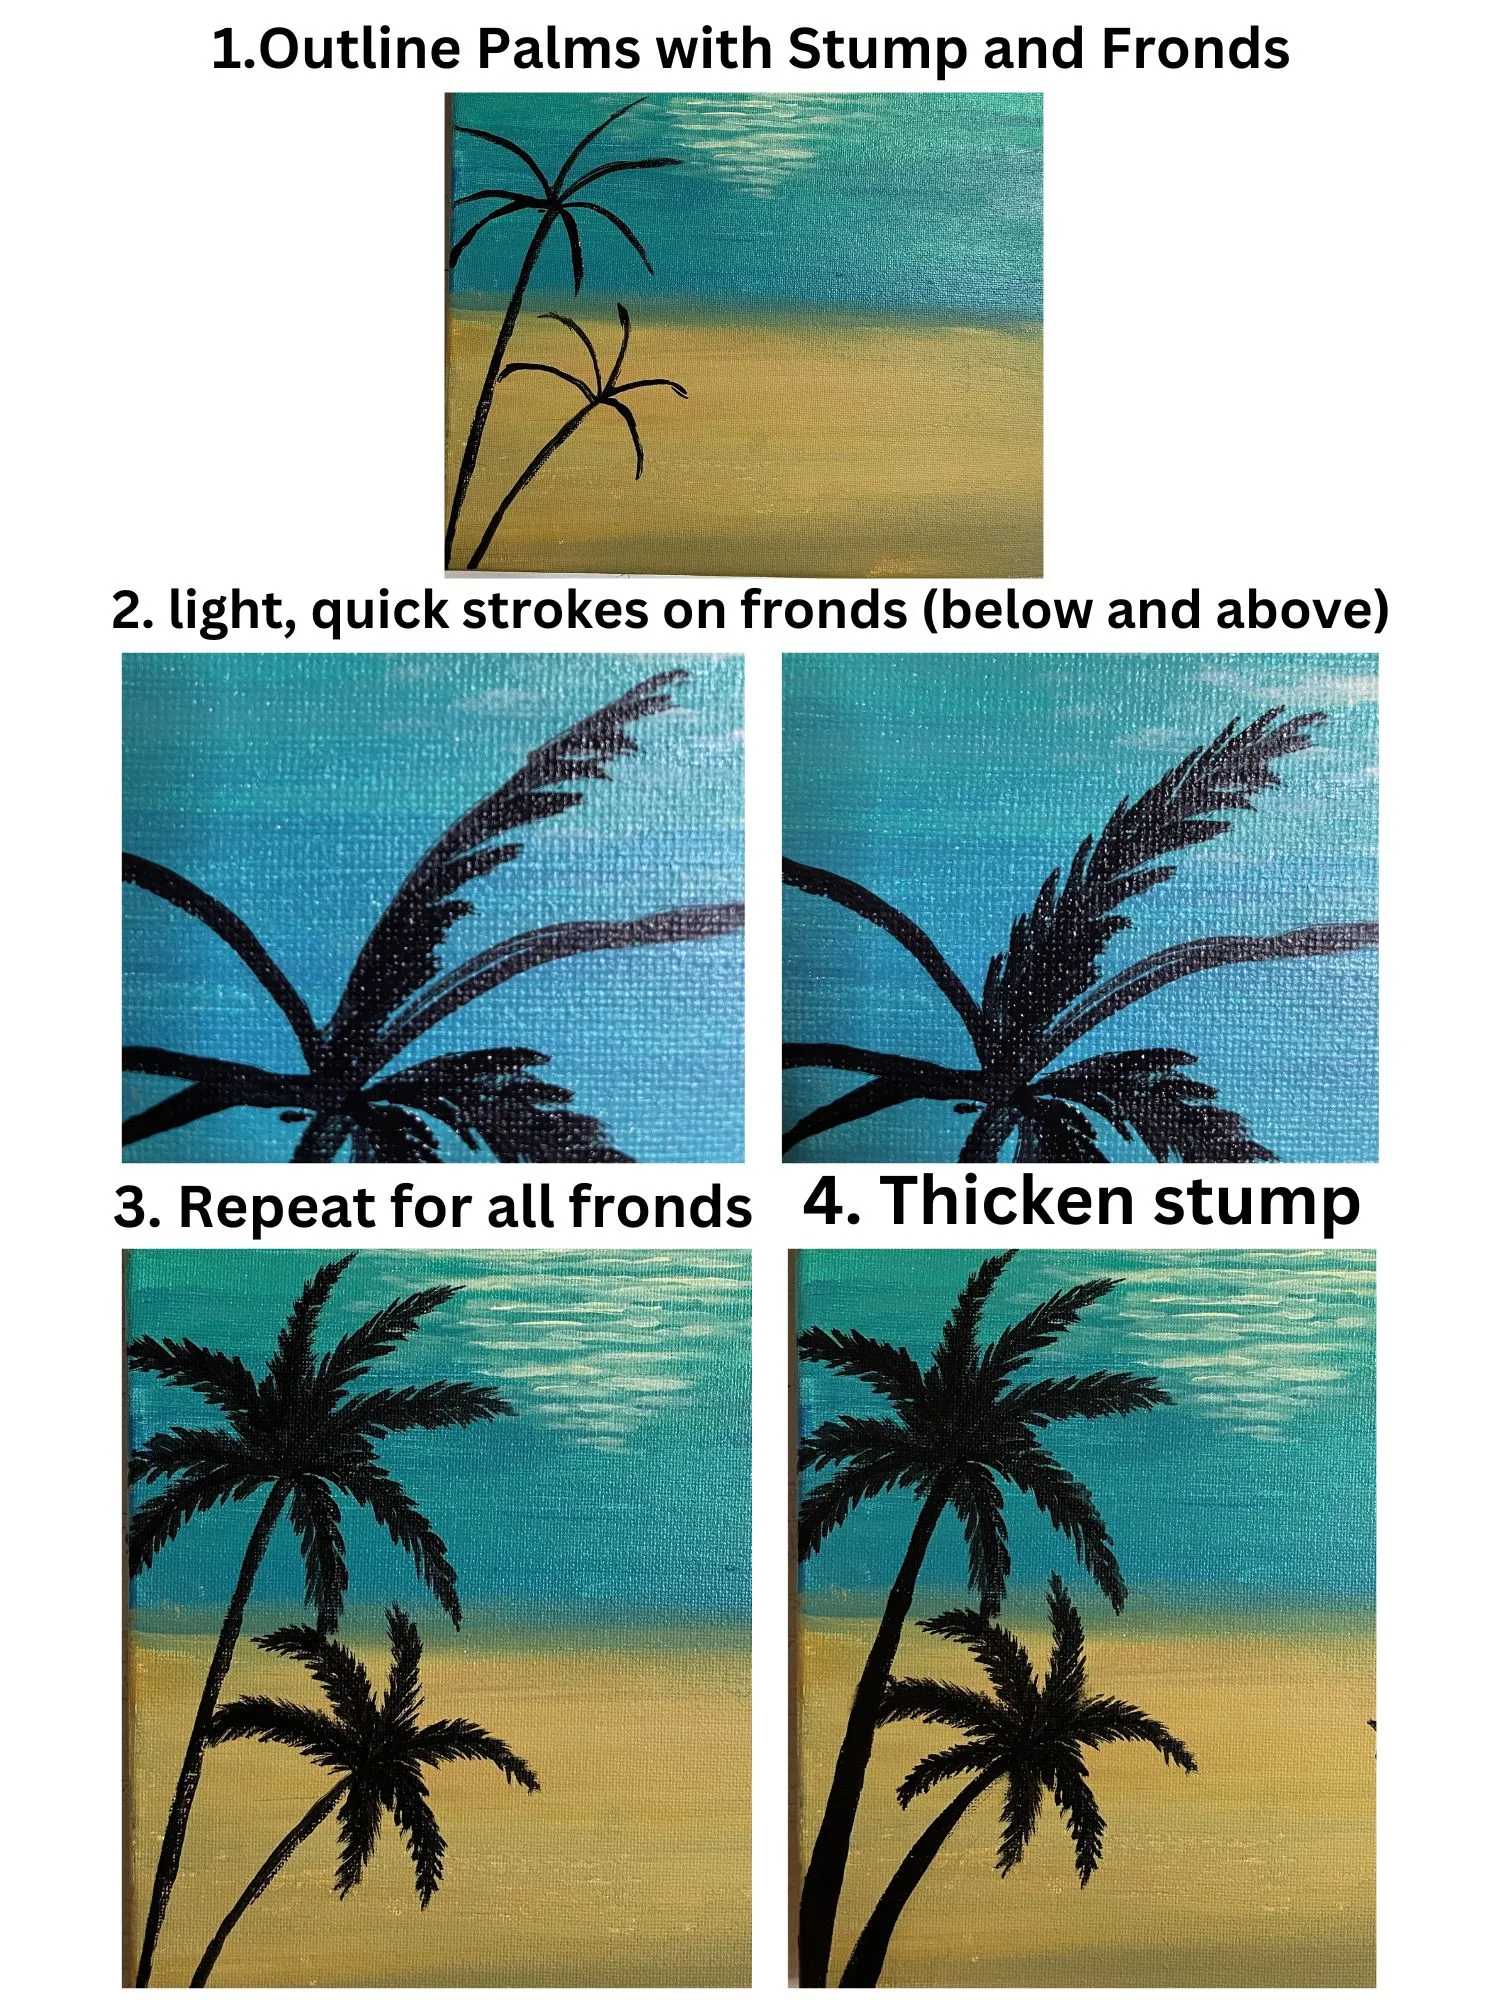
- Thicken the palm's stump a bit using the same black paint. Try to make the bottom of the tree stump thicker and it gradually gets thinner towards the top.

- Using the same black paint, draw/paint in a small beach umbrella on the right side of the palm trees. Leave enough room to paint a chair on either side of the umbrella.

- Paint a pair of chairs (one on each side of the umbrella) using the same black paint.

Recommended Products
As an Amazon Associate and member of other affiliate programs, I earn from qualifying purchases.
-
 Ranger MIS22701 Inkssentials Mini Misters, 3-Pack , White
 -
 Professional Artist Paint Brush Set of 12 - Painting Brushes Kit for Kids, Adults Fabulous for Canvas, Watercolor & Fabric - for Beginners and Professionals - Great for Water, Oil or Acrylic Painting
 -
 Royal & Langnickel Essentials 9x12" Triple Gessoed Stretched Canvas Value Pack, for Oil and Acrylic Painting, 7 Pack
 -
 Liquitex BASICS Acrylic Paint, 118ml (4-oz) Tube, Fluorescent Pink
 -
 Liquitex BASICS Acrylic Paint, 118ml (4-oz) Tube, Cadmium Red Medium Hue
 -
 Liquitex BASICS Acrylic Paint, 118ml (4-oz) Tube, Cadmium Yellow Medium Hue
 -
 Liquitex BASICS Acrylic Paint, 250ml (8.5-oz) Tube, Mars Black
 -
 Liquitex BASICS Acrylic Paint, 250ml Tube, Titanium White, 8.45 Fl Oz (Pack of 1)
Painting Inspiration
This painting was inspired by my super creative son’s original painting he did on a sick day off from school. He did such a beautiful job and I am so proud of him and his masterpiece. He even showed me a few tips and tricks with blending brush work and creating that gorgeous indigo/violet hue in the sky. Well done D! Here’s some pictures of his artwork.


Here are a few shots of the finished painting for this painting tutorial.


In conclusion, this beginner-friendly beach sunset painting tutorial provides an exciting opportunity to create a captivating masterpiece. By blending vibrant colors and capturing the essence of a tropical sunset, you’ll unleash your creativity and bring a slice of paradise to life on your canvas. Embrace the joy of painting and enjoy the process of creating a stunning beach sunset artwork that will leave a lasting impression.
If you liked this beach sunset painting tutorial please pin it!
