Looking for some acrylic painting techniques that will elevate your art? The post below will go over various techniques from basic techniques for beginners, to some fun unusual acrylic painting techniques, and everything in between.
If you’re just getting started with acrylics you might want to check out this acrylic for beginners post, or this acrylic painting tips guide, and acrylic painting ideas to get your started.
Let’s first look at answering some questions.
What is the most common acrylic painting technique?
The most common acrylic painting techniques is layering. The beauty with acrylic paint is that it dries fairly fast (unlike oil paints). This means that you can paint a layer of acrylic on your canvas, wait for it to dry, then paint another layer over top. This method can give depth and richness to your painting. If you’re painting with thick paint/ heavy body paint then it’ll take a long time to dry. If you’re in a rush then you can use a hair dryer or heat gun to speed up drying time of your layers.
Do you wet the brush before using acrylic paint?
For many of the acrylic painting techniques below you’ll Most of the time you need to wet your brush in water before picking up acrylic paints. The exception to the rule is when using a dry brush method (below). The best way to wet your brush is not to have a lot of water on it, otherwise it can make the paint drip on canvas.
The method I use is to dip the brush in water, is in a simple 4 step process.
1. Dip your brush in the water so all bristles are submerged.
2.Take out brush and scrape all sides of the brush against the edge of the jar to remove excess water.
3. Don’t use a paper towel or a rag to dry off because it will take out
too much moisture.
4.Your brush is now ready to load paint onto it!
Acrylic Painting Techniques On Canvas
Whether it’s your first time using acrylics or you’ve been painting a while, the 47 simple acrylic painting techniques below can take your paintings to incredible new heights. This list can also serve as an inspiration, to give you new painting ideas and techniques to try.
1. Layering
Layering is the most common and basic acrylic painting techniques. The benefit of acrylics fast drying time allows you to paint in layers efficiently, unlike an oil painting where it can take weeks/months for the layers to dry.
Painting in layers can elevate your painting and add depth/dimension to it. You can use multiple different techniques as well. From adding a transparent layer with thinned down paint (see below), to adding bold strokes of texture with thicker paint. You can also use other mediums over top the acrylic in layers like paint markers, chalk, pastel, crayon, gel pens, etc.
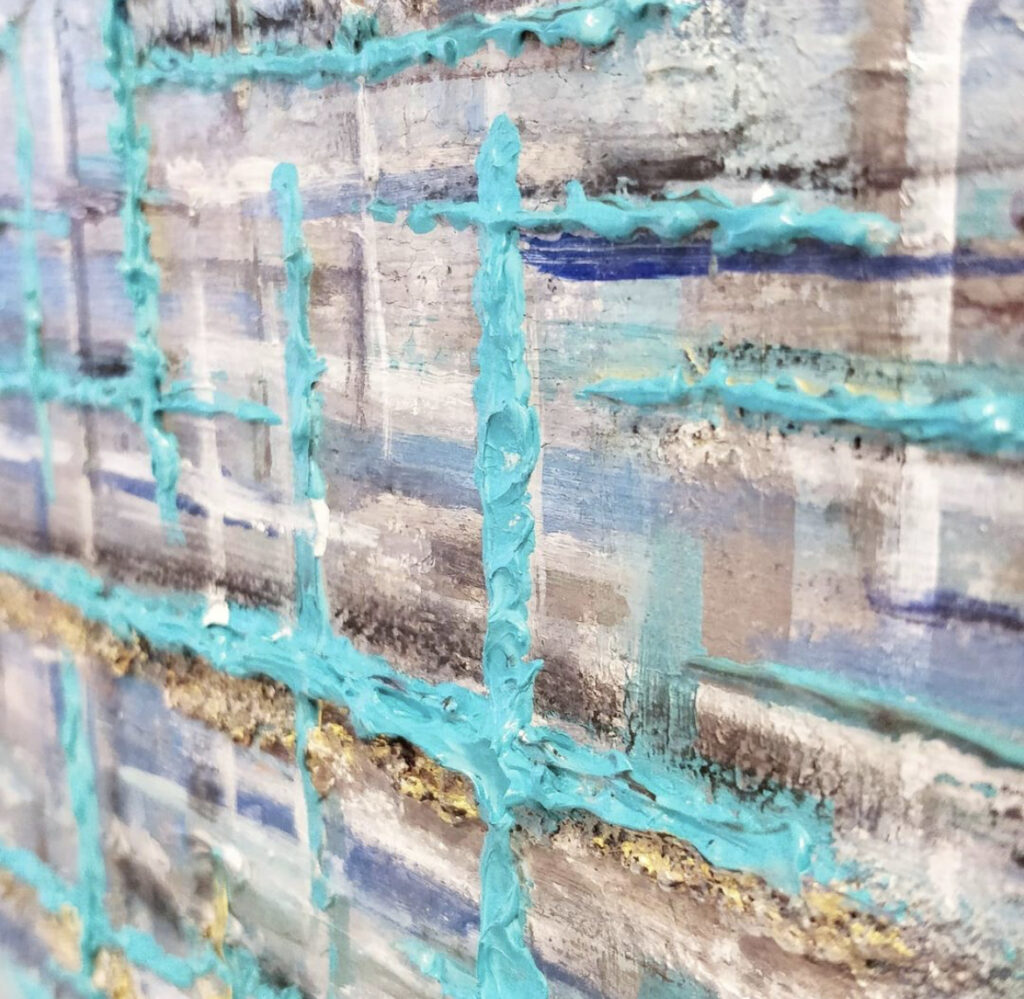
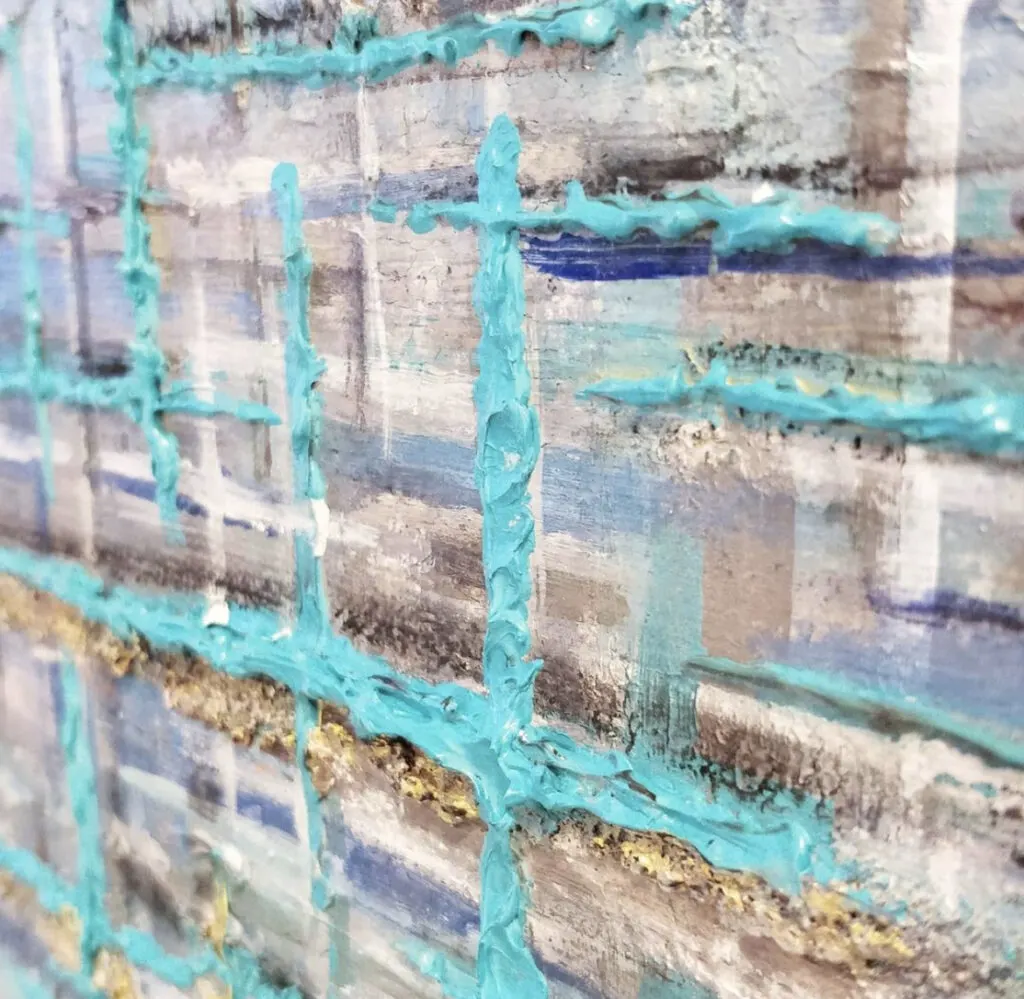
2. Impasto
Impasto is another popular acrylic painting techniques where you purposefully add thick layers of paint in order to build elevated texture into your painting. You can achieve thicker paint consistency by adding in a medium like modelling gel or extra heavy gel medium into your paints. When painting with a thicker paint consistency your brush strokes will be more visible and bolder. Many acrylic painters also painting with a palette knife (below) when painting impasto.
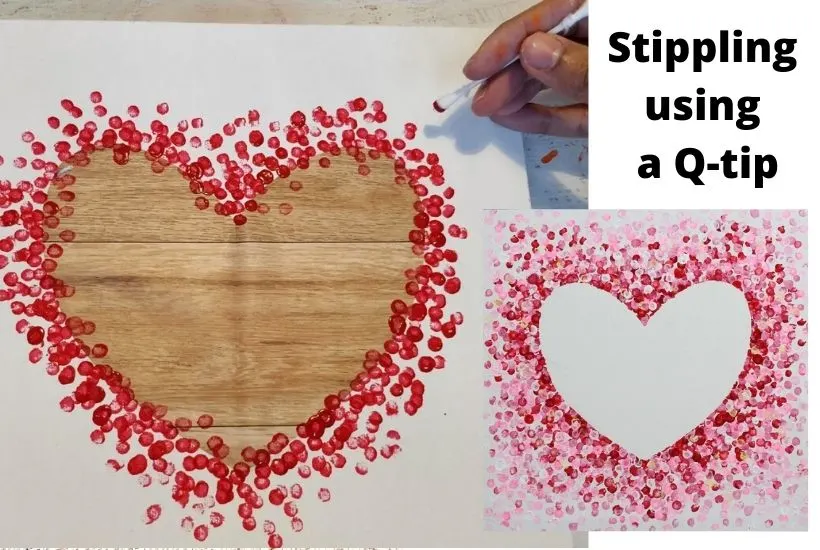
2. Stippling
Stippling is a fun dotting technique where you add your paint in dots onto your canvas or surface. To create these dots of color you can use multiple types of tools from q-tips (my personal fave), the backside of your paint brush handle, paint markers, to specialized dotting tools you can buy and beyond.

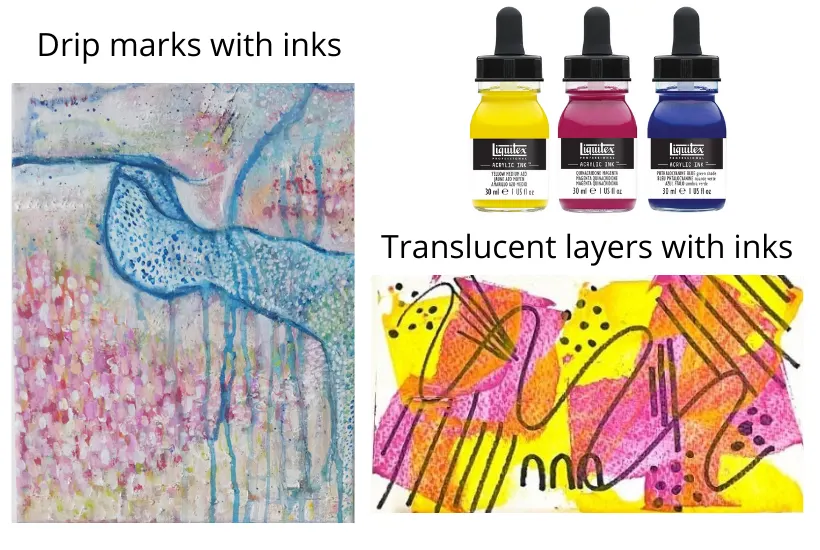
3. Drip marks
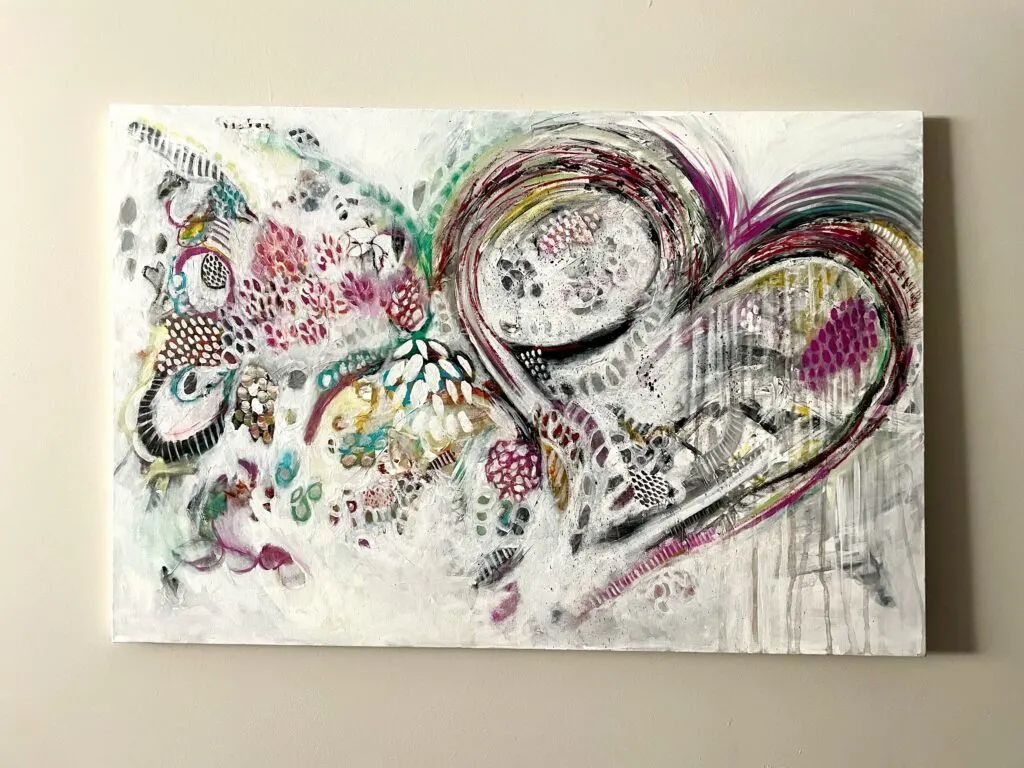
Drip marks is another fun technique you can add into a variety of painting styles. My favorite is to add drip marks into my abstract pieces. To add drip marks you’ll either need a fluid acrylic or you can use acrylics that are thinned down for best results. If you’re using acrylics that are thinned down, you can use a spray bottle with water to spray the paint on canvas to help it run and create drip marks. In the painting below, the drip marks on the right side of the painting were created by using a thinned down grey paint and I sprayed it with a water bottle to make the paint run.
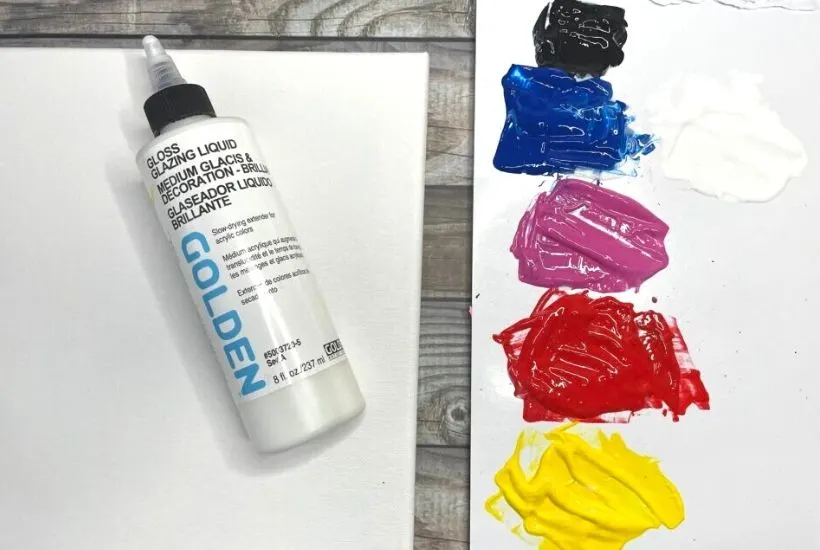
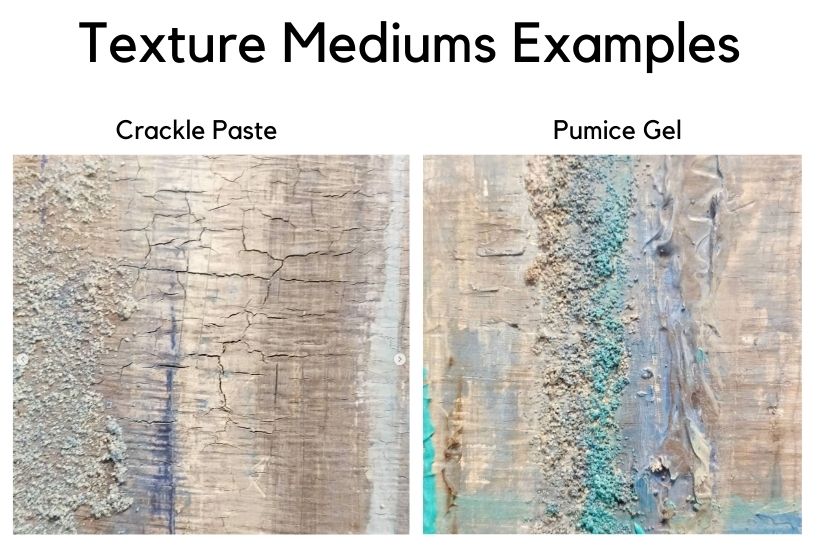
4. Acrylic Mediums
Acrylic Mediums are a great way to change the properties of your acrylic paints in order to achieve some incredible effects. From thickening up your paints (impasto) to texture agents ( pumice, glass beads, crackle paste), to thinning down your paint (glazes, translucent effects and pouring mediums). You can also slow down drying time with glazing liquids and paint retarders so that you have more time to work your paints on canvas for blending work, etc.

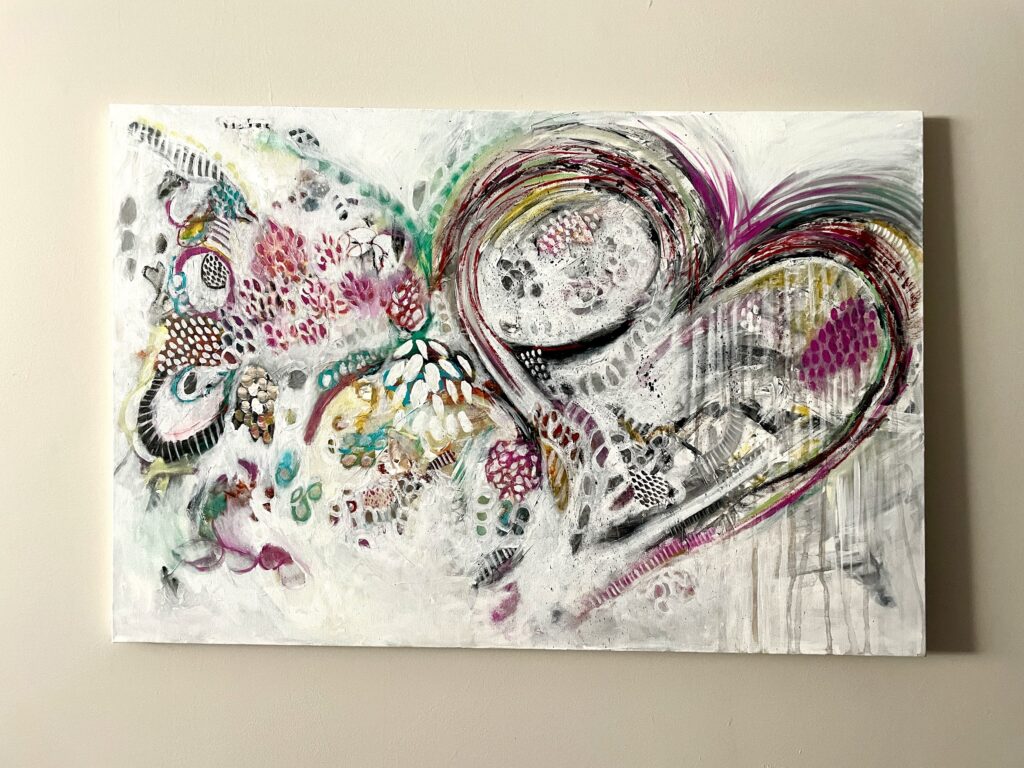
5. Abstract Painting
Abstract painting is another enjoyable form of painting, that allows you to paint from your heart without focusing on perfection. It’s a liberating form of expression and a painting process that can set you free as an artist. It’s an enriching style of art that can elevate your artistic journey.
There are a variety of styles of abstract art. My personal fave is intuitional abstract art, which is a lot of fun. In this form of abstract you work in layers and the painting literally comes to life as you paint using a variety of creative techniques (stamping, collaging, mark making, etc.). You start with nothing more than your paints and you canvas and work through each layer allowing your painting to evolve as you progress. It’s a beautiful painting technique that allows your intuition to take the lead.

6. Dry Brushing /Scumbling
With this technique you don’t need a wet brush in water before you pick up paint with it. This allows the brush to make a textured like effect on your canvas. Use this technique in abstract art, to create the foliage on trees, fluffy clouds are just a f. The brush you use with this technique also matters depending on the desired affect. Use a more chiseled brush for bolder folliage and a softer round brush for clouds or anything that needs softer blends, etc.
7. Palette Knife
As mentioned above palette knives are a great tool to use with thicker paint consistency. With thicker paint consistency you can spread the paint across the canvas easier using a palette knife rather than a brush. Think of it like icing a cupcake!
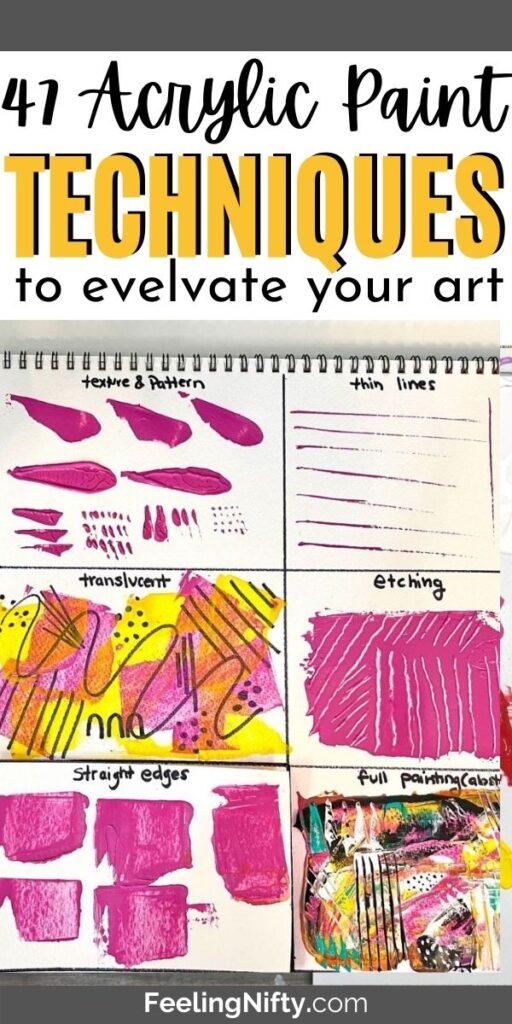
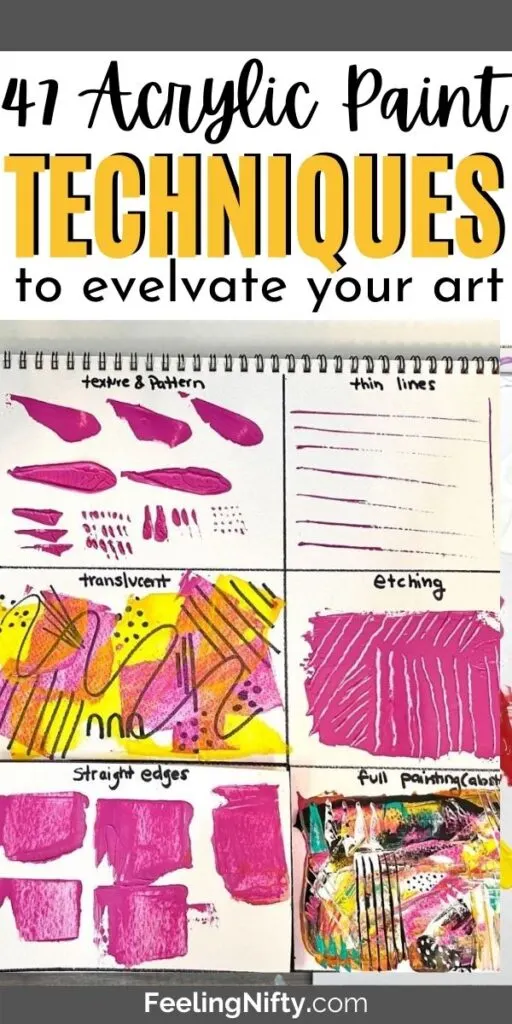
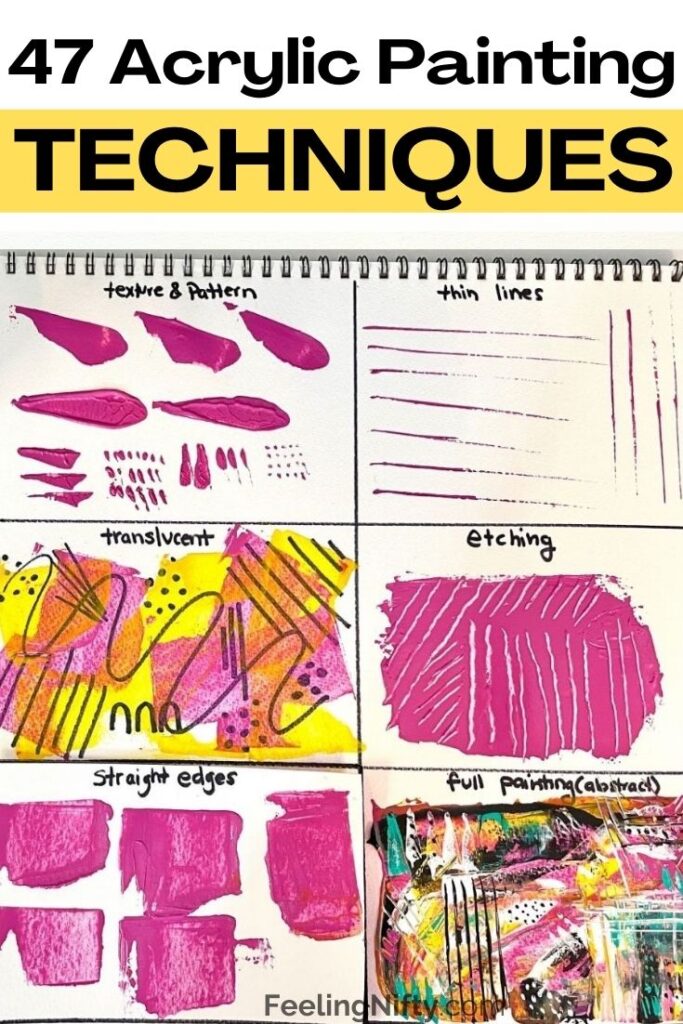
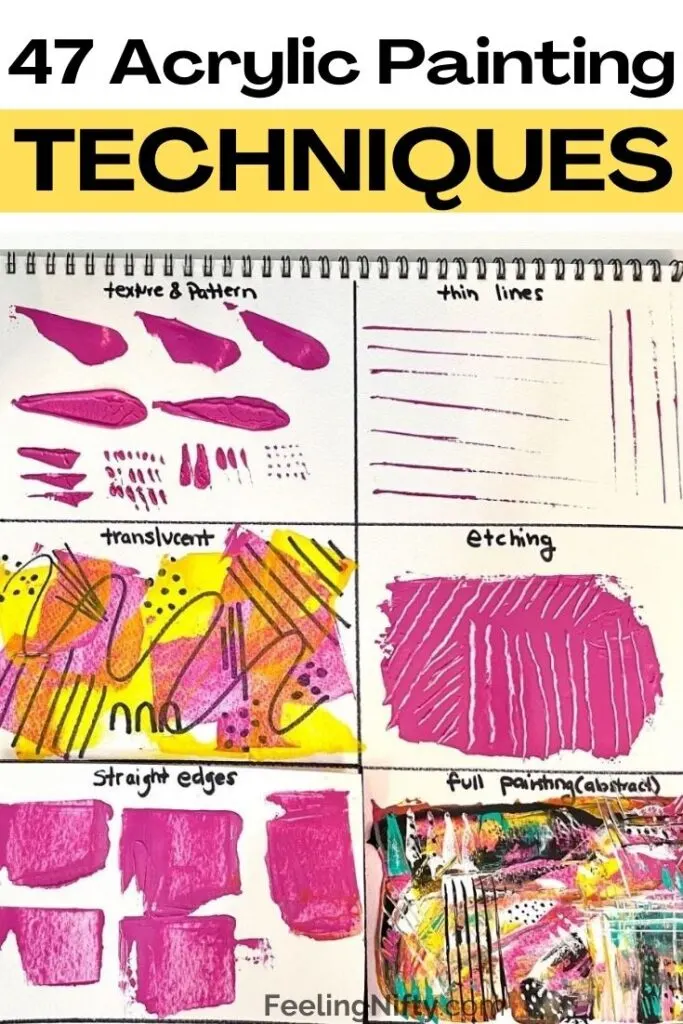
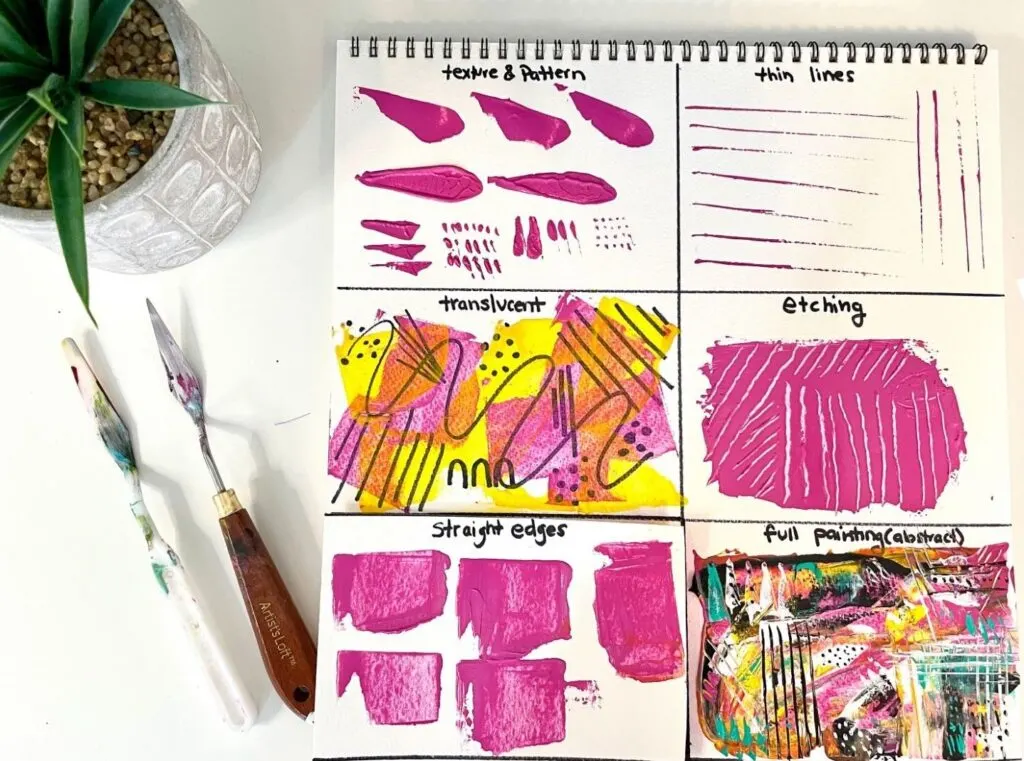
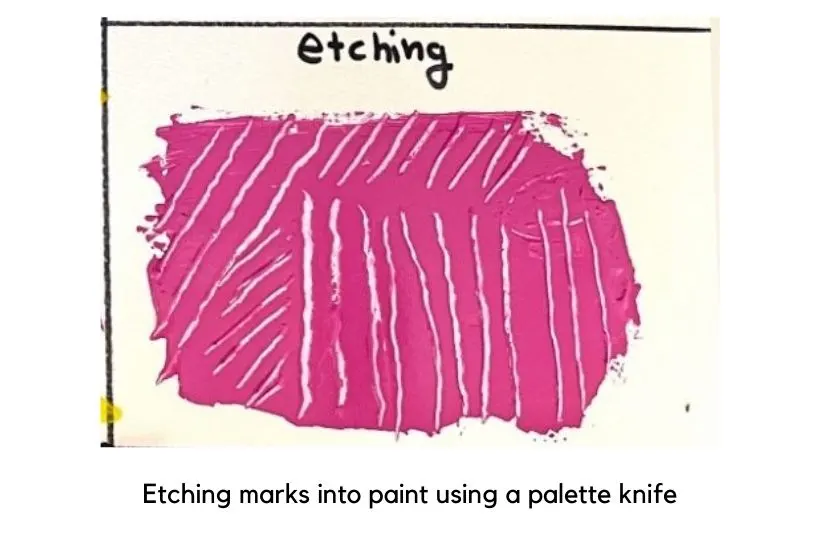
In addition to thicker paint consistency, you can also use palette knives to create a variety of other effects. In the picture below, a palette knife was used to create textures, patterns, etching effects, fine lines and even some straight edges. Some acrylic artists even use a palette knife for their entire painting!
Palette knives are also used to mix paints on your palette.

8. Interesting Textures
The beauty of acrylics is that you can layer with them which can help create interesting textures and different effects in your painting. There’s also a variety of texture mediums that you can buy which can be added to your paints to add different textures too. Adding textures into your art can transform your painting and create interest. Some popular mediums are pumice medium that gives a sand like texture. Another one is crackle paste which cracks the paint on canvas as it dries to mimic a desert floor look. You can check out this paint mediums post for more texture ideas (including DIY textures) .

9. Acrylic Inks
Acrylic inks is a fluid version of acrylic paints, while being highly saturated in color. If using acrylic inks to tint an area on canvas, and a little goes a long way since they’re highly saturated in color.. You can use acrylic inks for adding transparent layers of color to your painting, drip marks. In the painting below acrylic ink was used to create the blue drip marks.

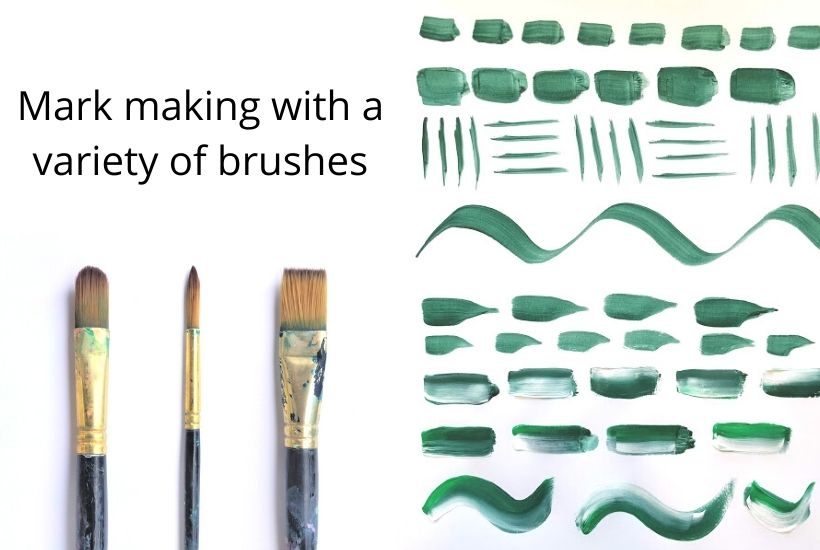
10. Brush techniques for acrylic painting
You can use your brushes in a variety of ways to achieve some beautiful marks and brush work. Brushes come in different shapes, can be used for creating different marks / effects and used in different ways. From mark making in abstract art to paint blending work, double loading (below) and beyond. Some examples of the most common brushes are flat, round, fan and the filbert brush. If you want to learn more about using your different brushes you can check out this acrylic paint brush 101 course.

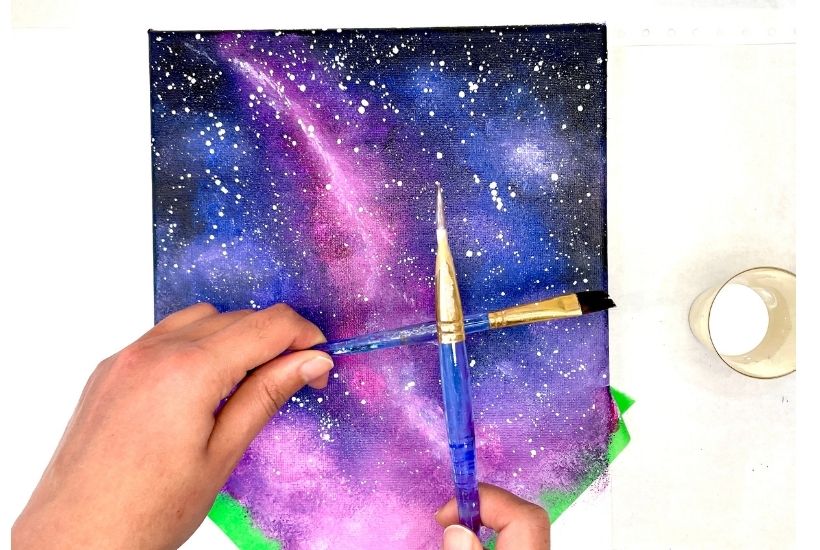
11. Splatters
Create some fun splatter marks, a la jackson pollock, with your acrylic paints with a brush or old toothbrush. I love using this technique for creating stars in a night sky scene. To achieve the splatters you’ll need to thin down the paint until it’s a liquid consistency. If using a toothbrush, first dip the brush in the liquid paint, hold the toothbrush close to the canvas then use your thumb/ fingernail to pull back the bristles and release. Splatter the paint across the canvas. You can also use a brush loaded with the thinned down paint and gently tap it on another brush to create the splatters.

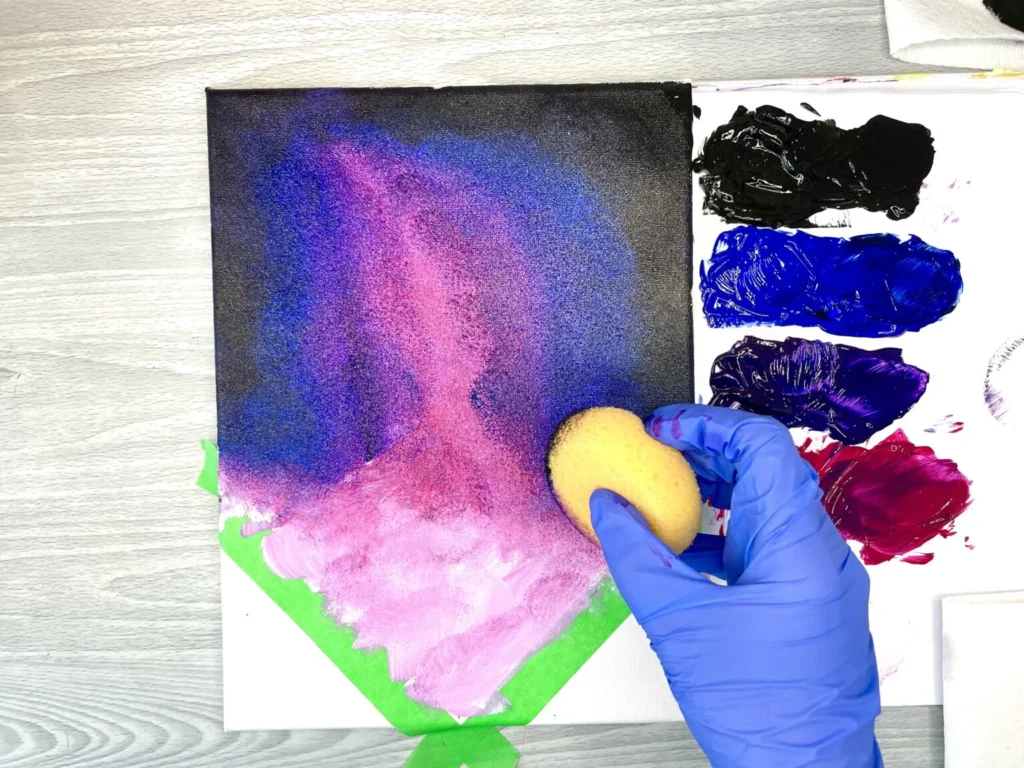
12. Sponge Blending
Blending work with a sponge is ideal for beginners. I find using a sponge is much easier to make seamless blends, compared to a brush. You can use any type of sponge or you can buy speciality artist sponges in the painting section. Either will work. To use your sponge to blend paint you can add your paint directly to the canvas and then you can use the sponge to dab the paint between each color to create your blends. If you’re blending multiple acrylic colors it’s best to start blending from lightest to darkest color so that the darker colors don’t affect the lighter ones. You can also clean off your sponge between colors to ensure purity of blends.
13. Thin Paint
Working with a thin paint application can be ideal when wanting to achieve smoother brush strokes and have your paint glide easier across your canvas. This is especially true if you’re working with heavy bodied acrylics. You can thin down your paint with water (no more than 30 % water, since it can affect the binder in the paints), pouring medium, or my personal fave – glazing liquid. Find out more on how to thin down your acrylic paints in this post.
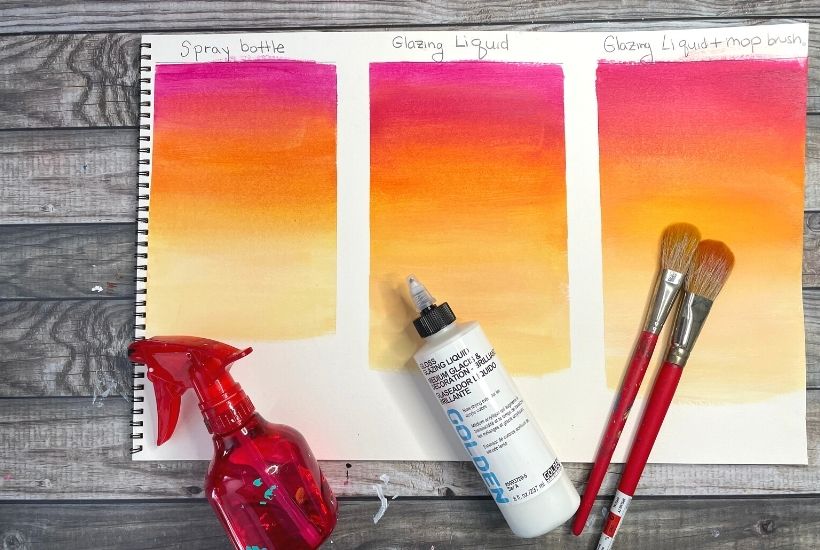
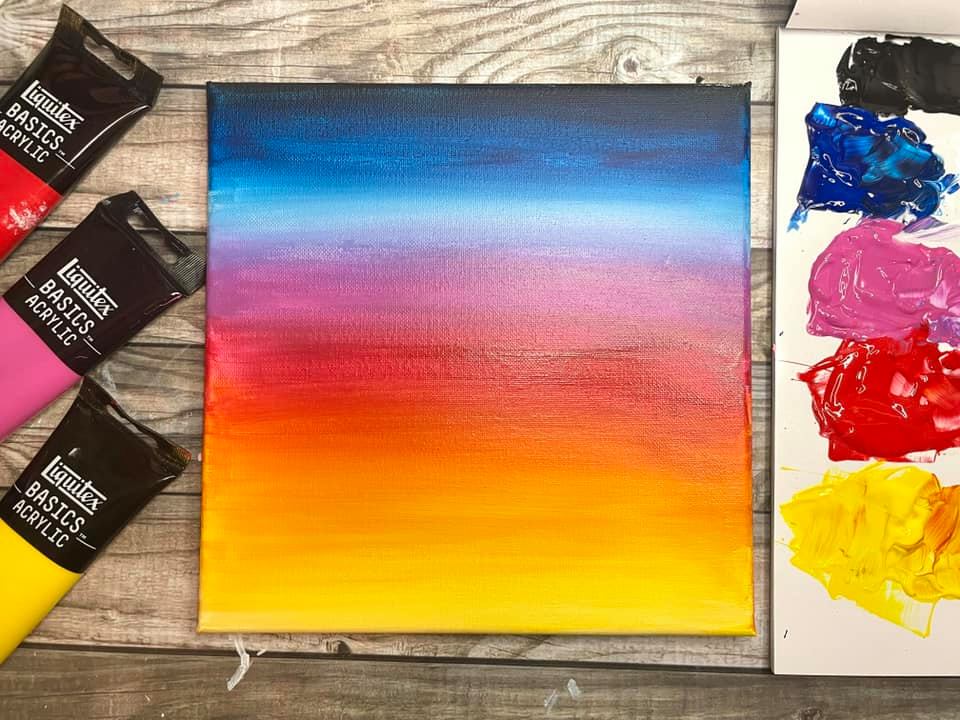
14. Color Gradients
Color gradients is another technique that can be a challenge to achieve at first, but with some practice and the right tools and techniques you can learn how to paint some beautiful, vivid gradients. These gradients can be useful in sunset skies, or anywhere you need two or more colors to fade into each other. Essentially you want to paint both colors side by side, then work the paint between the border of the two paint colors with a brush. You can watch this video for more tips on how to creating beautiful blends and gradients.

15. Fluid Acrylics
Working with fluid acrylics is another technique that you can use to create pour paintings. To create the right consistency you would mix your acrylic paint with a pouring medium in the correct ratio (instructions are on the bottle). Once you have the thinned down paint you can create some easy pour paintings or even use the thinned down paint for other projects like these DIY Paint Swirl Ornaments.
16. Glazing
Glazing is an acrylic painting technique where you apply thin layers of paint over existing layers. To make a glaze you can mix the acrylic paints with a glazing liquid and/or water (not too much water as it can weaken the binders in the paint) to thin it to a liquid consistency. Then you can apply the glaze. When it dries, it adds depth and richness to the paint colors. It also helps unify the painting when applied to the entire painting or large areas.
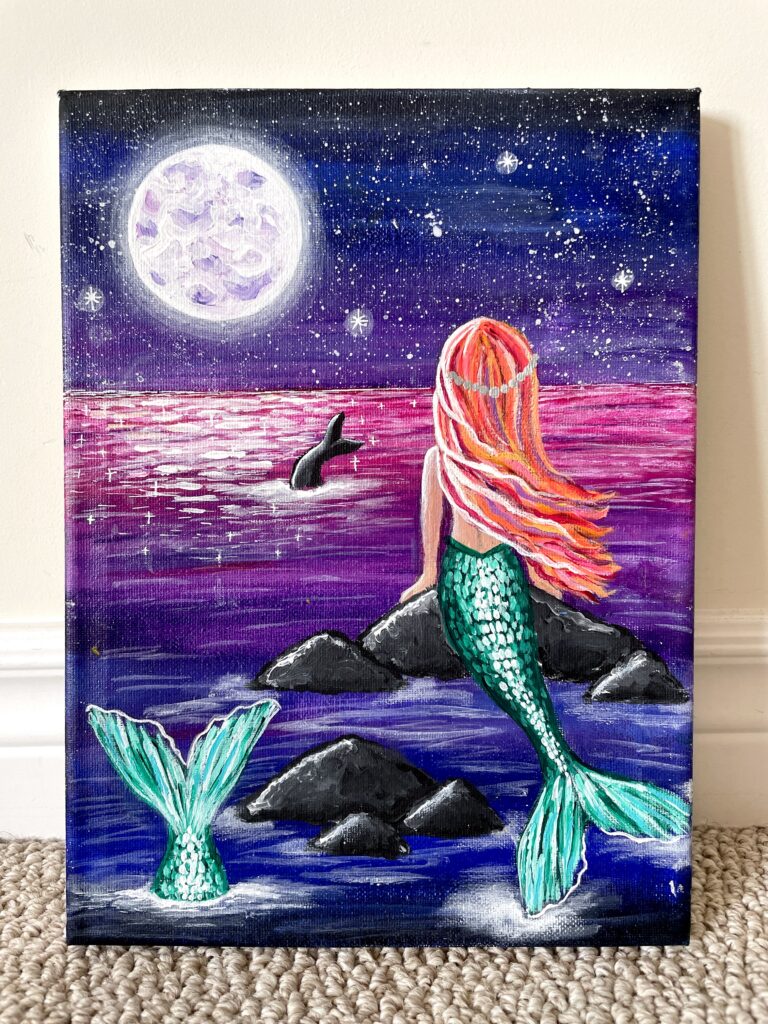
17. Highlighting
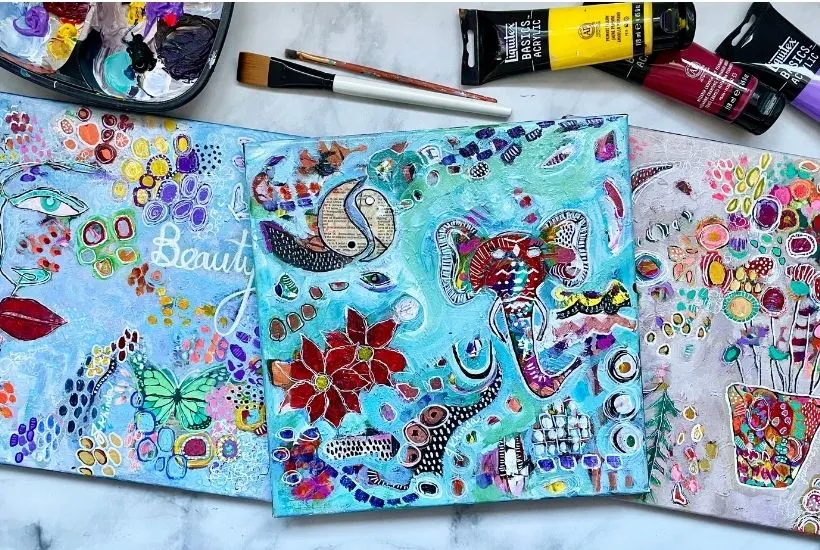
Using white paint as a final highlight in your painting can bring your painting to life. Usually the highlighting is done at the very end of the painting process. You don’t need much paint here, you can add it to areas/ objects in your painting where the light would shine on it. For example, in the mermaid painting below, a small amount of white paint is added into the mermaids hair to highlight the light reflecting off of it. It’s also added to the center of her tail to show the light reflection and create dimension. For the small details is best to use stiff brushes which give better control over the paint, especially where precision is required.

18. Transparent Acrylic Painting Techniques
Similar to glazing, and using fluid inks you can thin down your acrylic paint to create a watercolor like effect with your acrylics. When you thin down your acrylics enough with water/glazing liquid into a thin water like consistency it becomes transparent. So any paint or marks below will show through. This can be useful in abstract art, when wanting the layers below to show through, or trying to create a watercolor effect with your acrylics.
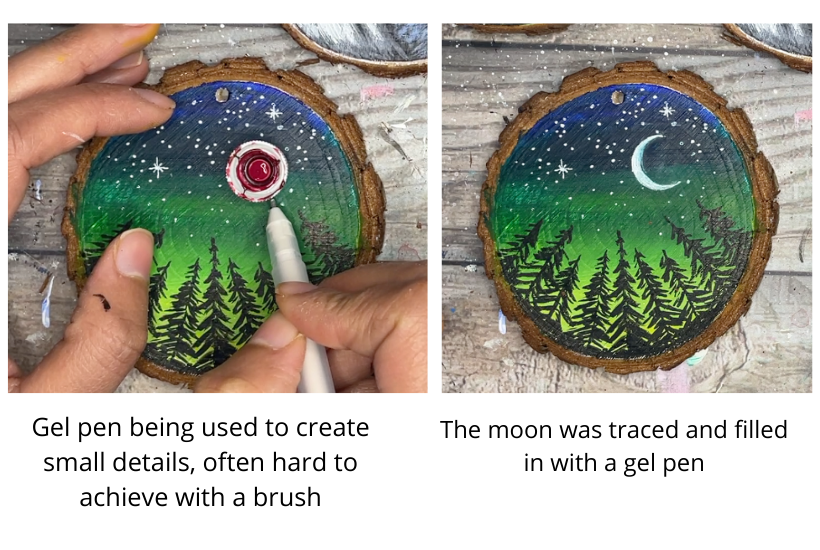
19. Gel Pen
Gel pens are a great addition to your acrylic painting toolkit. You can find gel pens at stationary stores or the pen section at your local craft stores. They come in a variety of colors and tip sizes. I use the gel pens to add very fine details (like tiny dots, stars, crescent moon, or details in small paintings) or other markings in a painting that are often hard to achieve with a brush alone. You can use the gel pens in any layer of your acrylic painting.

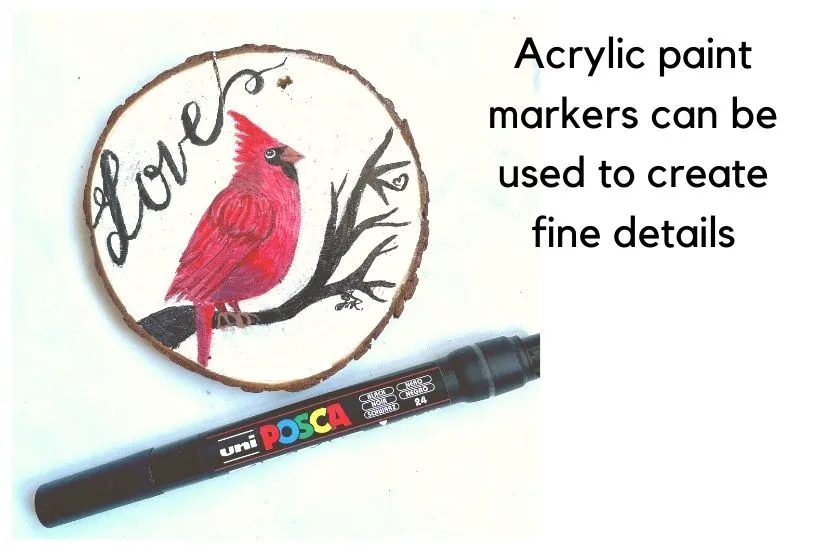
20. Acrylic paint markers
Acrylic paint markers, like gel pens allow you to add finer more controlled details to your painting, which is often harder to achieve with a brush alone. I find hand dexterity is much easier with paint markers versus a brush. Make sure you read the label to ensure they are water-based and will work with acrylics. Paint markers also come in a variety of colors and also tip sizes (depending on the level of detail you’re trying to achieve). The Posca brand is very popular with acrylic artists. Many artists use them in abstract art, to create fine details in realistic art, hand lettering (below) and even rock painting! Paint markers can be used in any layer of your painting.

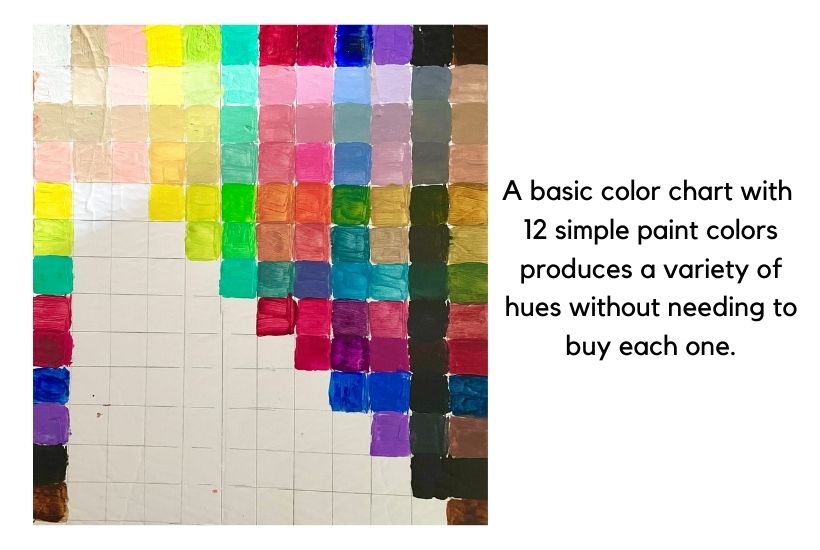
21. Color Mixing
Color mixing is an important skill and technique to practice even as a beginner artist. Essentially you create your desired colors with the paint you have on hand, instead of having to go buy the exact colors each time. Understanding the basics of color theory will help you know which colors to mix in order to create your target color. For example, instead of buying an orange tube of paint you can simply mix it with some red and yellow. This will both be more cost effective for you and your colors will be richer compared to the pre-mixed, store bought variety. A great way to learn this skill is to create a color chart.

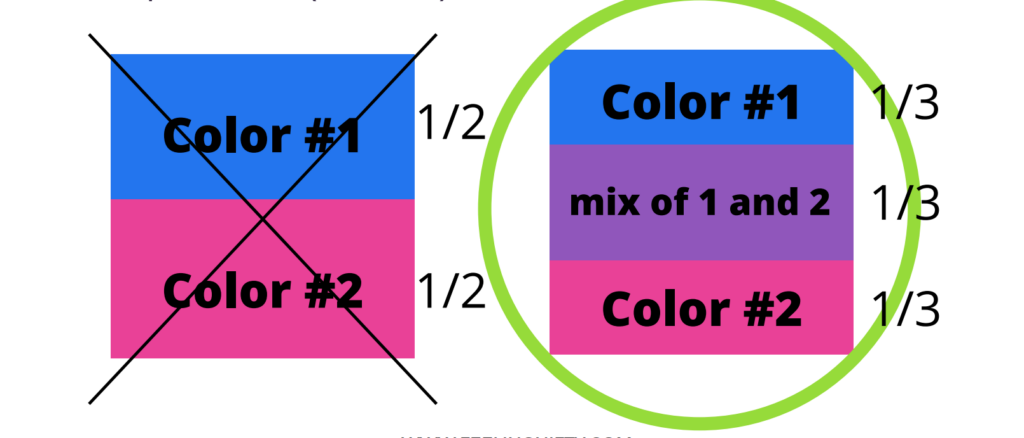
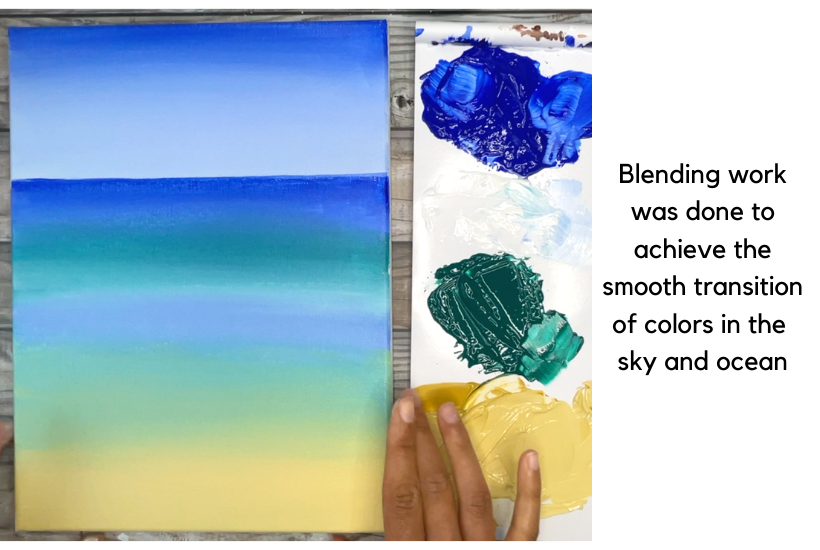
22. Blending
Blending acrylic paints can help you achieve some beautiful gradients and realistic details into your art work. It can also help achieve smooth transitions between different colors. When wanting to achieve gradient like paint blends between any 2 colors, it’s key to blend both colors in the middle. So in the end you’ll have 3 paint colors that are equal in size (each 1/3). Another tip is to work the paint (while it’s wet) with horizontal back and forth strokes to smooth out paint strokes and blends. The more
you go over the wet paint, the more it will smooth out.


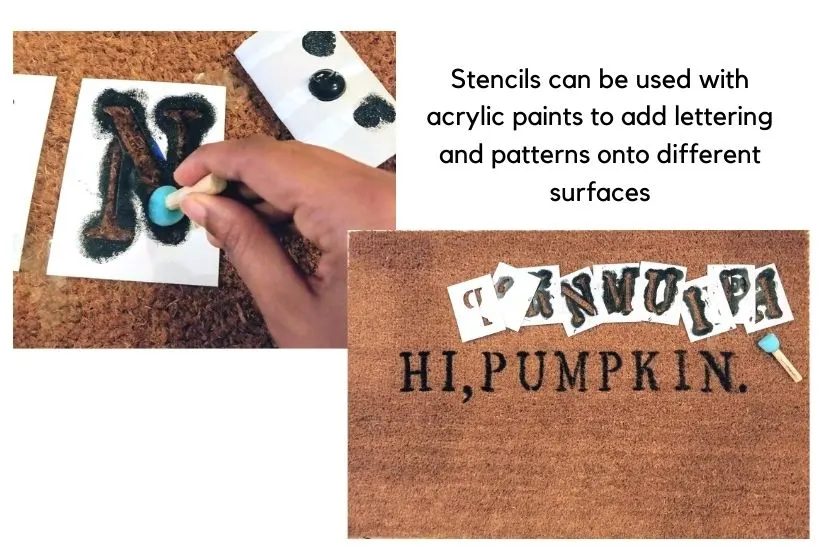
23. Stencilling
Stencilling is another acrylic painting technique that can allow you to add precise lettering /pattern work into your art or on any work surface you choose. The best technique to allow you to achieve sharp lines and less paint bleeds is to use your stencils with a foam pouncer (instead of a brush). To use the pouncer, simply dab it into some paint, then with gentle dabbing movements, apply the paint into the stencil. Also ensure the paint thickness is thinner rather than heavy bodied paints. Below I used simple paper stencil, a pouncer and some thinned down black paint to create the stencil on a door mat.

24. Underpainting
Underpainting is another technique that allows your end painting to have more dimension and depth. Artists commonly paint a the first layer of their painting to both plan out the end painting and also to allow the artist to understand the paint values. In a nutshell paint values are the light and dark areas of the painting. Getting a good understanding of the values in your painting before you begin (by using an underpainting for example) will make your painting look more realistic in the end.
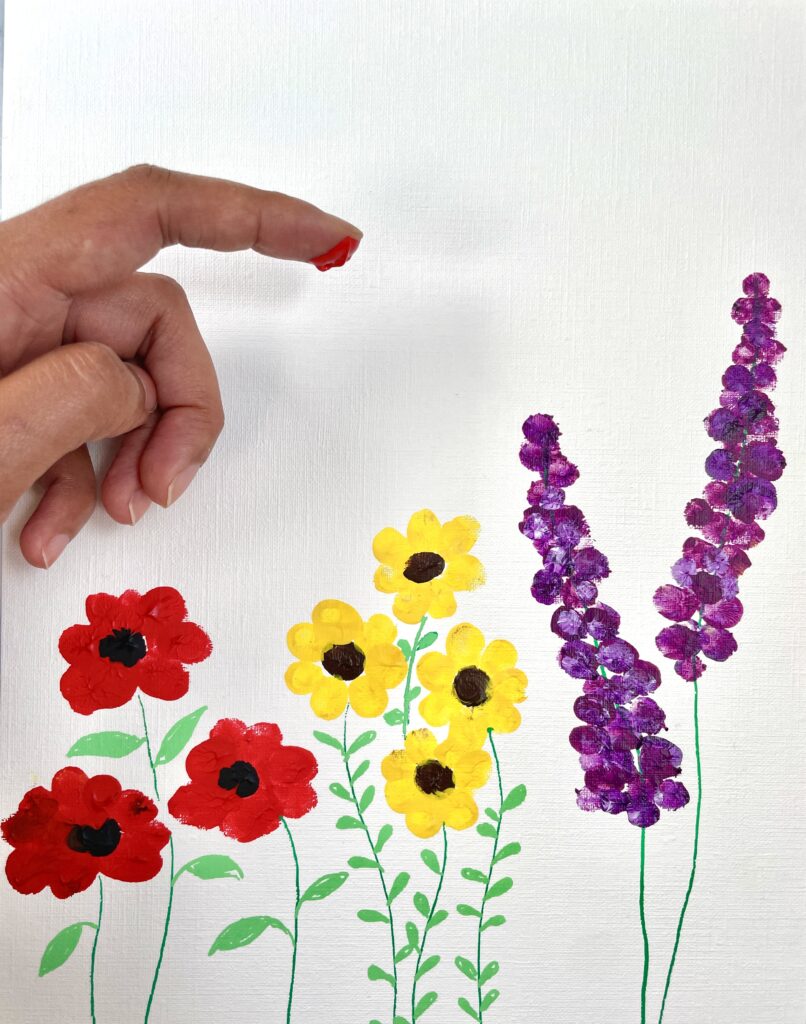
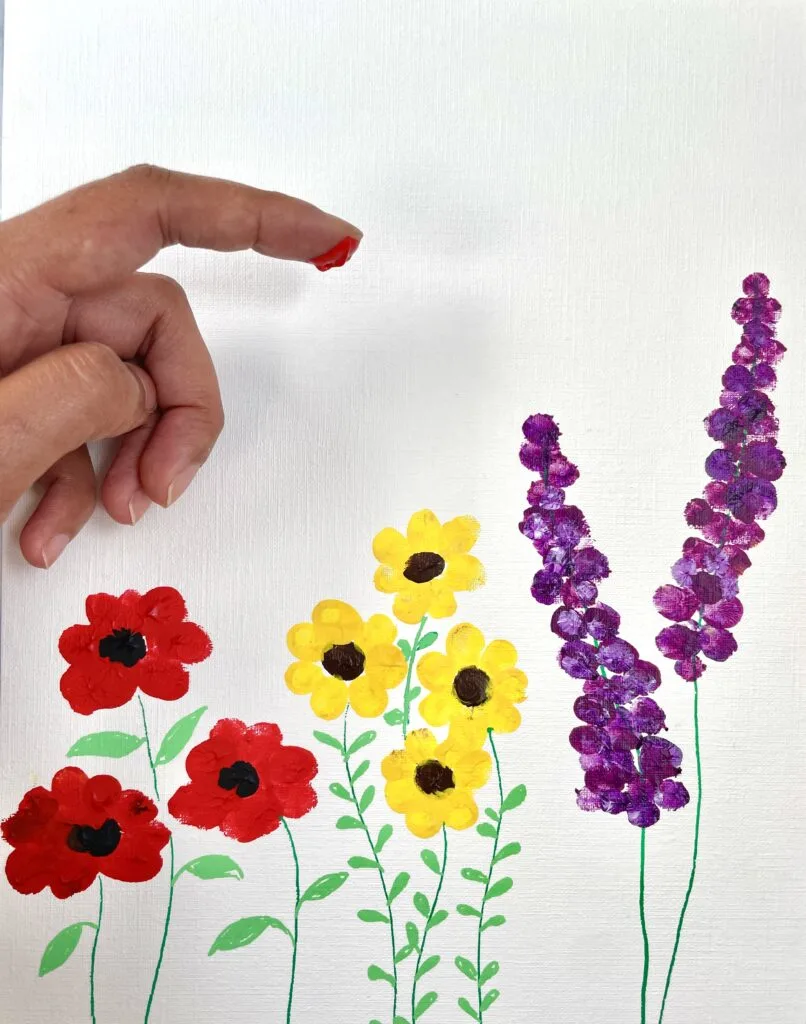
25. Painting with Fingers
Although many people think finger painting is meant for children, the truth is that you can create incredible artwork using your hand as tools. You can create a variety of different marks and even entire compositions with your fingers as a painting tool. In the painting below the flowers were painting with simple finger dabs of paint.
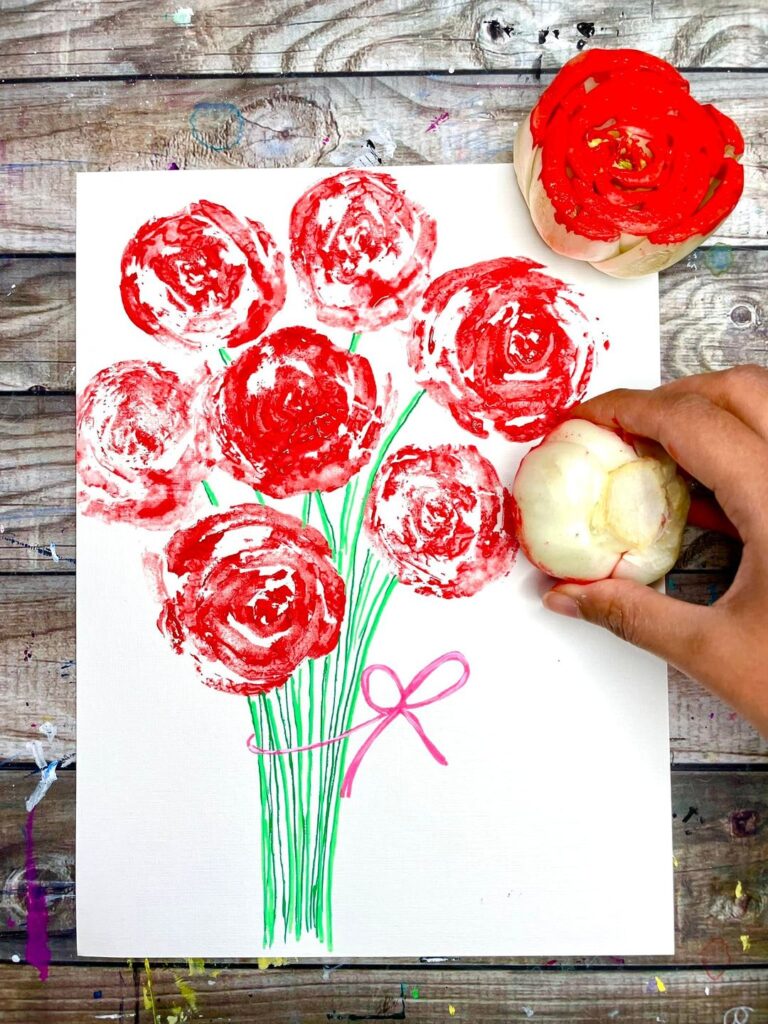
26. Stamping / Mark Making
Stamping is another way to achieve some beautiful marks and patterns in your art work. Many abstract artists use simple objects found around their home as stamping objects- no need to buy anything and no extra cost is involved. Some examples are q-tips, bubble wrap, cardboard, even fruits and vegetables (you can create some fun stamps with a patterned paper towel, potatoes, celery, bok choy, etc.). In the picture below I created some beautiful red roses using the bottoms of bok choy. To use the stampers, just dip the stamps in the paint (that’s thinned down) and stamp away!

27. Wet on Wet
This technique is used for blending work. Essentially you’ll add your paint color on canvas, and while it is still wet you can add another color, and blend them together while they are workable and wet on canvas. Working the blends on canvas while both paint colors are still wet allows you to get smooth blends and gradients. Since acrylic paint dries fairly fast, you can add a water-soluble medium like gloss glazing liquid or a paint retarder to extend the time the acrylics will stay wet on canvas. So you have more time to work the paints and blends.

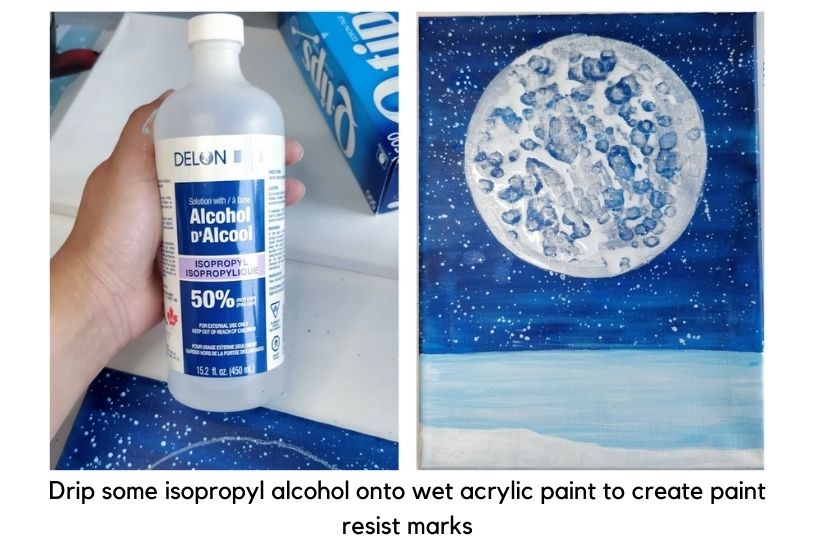
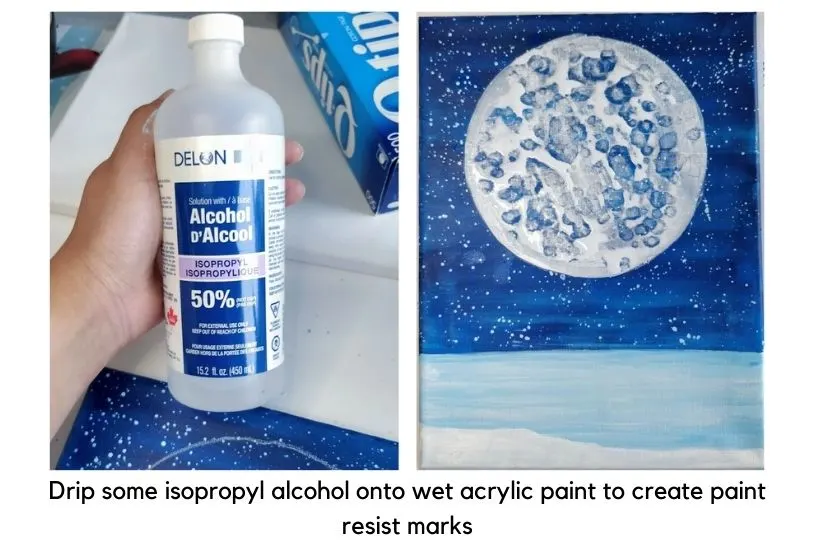
28. Isopropyl Alcohol / Acrylic Paint Resist
Create some nifty acrylic paint resist marks by dripping some isopropyl alcohol over wet acrylic paint. To make sure this technique works, you’ll want to make sure the acrylic paint is thin and applied in an even coat on canvas. You can learn more about this method is this Christmas tree painting tutorial.
30. Abstract Acrylic Painting Techniques on Canvas
Abstract painting is a beautiful acrylic painting technique that allows you to paint freely without the worry of perfection or trying to make the painting look a certain way. Many abstract artists use different colors, stamping methods, mark making to express their intuitional side and just paint, play and have fun with their art. If you’re interested in learning more about intuitional styled abstract art you can check out this course.
31. Realistic Acrylic Painting Techniques
On the flip side of abstract is realistic painting which is an advanced technique. This is where you’ll try to mimic reality as close as possible. To make the subject matter easier to paint you can try to dissect it into simple shapes first. Once the shapes/forms are done you can use you paints to add areas of shadows, mid tones and highlights to bring the painting to life and give it dimension and depth. Following a painting tutorial is a great way for beginners to start with realistic styled paintings.
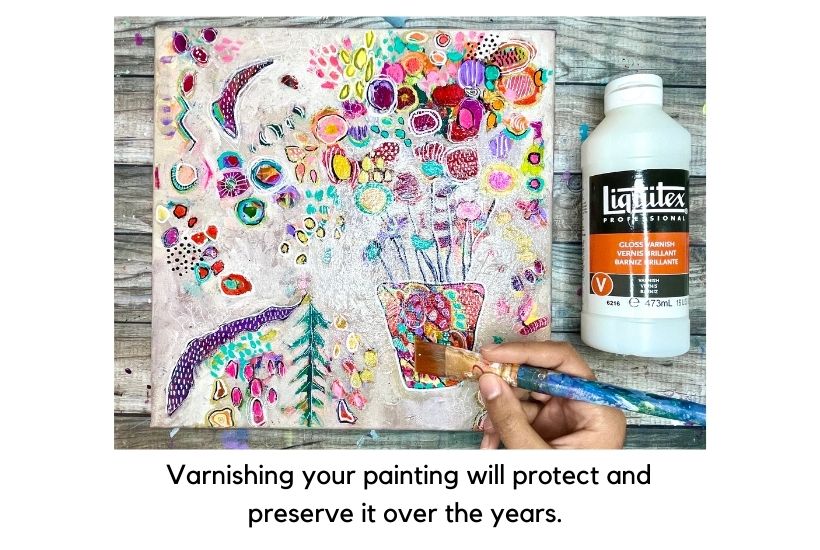
32. Varnishing
Varnishing your painting is a way to protect and preserve it against the elements like sun and every day wear and tear. Using a varnish is a fairly simple technique and requires a couple of thin layers of the varnishing medium to be applied to your final painting / top layer of paint, using a brush. You can watch this video for step by step instructions on how to varnish your painting.

33. Etching/Sgraffito
Etching/Sgraffito is a fun acrylic painting technique that you can use to add texture and interest into you art. To etch make sure you apply a layer of paint that’s wet on your canvas then use a tool like a palette knife, the back of your paintbrush, a skewer to scrape away some of the paint and allow the canvas underneath to show through.

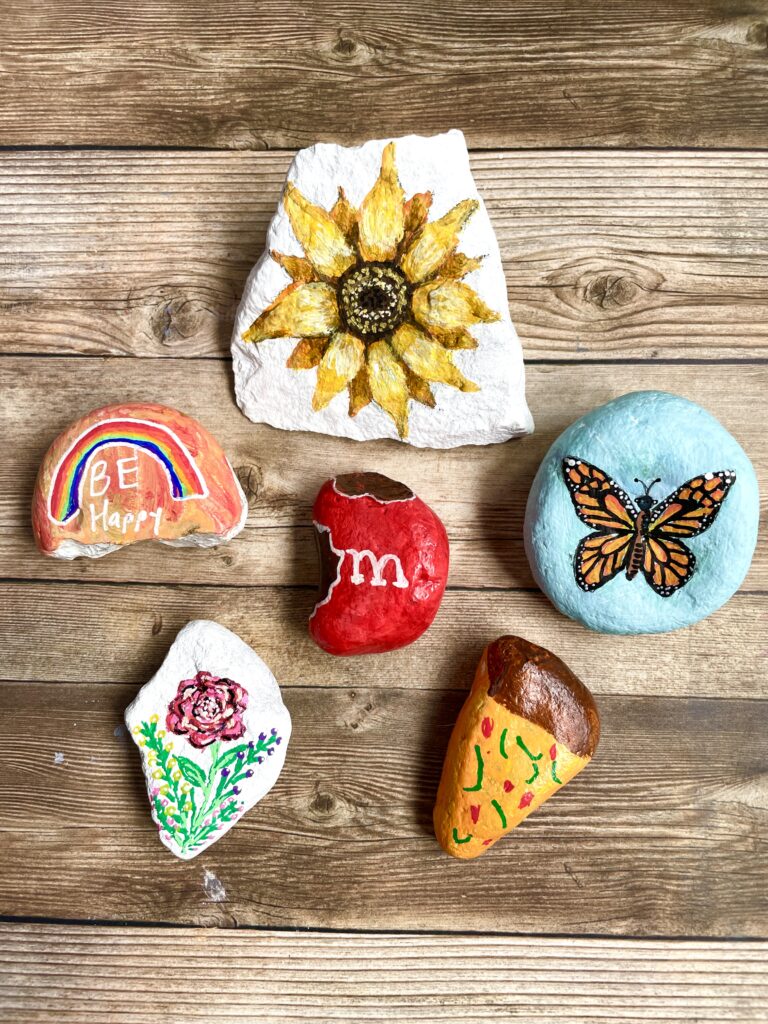
34. Rock Painting
Instead of painting on canvas you can paint on a rock! The great thing about acrylic paints is that it adheres to many different surfaces. Rocks are an excellent choice of painting surfaces as they’re porous and acrylic paint can bond to it very well. Pick a rock that calls out to you in terms of shape for inspiration. You can use the same acrylic paints you use on your canvas on rocks. In terms of brushes I find the smaller detailing brushes (or any fine brush) are best for rock painting since they’re smaller than canvases. You’ll also only need a small amount of paint compared to canvas, since rocks are smaller.

35. Gesso Primed Canvas
Having a properly gessoed canvas will help your paint slide smoothly across it. Although many canvases come pre-repimed with gesso, some are not. If you’re working with a canvas that isn’t primed already, then you can DIY it! Simply buy a bottle of gesso, apply it to your canvas and leave to dry. Once dried you can paint overtop with acrylics.
36. Wet On Dry
In this technique you are applying the paint on a dry canvas. You’ll still want to wet your brush before picking up paint. You can use this technique to apply your underpainting, or background into your painting. Use it to add uniformity to the piece by adding a thin glaze overtop the dried painting.
37. Wet On Wet
In this technique you are applying a layer of paint over top another layer of paint that’s still wet on canvas. This can help with blending work between colors and soften their edges. For example, if you are trying to paint a gradient affect, you would apply the first paint color to the canvas. While the first paint color is still wet and workable, you’d add the second color over top and blend them until your gradient is achieved. Blending paint colors right on canvas through wet on wet techniques can help create some very smooth blends/gradients. You can also add in a paint retarder or glazing medium to extend drying time so the paints don’t dry out while using this technique. You can also use it to create textures in your painting.
38. Darkest To Lightest
When starting a painting, a common technique that’s easy for beginners is to paint from your darkest paint colors (shadows), to your mid-tones, then to your lightest paint colors (highlights). The benefit of this is you’ll create depth in your painting. When your darker paint colors stand out in contrast to your highlights (lightest paint colors), this gives the illusion of depth and dimension. If you paint your darker colors after the lighter ones, it’s much more challenging to achieve this contrast between your darks and lights, since the darker colors can easily overpower the lighter ones.
39. Contrasting Colors
Using contrasting colors (colors that are opposite to each other on the color wheel) is a technique you can use to bring out the vibrancy of each color. The only thing to keep in mind is to try to balance the ratios of each color. To avoid a jarring effect, it’s best to pick one of the colors as your dominate paint color, then use it’s complimentary color in small accents around the painting. This will bring more balance and harmony to your painting. Below I used a yellow-orange (sunflower) with a blue-purple ( background). Using these two colors side by side brings out either colors vibrancy.


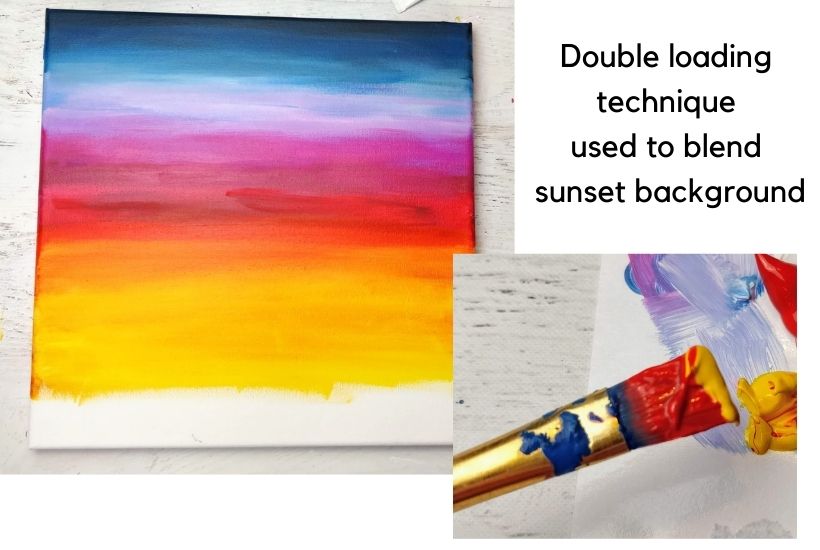
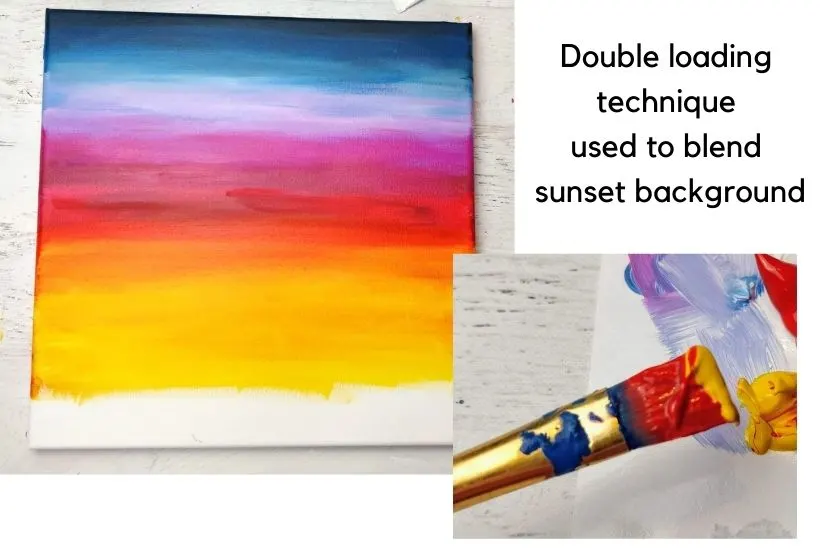
40. Double Loading
Double loading is when you have 2 different paint colors on your brush. This can help with blending work and is also used in one-stroke painting. I used the double loading method to blend the colors of the sunset background in the painting below.
41. One Stroke Painting
One stroke technique is another great technique for beginners to try. For this technique you’ll load your brush with 2 or 3 colors and you’ll paint your highlights and shadows in one stroke. It does require practice but can yield some beautiful results. This is a popular technique to create flowers and flower petals and can be used a a variety of surfaces like canvas, glass, wood, watercolor paper, etc. In terms of brushes a flat brush works best.
43. Mixed Media
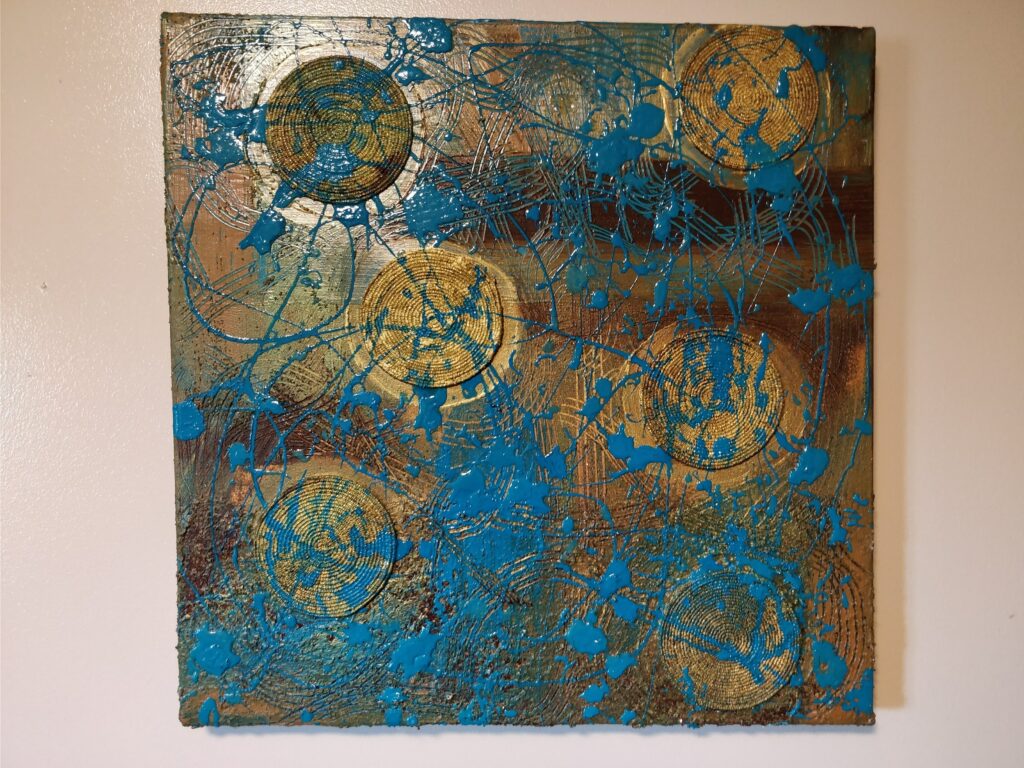
With the mixed media technique you’ll be using acrylic paint in conjunction with other items / mediums like collaging (paper, magazines pages, fabric, other items, etc), charcoal, pastels, pencil, etc. In the painting below I glued on circular coasters on the canvas and used a splatter technique overtop. The sky is the limit with this technique, which makes it a freeing and a very enjoyable art form.

44. Hyper-Realism and Photo-Realism
Painting photo-realism is one of the more advanced acrylic painting techniques where you’ll be painting your subject matter to look like the real thing or close to it. Which usually involves a high level of detail. This technique can be a little bit more challenging for beginners, but there are some great beginner-friendly tutorials that you can follow to get your started with this technique.
45. Psychedelic Paintings
This is one of the more unusual painting techniques, but can be a fun one to try. It usually involves bold contrasting colors and expressive subject matters. This tutorial is an easy one for beginners and involves using acrylic paints, with watercolors and a sharpie marker.
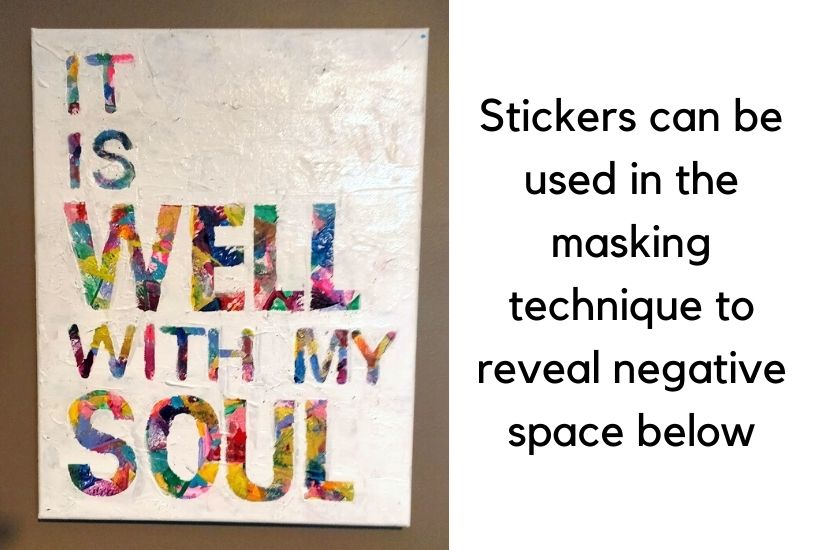
46. Masking
The masking technique is an easy technique for beginners. It involves placing masking tape or even stickers on the canvas then painting over top the masking tape/stickers. You can remove the tape/stickers to reveal the negative space, once the paint is dried. In the painting below I painted a bold and bright background. I then placed large letter stickers overtop the dried background, then painted simple white paint overtop. This gives a simple yet dramatic look and is a very easy painting technique that anyone can do.

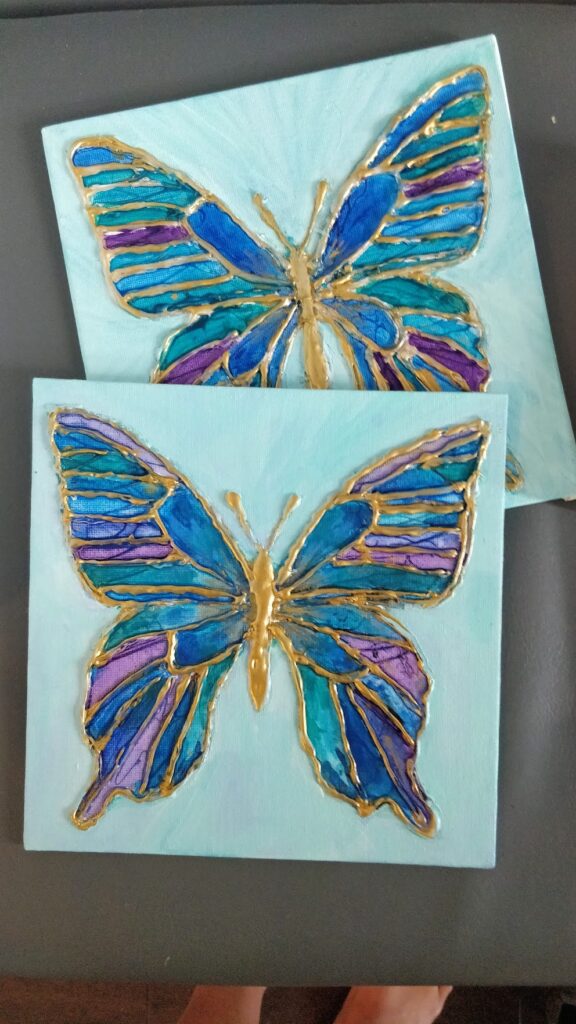
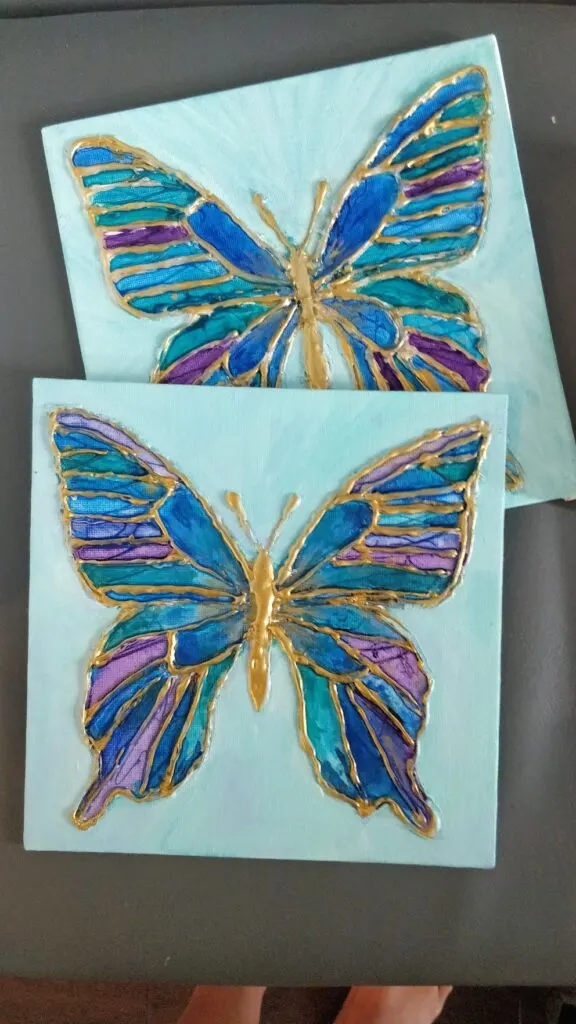
47. Glue Gun Texture Technique
This is another unusual painting technique, but can yield some dramatic and easy paintings with fun texture. For this painting technique, you’ll need a glue gun. You can choose to paint a background first and then leave it to dry. You’ll then use your glue gun to trace in a pattern overtop (like the butterfly below). Once the glue is dried/cooled you can paint right over top of the glue portion it with acrylics- below I painted it with a nice shimmery gold paint. The results are a highly texturized piece that’s also very unique.
If you liked this acrylic painting techniques post please pin it on Pinterest