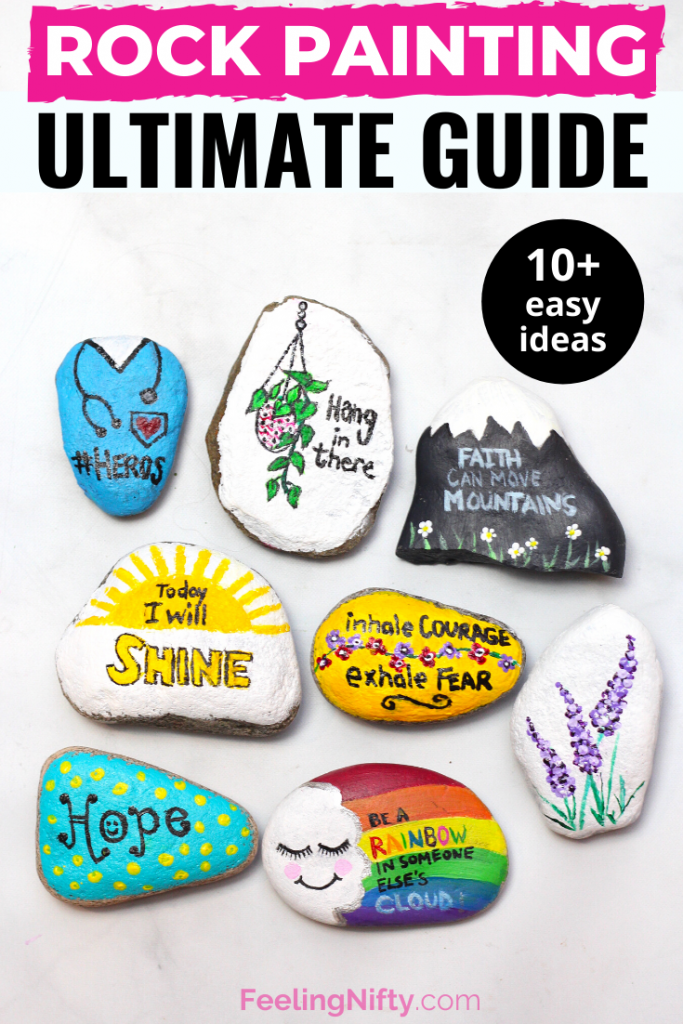
How To Paint Rocks with 20+ Easy Ideas {Rock Painting 101}
How to Paint Rocks for Beginners
Want to learn how to paint rocks but have no idea where to begin? Rock painting is one of the easiest crafts/ hobbies to start that can be done by all ages and is completely suitable for beginners.
In this rock painting 101 tutorial, I'll leave no stone unturned.
I kid you not.
I'll cover the basics including how to find and prepare rocks for painting, the best rock painting supplies and tools(I.e what paint to use on rocks), how to seal your rocks, and finally 20+ easy rock painting ideas perfect for beginners (flowers, butterflies, pizza, inspirational painted rocks and more!)
Once you're done reading this, you'll know what tools you'll need plus some fun ideas to start this quintessential summer painting idea . If you're looking for even more inspiration check out this 141 rock painting ideas post.
For all you Disney fans out there check out this inspiring list of 90+ Disney rock painting ideas.
Where to find rocks to paint

Here are some ideas of places you can search for rocks (for free):
- On a river bank is where you'll find nice smooth river rocks
- Go rock hunting in a nearby forest/park (check the laws in your area to make sure your allowed to take rocks off the premises)
- Ocean shore
Another option is to buy your rocks them. Where to buy rocks to paint you ask? Here are some ideas:
- Local craft store / dollar store in the home decor section
- Amazon sells rocks specifically for rock painting
- Hardware store in the landscaping section (river rock)
- Pet stores sell decorative rocks for fish tanks and aquariums
How to Prepare Rocks for Painting

A common question people have when starting out is how to clean and prepare rocks for painting.
To make sure your paint adheres properly to the rock you want to make sure it is free of dirt and oils.
The rule of thumb I follow with anything organic I use in my art (seashells, rocks, branches) is to soak your rocks in warm soapy water and use a toothbrush to scrub any big pieces of dirt off.
Then lay them flat to dry on some newspaper.
How To Base Coat Rocks To Paint
Base Coating a rock is essentially covering the rocks surface with a layer of acrylic paint, for a blank canvas type effect. It's usually done with white paint or any light colored paint.
The benefit of base coating a rock with white paint is that the subsequent colors/design will be more vibrant, compared to painting them on a bare rock.
To base coat a rock, simply use a wide flat brush and paint on a layer of white acrylic/craft paint and leave to dry. Once dried, you can start painting in your design with acrylic paints, or paint pens.
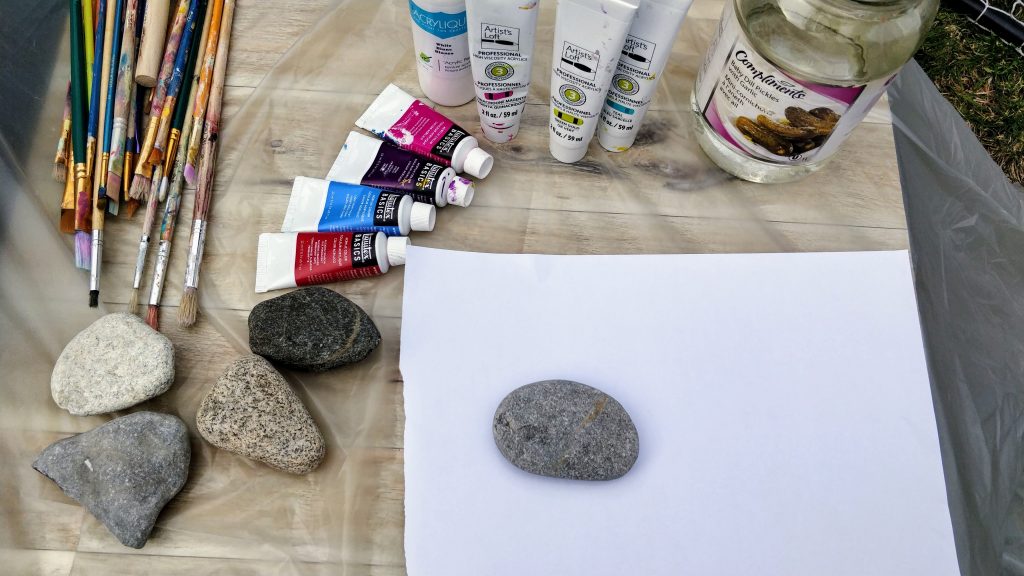
Rock Painting Supplies
The beauty with rock painting is you need very few supplies. All you generally need is paint and a paintbrush!
However, with the recent huge popularity in rock painting, some art brands have created paint supplies specifically made for rock painting. I'll list the most popular ones that rock painting connoisseurs use, as well as some cheaper options.
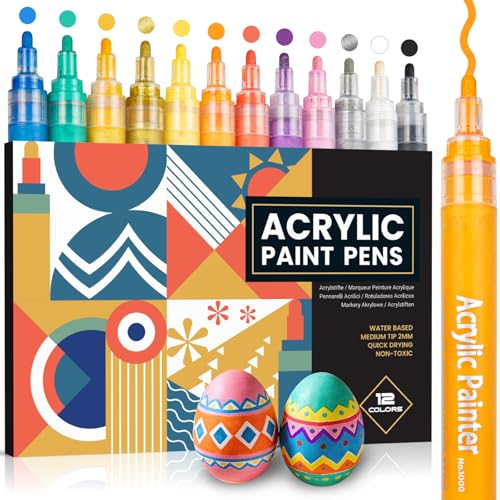
Rock Painting Pens
Rock painting pens are pens that have acrylic paint loaded in them , which allows for easier control and handling when painting in designs on your rocks. Essentially it makes it easier to paint versus using a paint brush , which is perfect for beginners. Many rock artists and crafters use these POSCA paint pens which are very popular and work really well. I personally use these and I love my Posca markers.
They aren't cheap, so I usually only reserve them for intricate details only - the big parts of my design I'll paint in with craft paint and a brush.
It's also a less messier option than paints. No setup and no cleanup of brushes, palettes are required. Just grab your paint pens and start doodling, designing, and painting away.

Best Paints for Rocks
If you don't want to invest in paint pens, or you want more diverse color/pigment options, there is another alternative. Simple craft paints!
You might be wondering what kind of paint do you use on rocks?
Any acrylic (water-based) craft paint will work for rock painting. The acrylic paint you use for painting on canvas (think Paint-Night paints) will do - no need to get any special formulations for rocks/pebbles.
For the projects below, my family and I used a mix of acrylic craft paints and my favorite Liquitex paints from a set (which are thicker and more pigmented compared to the craft paints) .
I find the higher quality paints like Liquitex, provide better color and coverage with fewer layers needed. This is because higher quality paints have more pigment in them (hence them costing a bit more). The craft paints will work too, you just might not get as vibrant colors or many layers will be needed to get the effect you want.

Acrylic paints are water based, but once they are dry they are resistant to water (unlike watercolour paint that reactivate once water touches it).
So you might be thinking now: does acrylic paint wash off rocks?
No, it does not wash off. The paint adheres to the porous rocks and then once the paint is dry, it turns into a plastic-like hard consistency. If the paint is still wet then, you can wash it off with some water and soap.
But the paint can still scratch and chip off over time if the rock is sitting outside exposed to the elements.
Which is why you should seal your rocks if you plan on keeping them outdoors.
I'll go into detail about how to seal your rocks further down.
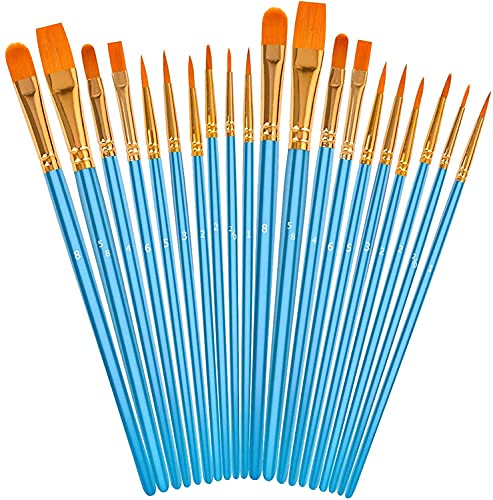
Rock Painting Paint Brushes + Mandala Tools
If you are using acrylic paints to paint your rocks, then any synthetic small sized paintbrushes will work. You probably want to have a variety in size, I.e. one larger paintbrush to cover a rocks surface or to paint the background, and medium and finer tip brushes to paint on small details.
This brush set is inexpensive and has a variety of sizes that would work well for rock painting.

If you want to get some very fine detailing brushes (think mandala art, writing quotes, words, etc.) then a brush set like this would be your best bet.

If you're exclusively painting Mandala's, then there are some innovative new tools you can buy to help get those tiny perfect dots without too much stress.
I have personally tried to create tiny uniform dots with my paintbrushes on rocks and I found it a bit challenging. I think tools like the ones below would really help and make the process more enjoyable.
Here's a Mandala rock painting toolset on Amazon.

Rock Painting Kit
If you want an all in one kit, that includes rocks, waterproof paint, paintbrushes, and sticker transfers then you can look online for some inexpensive ones like this one. The kits also include instructions on how to hide rocks and even provides them with code kids can add to the backside of their rocks to track them. Nifty!

How to Paint on Rocks for Outdoors
If you are planning to keep your rocks outside, then you might be wondering how to waterproof painted rocks ?
Whether you're painting rocks for your garden or around your neighborhood for the kindness rock project (see below), you will want to seal your painted design with an appropriate sealer or clear coat. This will make sure your painted design doesn't chip, scratch-off or fade and can resist moisture.
How To Seal Painted Rocks
If you are keeping your rocks indoors, you don't need to seal them. But if you want to put your gorgeous rock creations on display outside, then sealing your rocks them would ensure the paint doesn't chip, yellow/ fade (with UV light), and is resistant to the elements.
First make sure your paint is fully dried before using a sealer. Once the paint is dried there a are a few different options in terms of sealers you can use.
1. Spray on sealer
You can use the same type of clear coat artists use to protect their paintings agains UV and moisture. This Krylon Clear Coating Aerosol can be used to coat your rocks and it dries in minutes.

2. Brush on sealer
If you'd rather seal your rocks indoors and avoid the heavy fumes and smell from the spray-on sealers, you can use some non-toxic brush-on sealers instead. There is Modge Podge Outdoors sealer (made specifically for outdoors) and also this Americana Duraclear Indoor/Outdoor Sealer (I've used this one and it also makes your rocks nice and shiny and vibrant)

Rock Painting Tutorial Video
Watch the full step by step video on how to paint rocks below. I'll cover all the rock painting supplies in this post plus some DIY mandala dotting tools that you probably have at home. You'll also get to see a time lapse of each step to see how easy rock painting is.
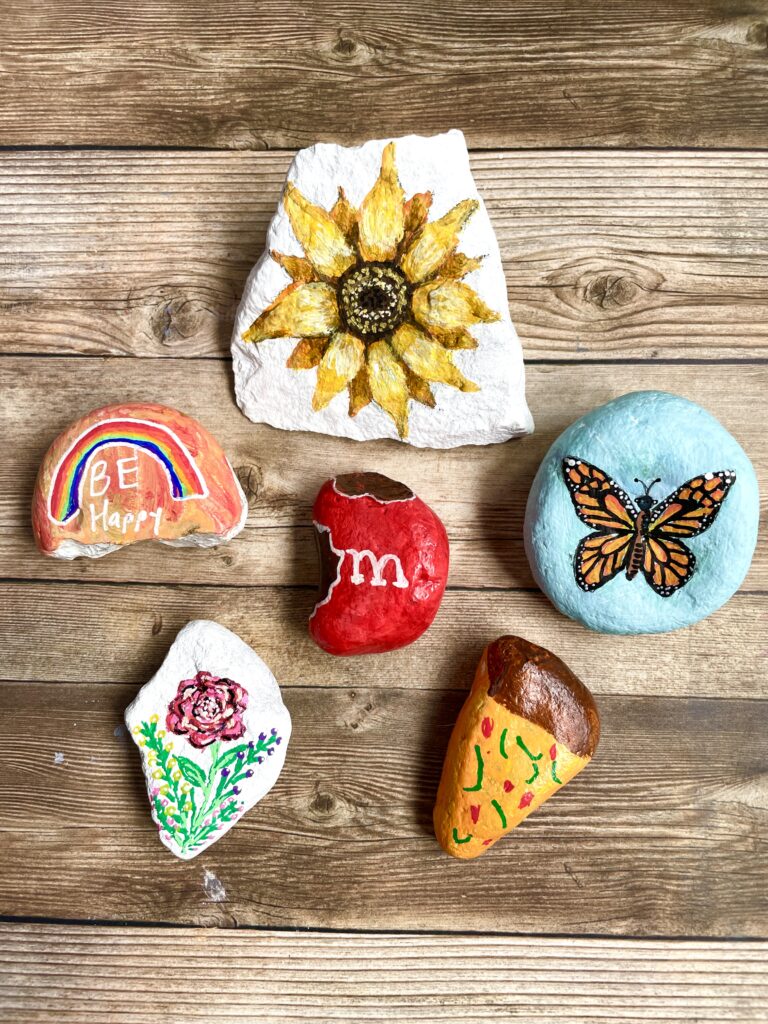
Rock Painting Ideas - Things to Paint on Rocks
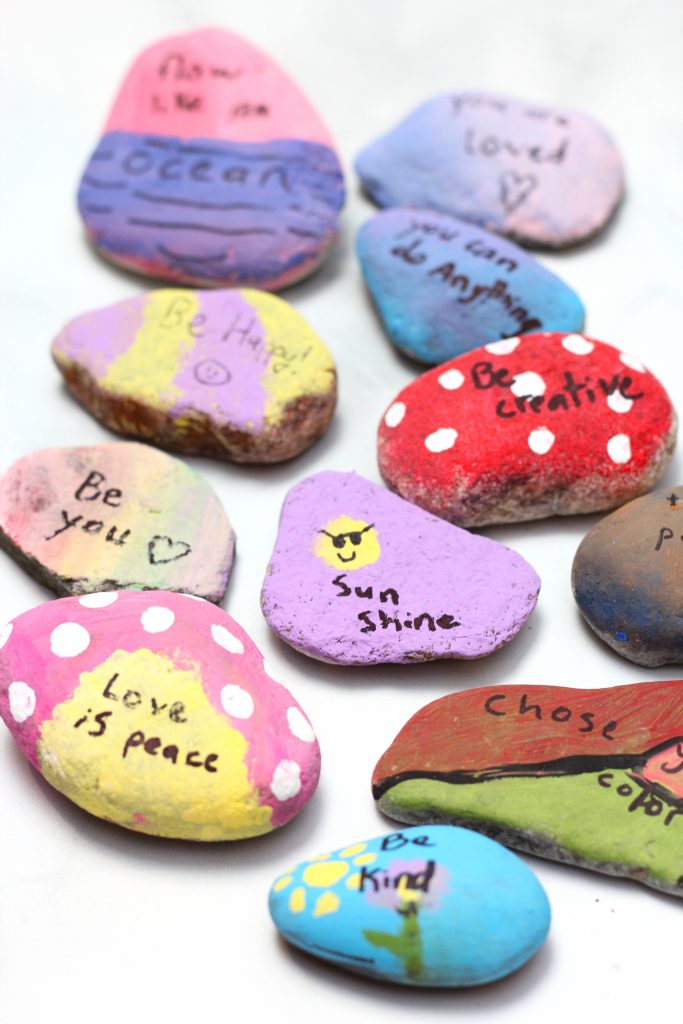
The rock painting ideas below were from my first attempt at rock painting. I got many of these ideas from searching on Pinterest and adapted them a bit with the colors I had on hand.
Hope these ideas further inspire you.
There's a mix for everyone, from many flower rock painting ideas, to butterflies, funny/inspirational quotes and more.
Here we go!
1. Sunflower Painted Rock

If you want to learn how to paint a sunflower on a rock then check out this how to paint a sunflower tutorial.
2. Cherry Blossom Tree Rock Painting

Paint this gorgeous cherry blossom tree on a rock using simple Q-tips technique. Learn how to paint a cherry blossom tree in this tutorial.
3. Butterfly Rock Painting

This easy butterfly rock painting is both beautiful and relaxing to paint. I followed the step by step tutorial on how to paint a monarch butterfly here. I used Posca pens to paint in the detailed wings and dots on the butterfly.
4. Beach Rock Painting

Paint a beach inspired rock with a simple blue ocean, blue skies, a sandy beach complete with a starfish on the shore. This rock painting was inspired by this
5. Painted Lavender Flowers on a Rock

Another flower rock painting idea for all you flower lovers out there! Paint some relaxing and soothing purple lavender flowers using basic paints and q-tips! Check out my full lavender flower tutorial on how to make this easy design!
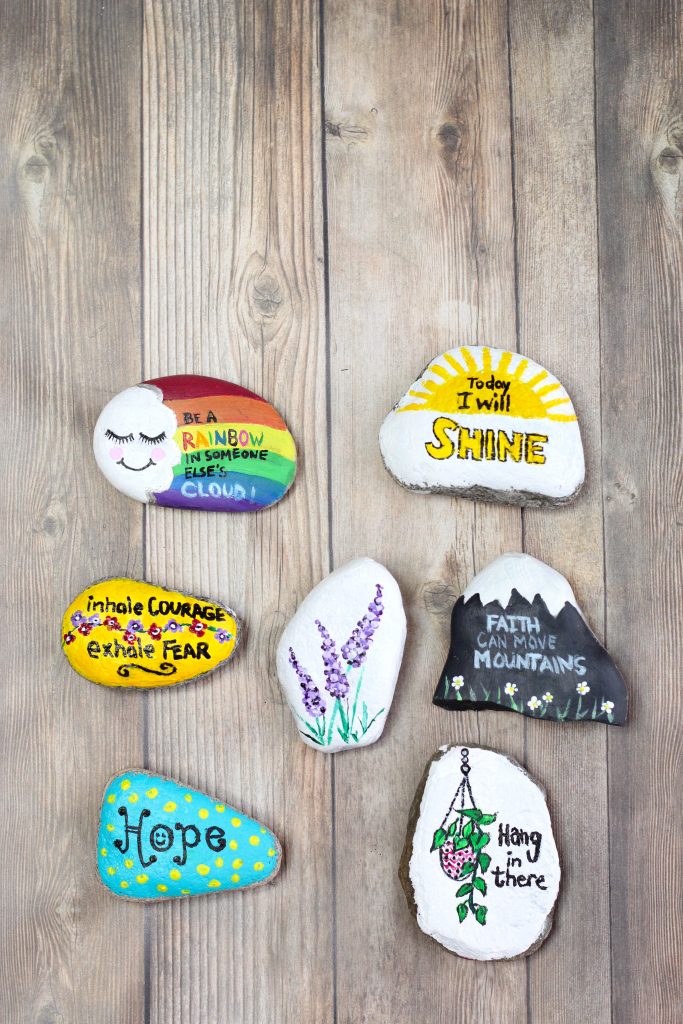
6. Hope Rock

Another easy rock painting idea that's also inspirational - is to use a simple word, like "Hope" and paint it along with a bright polka dot background. I used turquoise paint for the background and used q-tips to dab on the yellow polkadots. The "Hope" word was painted on with black paint. And finally sealed with clear nail polish!
7. Inspiration quote: Hang in There
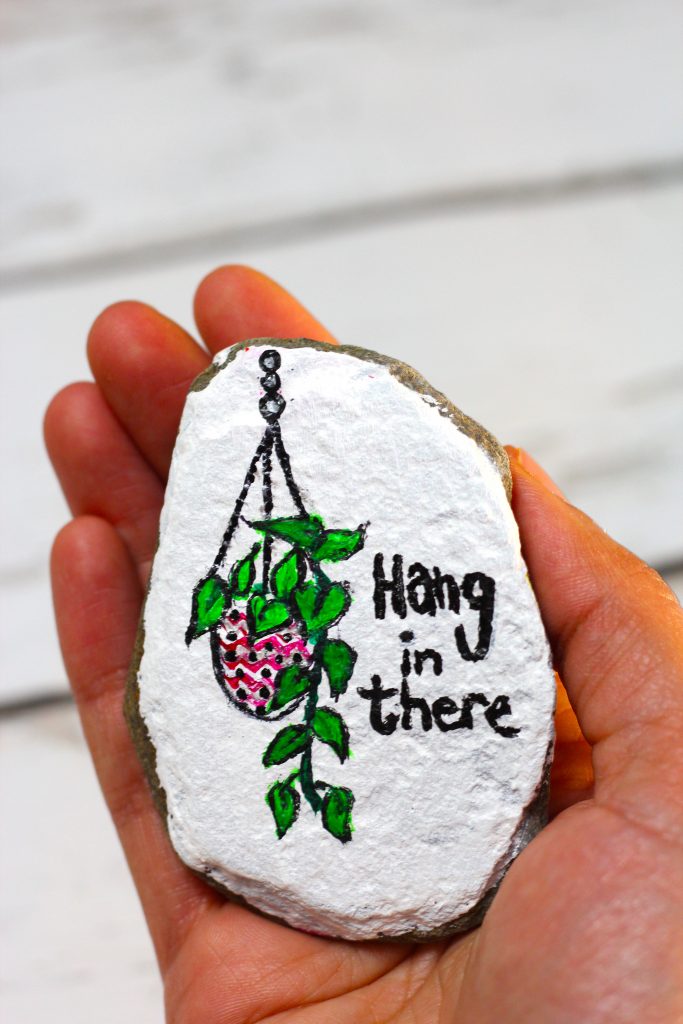
If you're a macrame-hanging, indoor-plant enthusiast (yes, join the club!), you're gonna love this punny but inspiring design. I squealed with delight when I found this design on Pinterest!
To paint it, I used white acrylic craft paint for the background and traced my plant hanging basket with a pencil then outlined it with black paint and filled in the leaves with green acrylic paint.
I wrote "Hand in there" with black acrylic paint and a fine-tipped paintbrush.
8. Faith Can Move Mountains Rock Design

Another inspirational rock painting idea!
This design was one of my favorites. I found this perfect mountain-shaped rock and knew I wanted to paint a mountain-inspired rock with it! Found some inspiration and ideas on Pinterest and was excited to transform my rock!
To paint this rock, I used black paint mixed in with some white to make a charcoal grey color for the background of the mountain. I painted the snow with white. The daisy flowers were made by dabbing my white and yellow paint with the back of my paintbrush to make perfect little circles (you can also use a q-tip).
a light sky blue (white mixed with a tiny amount of blue), was used to paint on the "Faith can move Mountains" quote.
9. Inhale Courage, Exhale Fear Rock Quote

Use your rock as a blank canvas for your favorite inspiring quote or mantra! You can use it as a daily reminder of what vibe you want to feel.
I found this quote "inhale courage, exhale fear", so important to remind ourselves, especially during times where anxiety might get the better of us.
To paint this rock I painted the background with yellow. The quote was written with a black paint pen, and the flower vine was painted using a q-tip dipped in some purple and red paints. The q-tips make it easy to create small dots (for the flower petals and center).
10. Today I will Shine Rock Art Quote

This design is very easy to create. The sun is among the very first forms we draw as children, so I think we all inherently enjoy(and find it easy) to draw the sun, even as adults.
There is something very inspiring, energetic, and powerful about the sun. Pair it with a powerful quote and you got yourself an easy motivational rock and daily reminder.
Inspirational rocks rock!
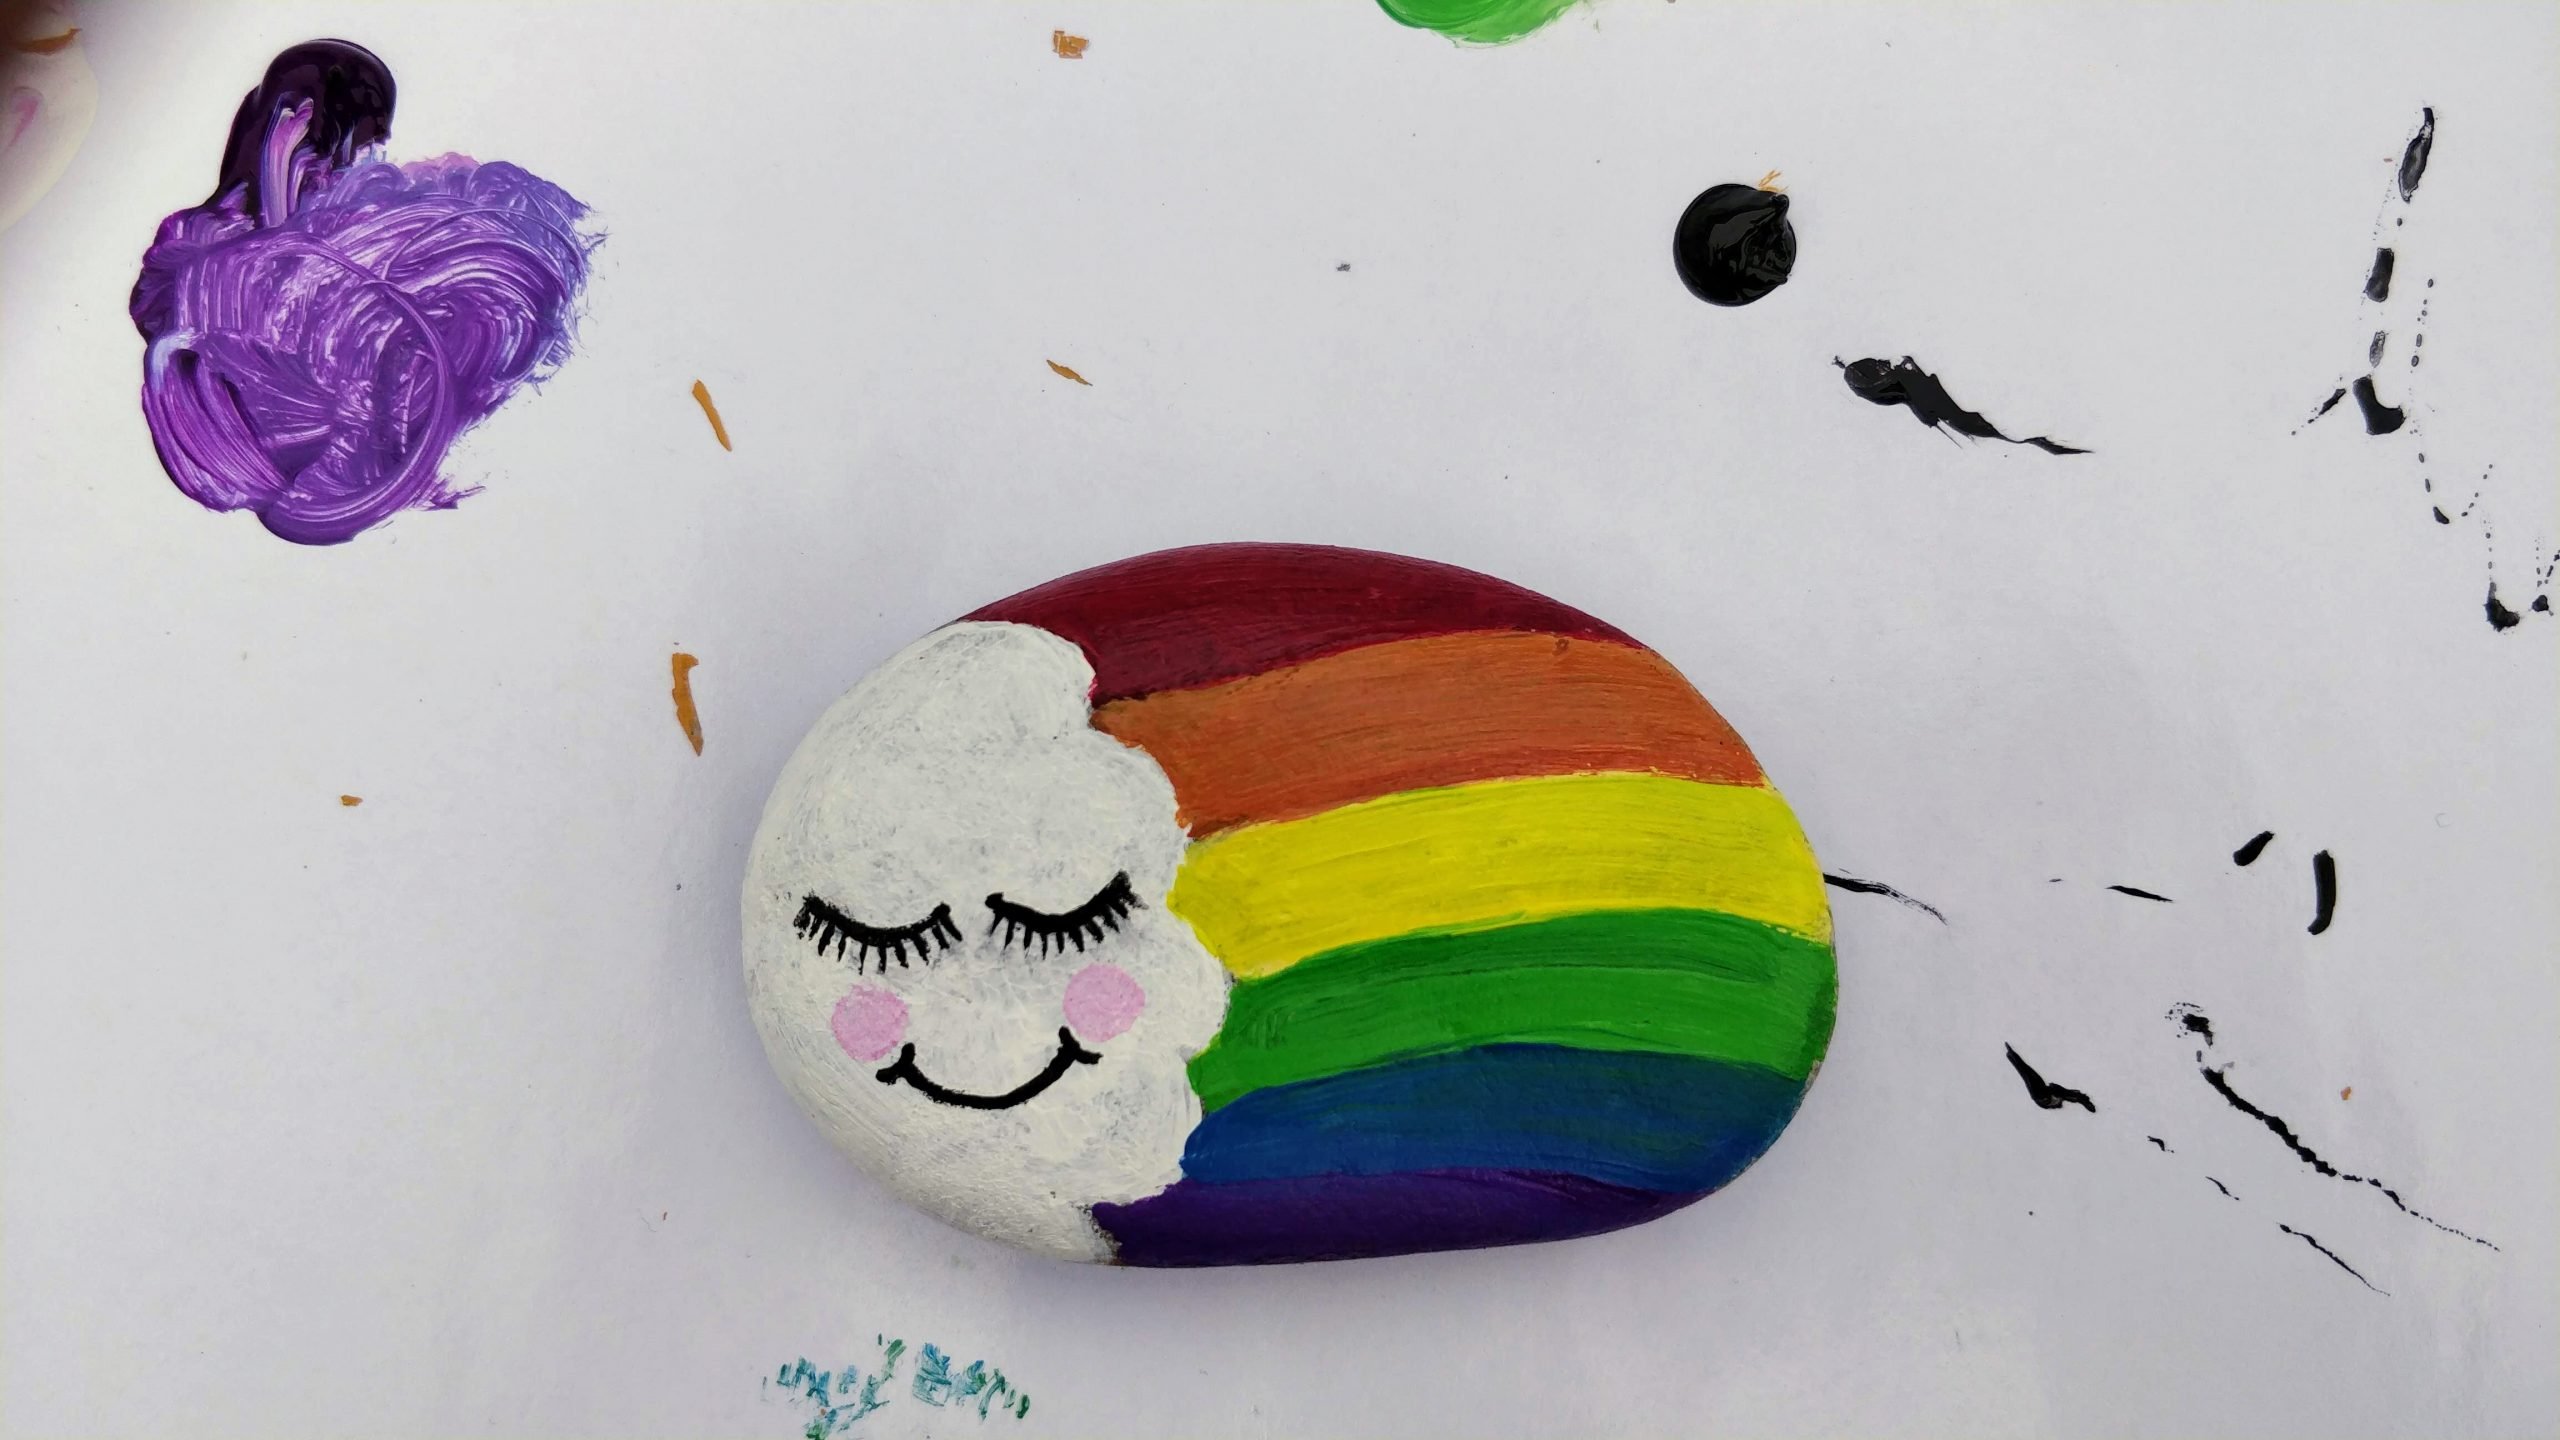
11. Easy Painted Rock Rainbow

Rainbows are always a joy to paint and color. Pair it with a happy cloud and this rock painting would make even Bob Ross proud! I found this "be a rainbow in someone else's cloud" rock painting idea on Pinterest and was inspired to recreate this happy piece!
12. Easy Rock Painting ideas for Kids

My 8 year old was super excited to paint rocks. She has seen friendship and kindness rocks being used in her classroom, so she couldn't wait to make her own batch to spread around our neighbourhood!
She went with the inspirational theme and added words of kindness and positivity to hers. Her fave was the rainbow "Be you" rock.
She used simple acrylic craft paints, a paintbrush, and used a black paint pen to write her words on at the end.
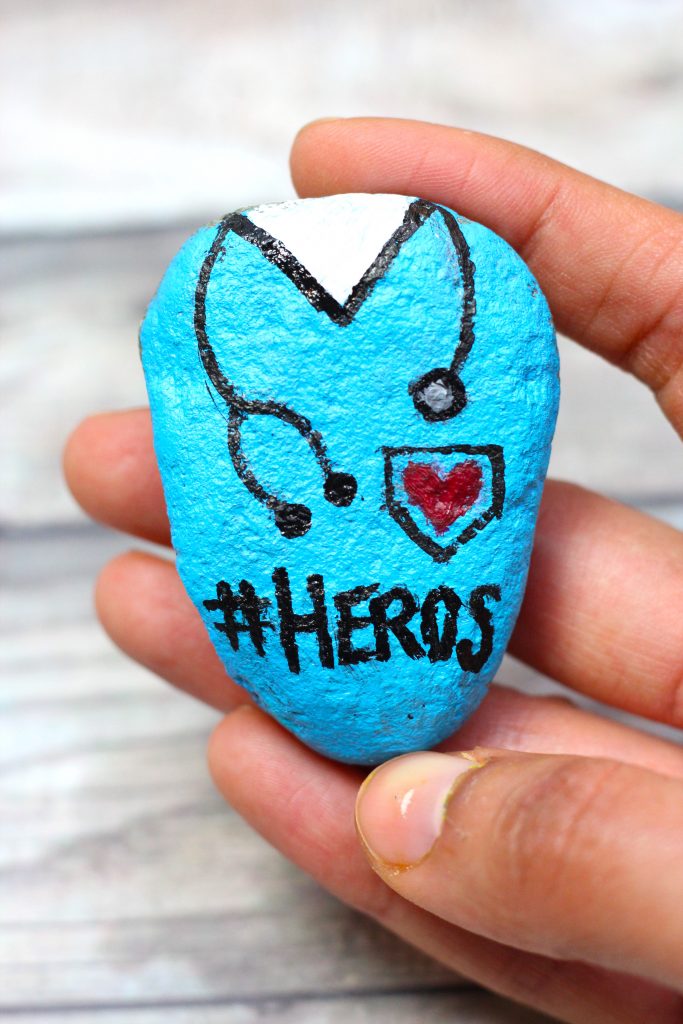
13. Nurse/Doctor gratitude rocks

This design is super easy to paint. Paint the background white. I then traced the design on with a pencil until I was happy with it. Then I use a fine-tipped paintbrush to paint on the heart/stethoscope, and the words. I realized after the fact that I spelled "Heroes" wrong (face-palm). If you're recreating this one-don't make the same mistake as me 🙂
14. Nurse/Doctor Thank You Rock #2
Here is another thank you design for nurses/doctors.
I used a blue which I mixed in with some white to make the medical "scrub" color. I used a fine-tipped paintbrush and then painted on the details and words.
15. Nurse/Doctor Thank You Rock #3
I found a rock that looked face shaped and I thought I could use it to paint a doctor/nurse as a part of my thank you series.
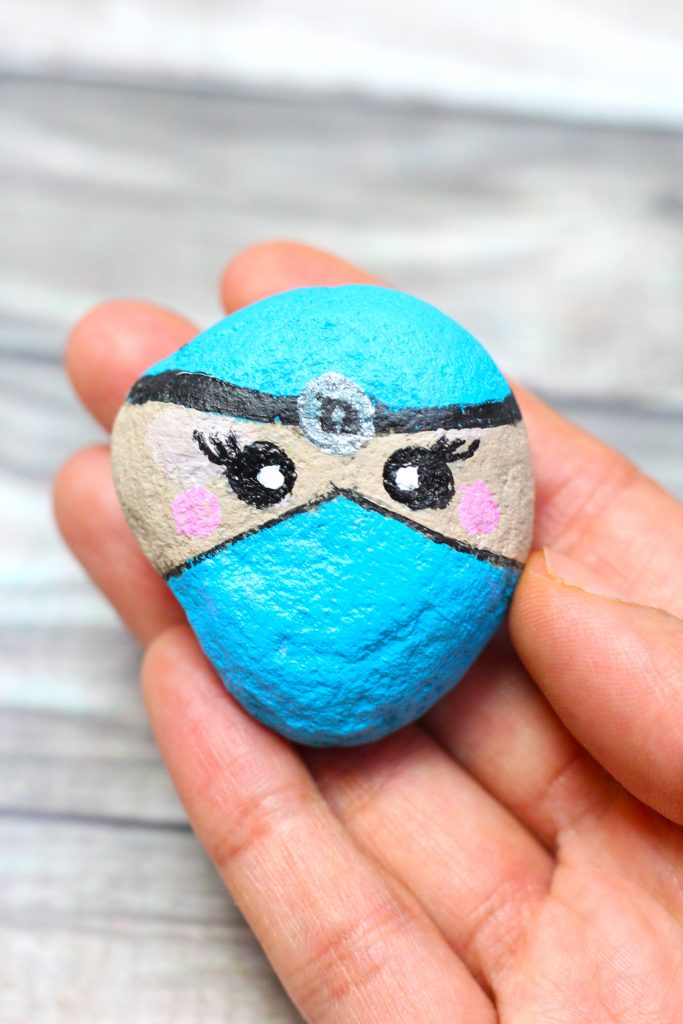
As above, I used a fine tipped brush to paint on the design. I made the pink cheeks perfectly round by using a simple Q-tip (it works amazing at creating uniform round shapes)
16. M & M Rock Painting (funny)

Have a rock that's broken or chipped? Use it for this funny "eaten" m & m candy rock painting. Just color in the broken/chipped parts with brown to make it look like chocolate - and you've got yourself a funny painted rock.
17. Rainbow Be Happy Quote Rock

Who doesn't get instantly happier when they see the magic of a rainbow? This rainbow inspired quote rock is easy and fun to recreate for all ages.
18. Pizza Painted Rock

This pizza looks almost good enough to eat! Customize your toppings like you would a real pizza and have fun painting in this cute rock.
19. Animal Painted Rock -Bunny

Paint a cute bunny for an animal inspired rock painting idea. Fun and easy for kids and adults and makes a fun easter craft too!
20. Flower Painted Rock - Rose

Roses are a fun and easy flower to paint on rocks. A single rose with some leaves is all you need for this rock design. This rose shape was inspired by how to paint roses tutorial.
What can you do with your painted finished rocks?
If you are looking for ideas on what to do with your painted rocks or your kids painted rocks after they are done, here are some tips and ideas to get you started:
- Hide them around your community as a part of the Kindness Rock Project (see below for details)
- Add them to your garden for a splash of color
- Add them to your seasonal decor
- Gift them as a birthday, mothers day, fathers day, Christmas presents
- Frame them in a shadow box
- Create magnets out of them
- Use them as desk decor or a paperweight
- Sell your rocks online
- Fundraiser idea
- Classroom craft project
- Rainy day craft at home
Kindness Rock Project
What is the Kindness Rock Project?
The Kindness Rock Projects' idea is fun and simple. Paint some rocks, any design will do- whether its a bright design, a quote, a kind word, etc. Then you hide them around your neighbourhood (or anywhere really), usually in plain sight though so people can actually find them.
Those who find the rocks can stop and enjoy and some even take pictures/selfies and post it on their local Facebook groups with a hint of where the rock is located, so that others in the area can go on a scavenger hunt to find them!
While some people like to share on social media this part is optional of course, the basic premise is creating a kinder world.
This project inspired my family to paint some rocks and place them around our neighbourhood. It was a positive and enjoyable activity for the kids (and adults) to do while stuck indoors this Spring. And it empowered us to feel like we were potentially putting a smile on someone's face.
While hiding rocks around your neighbourhood or in other public places is a great way to spread cheer there are a few rules to ensure it's a safe activity for all. Check out this leave no trace page to learn some best practices when it comes to placing rocks in nature.
How To Paint a Rainbow Rock
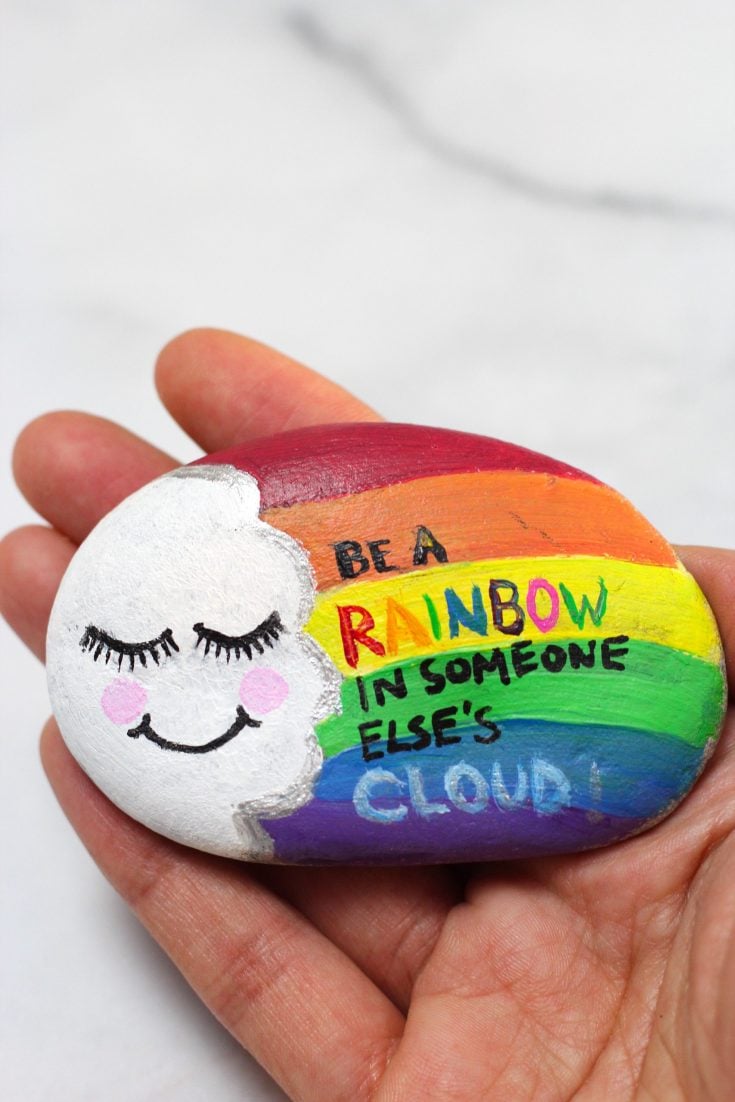
Learn how to paint a rainbow rock in this step by step tutorial
Materials
- Smooth Rock
- Acrylic craft paint (or paint pens) colors: Red, white, black, yellow, green, blue, purple, silver
- medium and fine-tipped paintbrush
Instructions
- Wash and dry your rock before painting (see article above for instructions)
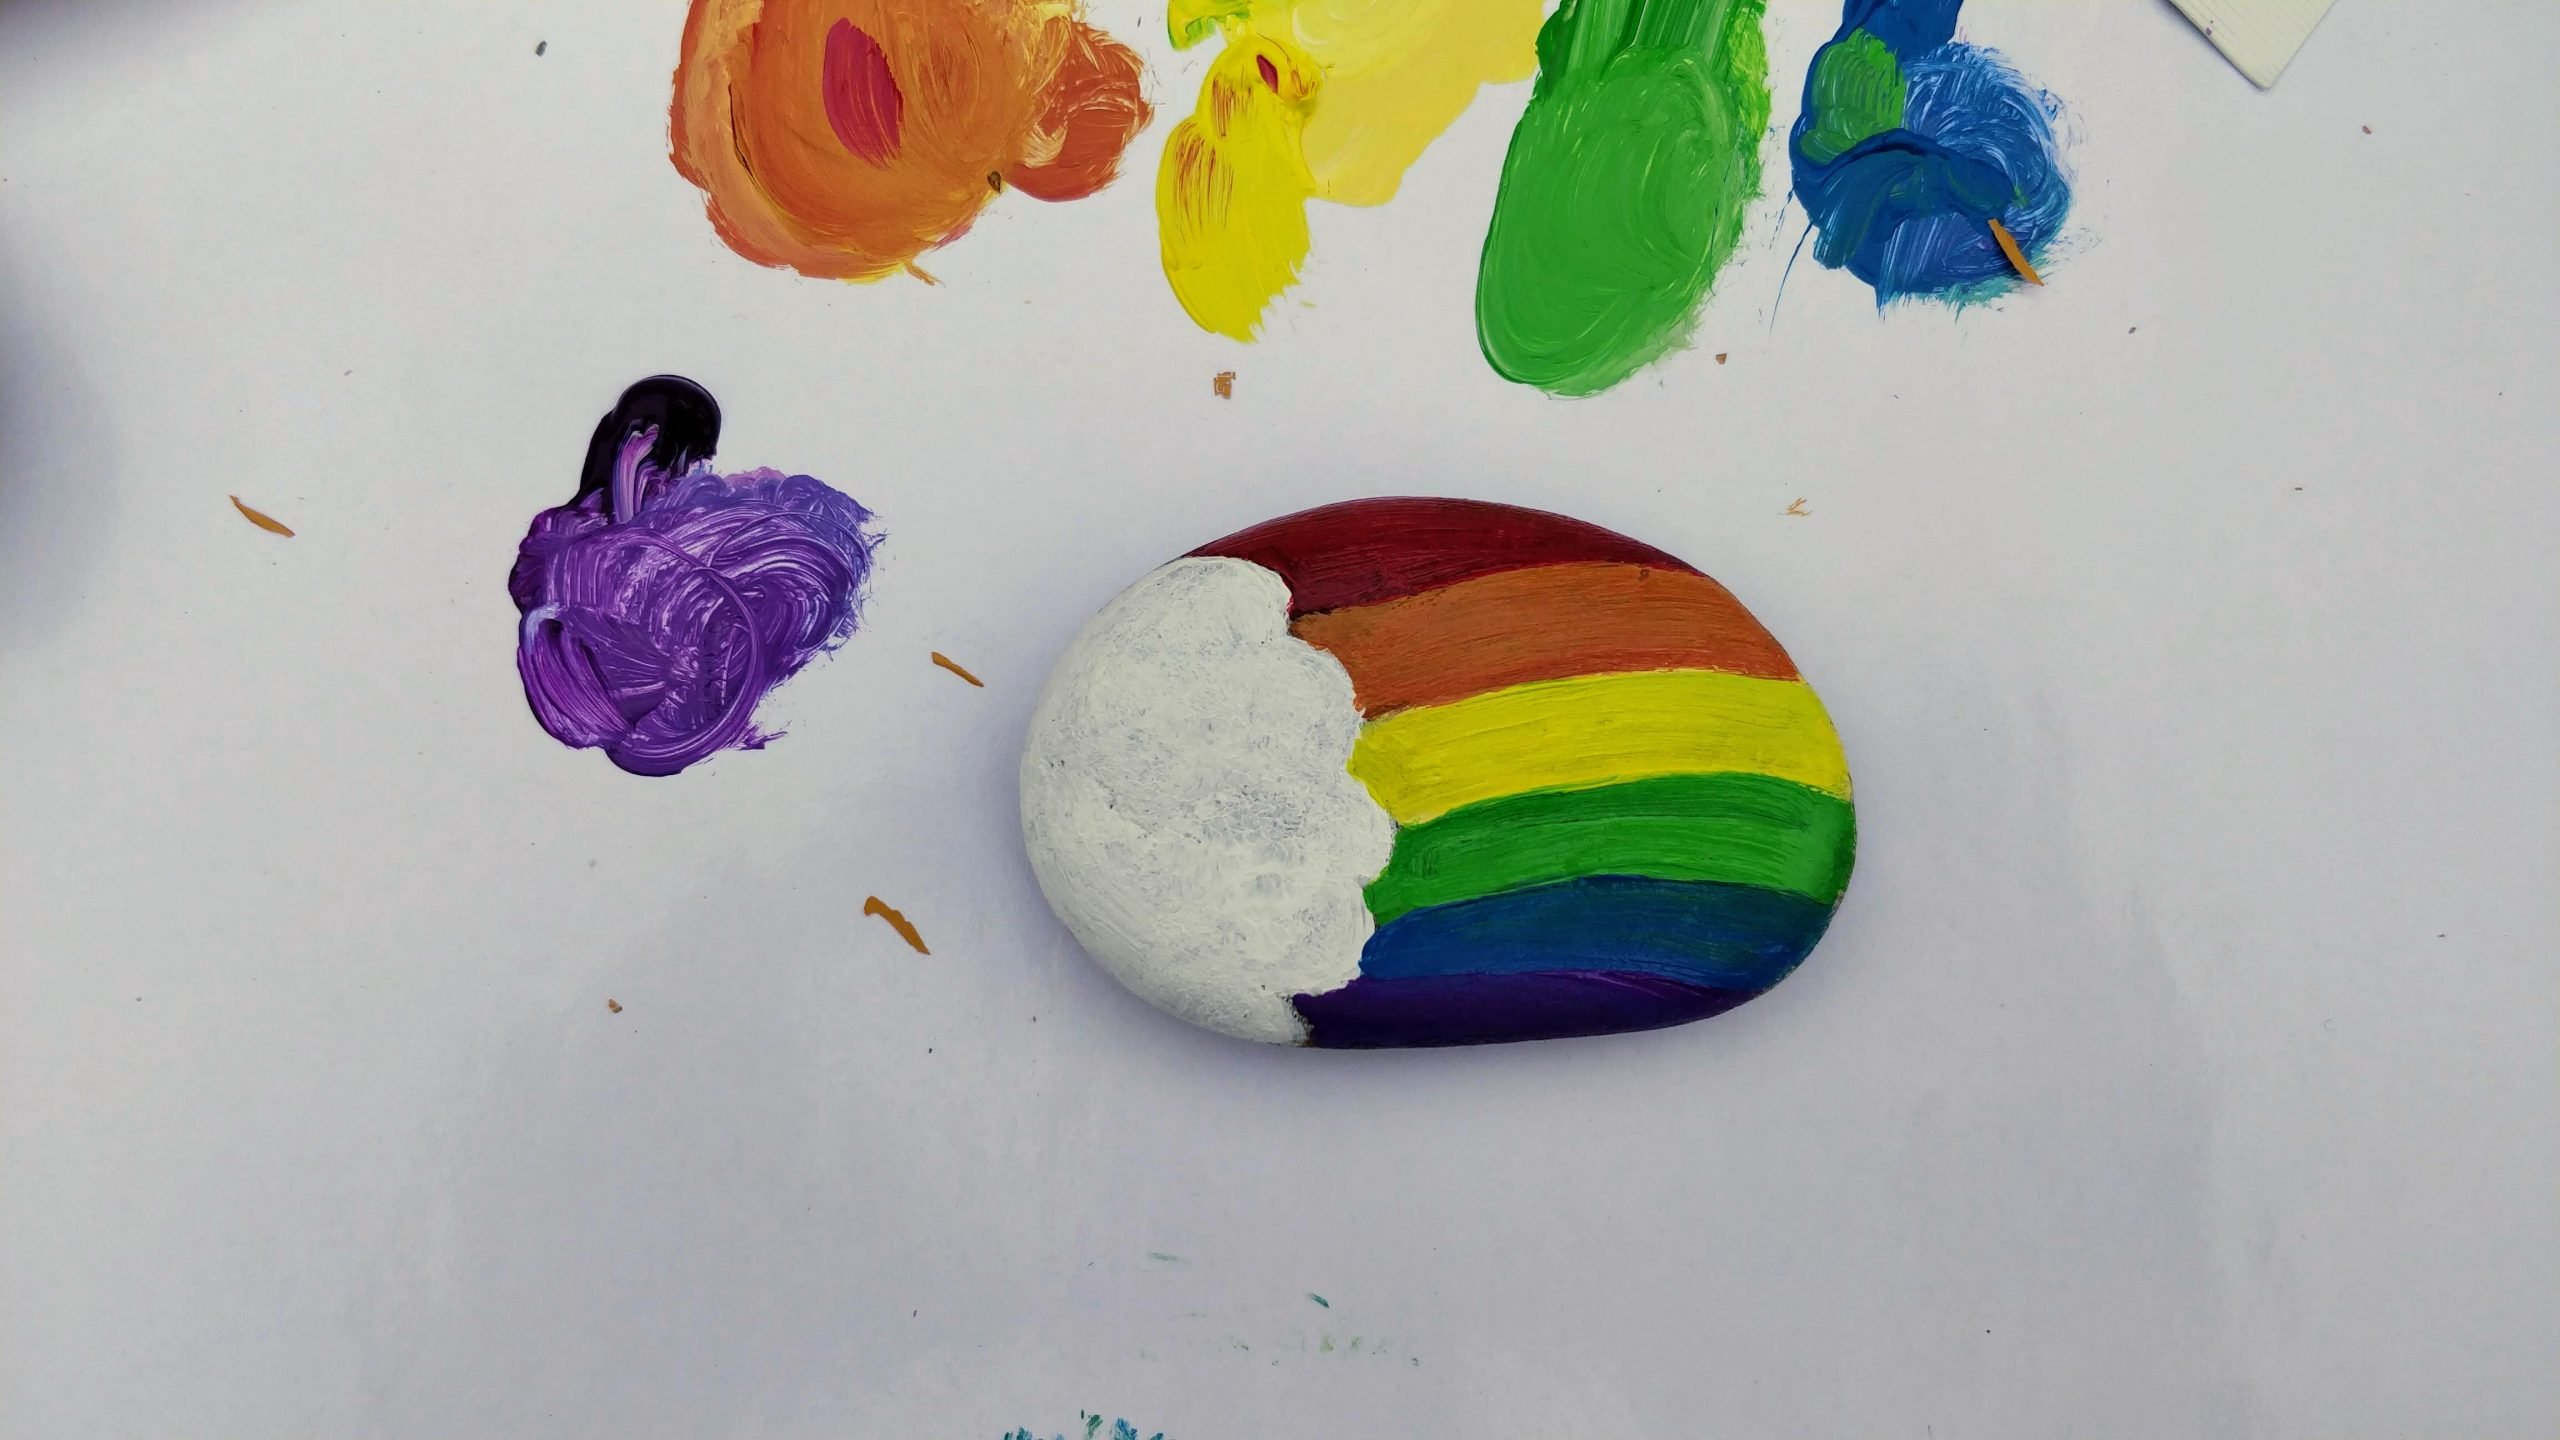
- Paint the cloud first with white paint then fill it in.

- Next using your medium paintbrush paint the top of your rainbow with red paint, followed by orange (just mix some yellow with the red to get a nice orange)
- Follow up the orange with yellow, green, blue and purple beams
- Use your fine-tipped brush to paint on the cloud face using black paint. Use silver paint to outline the cloud . To paint the pink cheeks use a Q-tip into your pink color (pink color= white+tiny amount of red)
- Finally, using your fine-tipped paintbrush or paint pens to draw on the letters for your favorite quote

- If you'll be placing your rocks outside you'll want to seal them. Use a brush on sealer or spray-on sealer to seal the paint to your rocks (more info above). Or watch this how to seal rocks video for more information.


Recommended Products
As an Amazon Associate and member of other affiliate programs, I earn from qualifying purchases.
-
 SC Johnson 623181 Q-Tip Cotton Swab, Standard, White (Pack of 500)
 -
Soucolor Acrylic Paint Brushes Set, 20Pcs Artist Paintbrushes Paint Brushes for Acrylic Oil Watercolor, Body Face Painting, Rock Painting Kit, Fine Detail Miniature, Beginner/Kids Arts Crafts Supplies
-
Acrylic Paint Pens for Rocks Painting, Ceramic, Glass, Wood, Fabric, Canvas, Mugs, DIY Craft Making Supplies, Scrapbooking Craft, Card Making. Acrylic Paint Marker Pens Set of 12 Colors
-
Liquitex BASICS 24 Tube Acrylic Paint Set, 22ml


Hope you enjoyed this rock painting 101 post, and have fun finding and painting your very own rock!
Here are some more pictures of the painted rocks above for you to enjoy:

If you liked this post please pin it!


I have some house paint left over (flat) will that work?
That's a great question... I haven't trued painting rocks with latex paint myself so not 100% sure. You could try it on a test rock and see if it adheres well and works.
Cheers,
Jasmine
Oops - You've got a typo on your rock! "Heros"
Thank you Katie! Big face palm moment 🙂 As Homer would say...D'oh!
Cheers,
Jasmine
FYI...Heroes is spelled with an “e”.
That was a big face palm moment when I realized I misspelled Heroes....thank you for pointing it out, appreciate it 🙂
Cheers,
Jasmine