Best Acrylic Flower Painting Techniques for Beginners
The beautiful strokes of the brush against the canvas and different shades of paint delicately layered on top of each other may make the art of acrylic flower painting look intimidating and complex. However, you’ll be glad to know it’s anything but that.
Painting inspires creativity.
It serves as the perfect emotional outlet for those looking to let go of their stress and anxiety.
It also fosters positivity, improves motor skills, and strengthens memory. In addition, it is one of the most fun hobbies you and your kids can do together.
So, whether you're learning acrylic painting to unwind or relax after a long day at work or want to enhance your artistic skills, or looking for easy painting ideas, I've put together some simple and easy tips on how to paint flowers that all beginners will find helpful.
Once you ace these techniques, you will be able to take on more challenging compositions and create some truly stunning masterpieces all by yourself. If you'd rather watch a video tutorial you can checkout the full length flower painting tutorial on YouTube here.
If you want even more ideas than the ones below, check out this 53 flower painting ideas post. The post includes flower painting tutorials like lavender flowers, sunflower, roses, lilies, and hydrangeas.
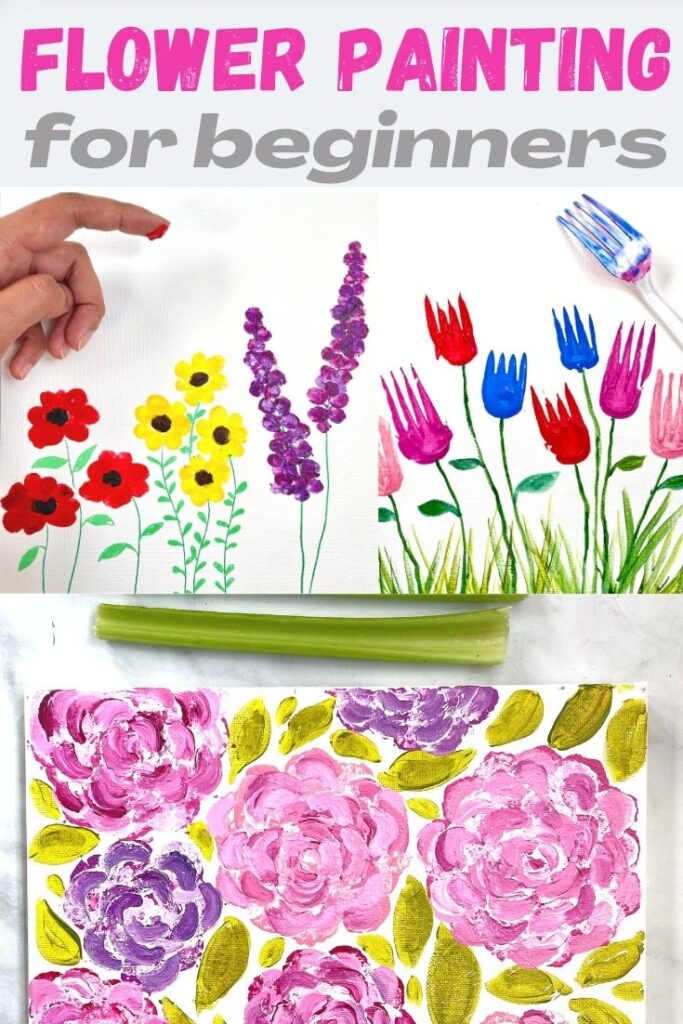
1. Flower Painting with Q-Tips
Want to instantly upgrade your painting skills? Buy a box of Q-tips and get started!
Though most people might not realize this, these small ear cleaners are a perfect tool for painters of all levels. You can use them to create mesmerizing landscapes, gorgeous trees, and of course, exquisite flowers.
Before you start your Q-tip acrylic painting, spend a few minutes observing the shape of your chosen flower. Count its petals, take stock of its overall shape, and then draw a rough sketch on the canvas.
Next, bind four to five Q-tips with an elastic band and dip the bundle into acrylic paint. Once all the tips are coated with the pigment, make sure to firmly press them down on the canvas to create full petals. Repeat the process as many times as required to create a beautiful bouquet or garden.
This trick works best for cherry blossoms, lavender (below), and hydrangeas. Make sure to check out my video tutorial below to see this acrylic flower painting technique for yourself!
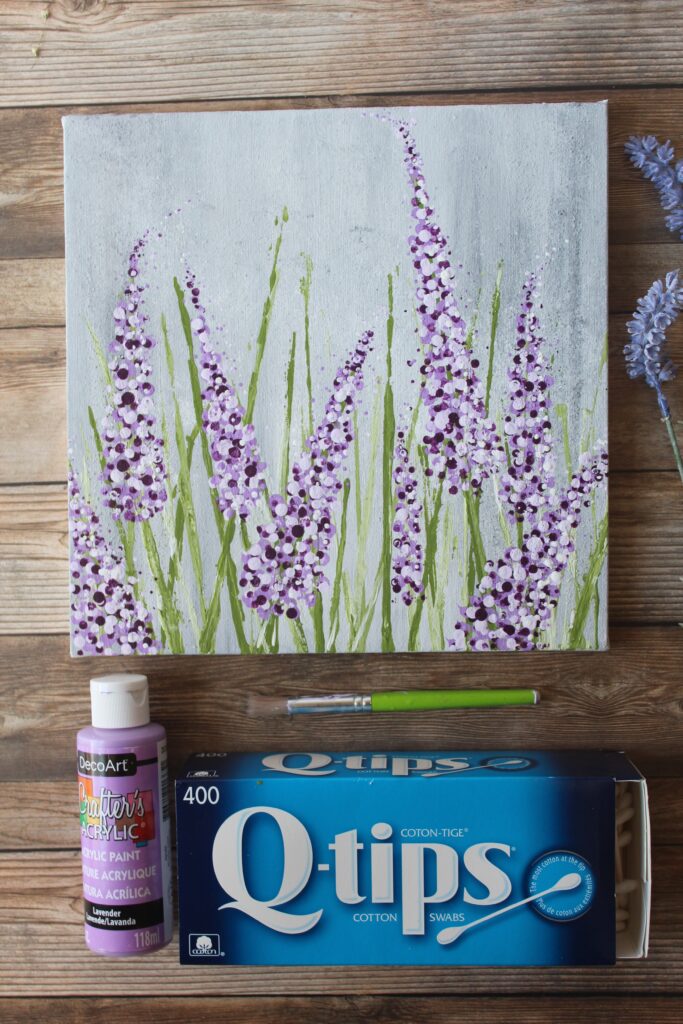
Important: Make sure to press the Q-tips firmly against the canvas. Otherwise, this tip on how to paint flowers may not give desired results. You can also use each of these hygiene tools separately to add some finishing touches to your artwork.
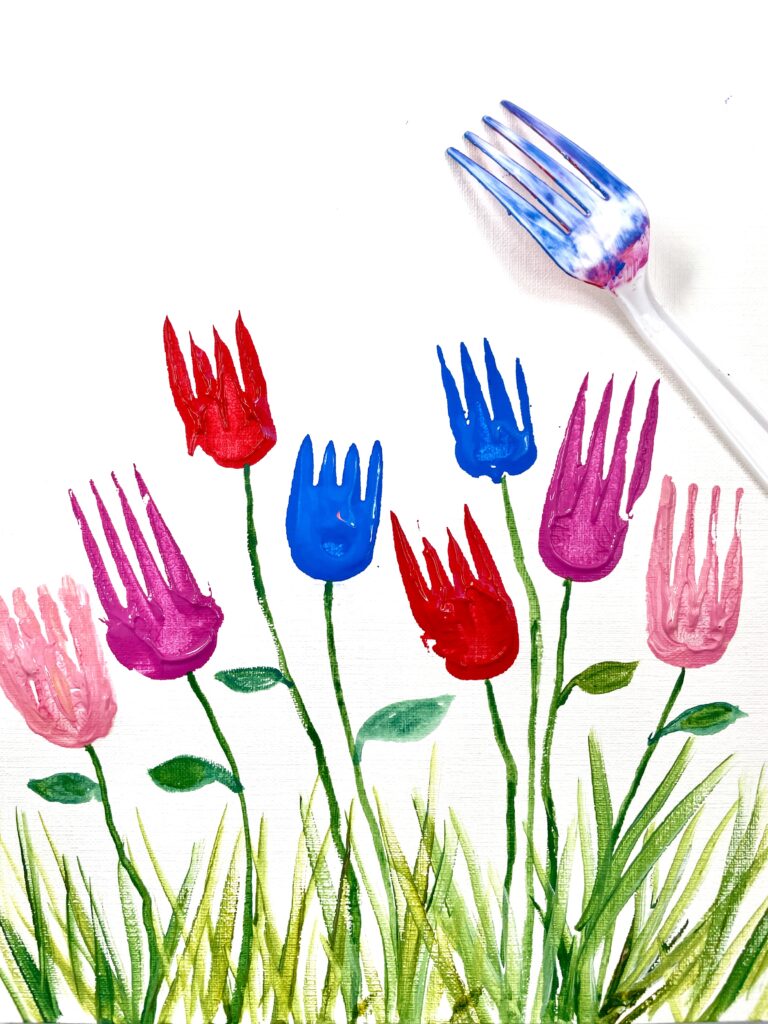
2. Easy Tulips with a Fork
Take a trip down memory lane and revisit your kindergarten days with this fun yet helpful technique to paint acrylic flowers. It makes a fun and easy spring time craft project for kids too!
To start things off, paint a vase with a few stems and leaves on your canvas. It doesn’t have to be completely symmetrical or detailed, but it should provide you with a base to complete your unique tulip flowers.
You can take a regular fork and dip it into bright acrylic paint before pressing it onto the canvas like a stamp. If you are satisfied with the impression, clean the fork and dip it into another color to create a vibrant painting. Meanwhile, if you think the fork hasn't done a great job transferring the paint onto the canvas, try and press it more firmly against the surface the next time.
Consider using forks of different shapes and sizes to add some texture and depth to your tulips.
So, the next time you and your kids are looking for something fun to do together, fish some forks out of your cutlery drawer and get painting.
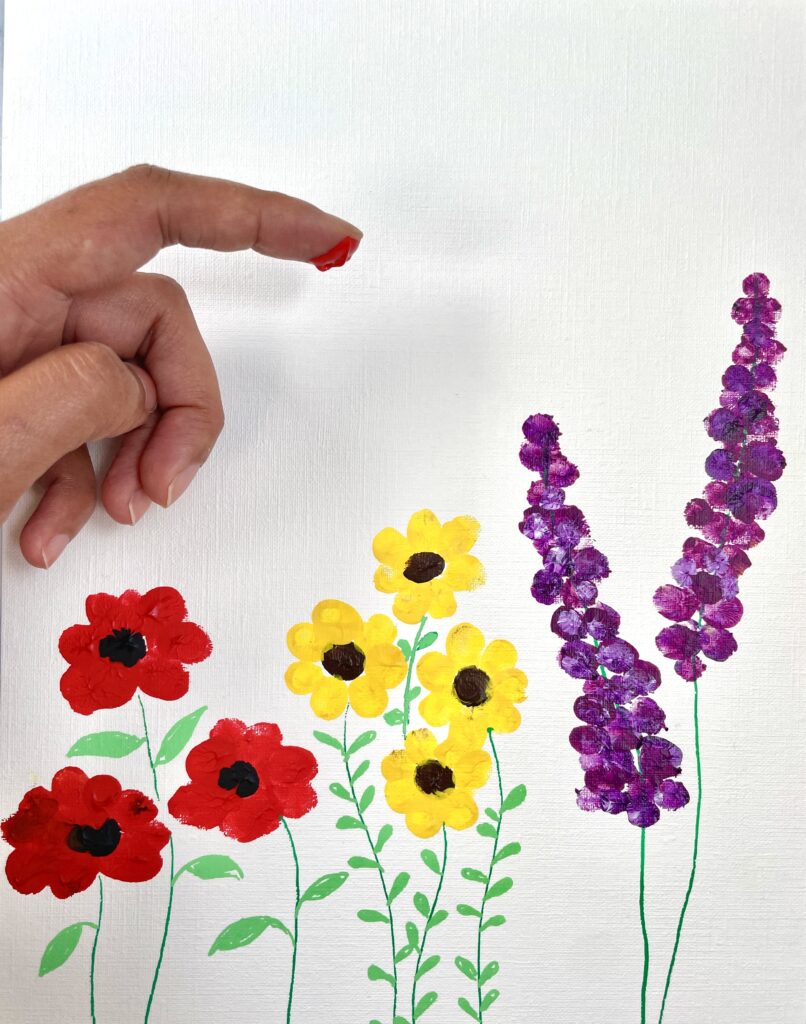
3. Fun Flower Painting with Fingers
If you are a beginner wanting to learn how to paint flowers, you’ll love this technique.
Although many people think finger painting is meant for children, the truth is that you can create incredible artwork using your hand as tools.
From painting glorious macaws to enchanting cityscapes, there isn’t anything you can’t create with some paint on your fingers.
The first step to painting flowers with your fingers is to familiarize yourself with the shape of your subject. It will allow you to create a rough sketch of the flowers before getting your hands dirty – literally! Next, dip your fingers in your favorite acrylic color and start dabbing on the canvas.
Once you are satisfied with your creation, wash and dry your hands thoroughly before picking up a paintbrush to fill in the missed spots. You can also use your brush to draw the stems and add more details to your painting.
This acrylic flower painting technique works best to create lilacs, cherry blossoms, poppies, lavender, hydrangeas, dahlias, and sunflowers, to name a few.
NOTE: If you have just started acrylic painting and are looking for some guidance, please make sure to check out the comprehensive Acrylic for Beginners Bundle: A-Z Guide to Your First Acrylic Masterpiece. This bundle includes an 87-page e-book, free video courses, detailed blending techniques, and a handy shopping list for basic painting supplies.
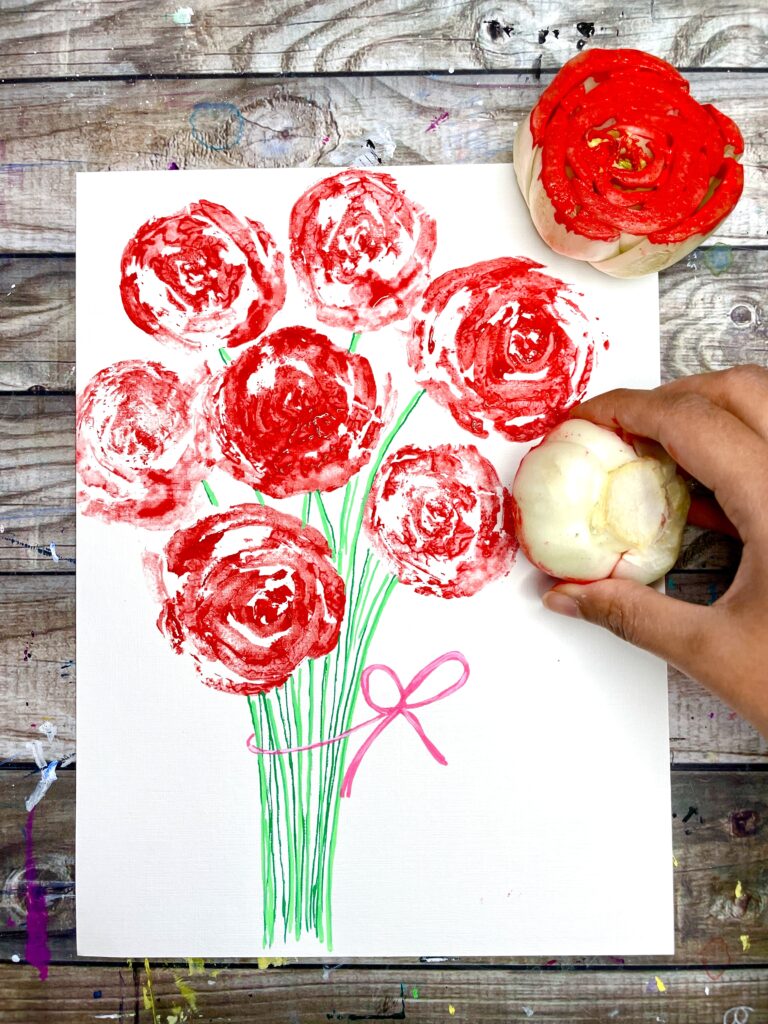
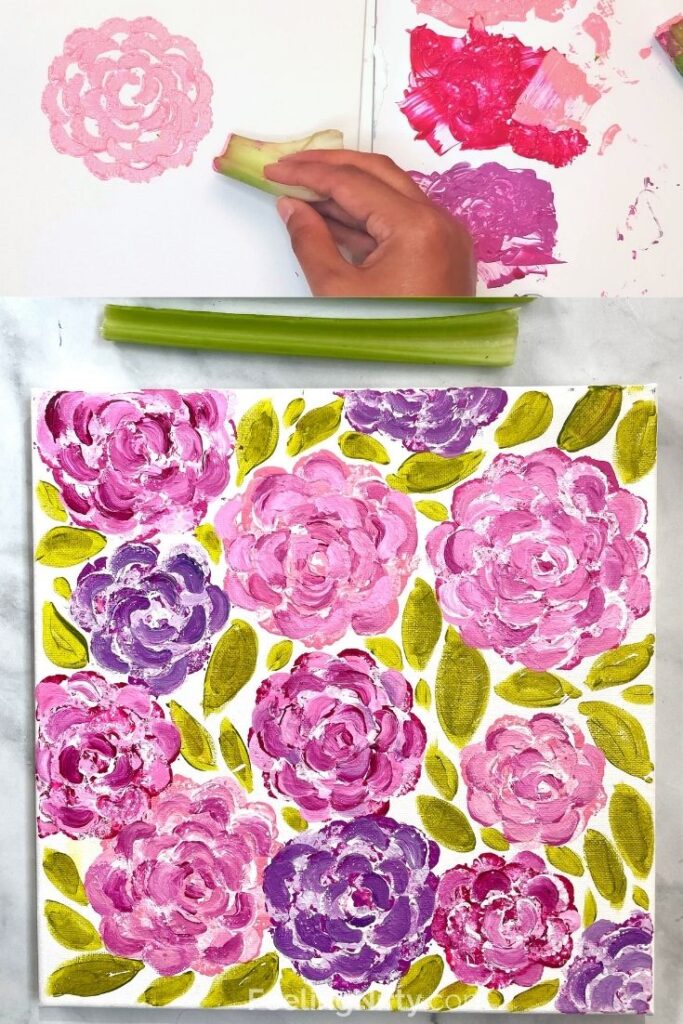
4. Paint Easy Roses With Bok Choy
Instead of tossing out the root ends of Boy Choy (or celery) use them as rose stampers! These fabulous patterned vegetables make easy and nifty roses in a jiffy.
Use the stamper to paint a beautiful bouquet of roses (like the picture below) or use the stamps as a pattern on material/fabric, DIY wrapping paper, DIY cards and gifts or even in an art journal. It also makes a great craft for kids for valentines day and mothers day.
To make these bok choy roses, simply cut off the ends (2-3" from the bottom). The key to making your stamped roses come out gorgeous it so make sure the vegetable is cut as flat and even as possible so that the cut part lays evenly on your surface when stamping. This will make sure the paint goes on evenly on your canvas.
Another tip is it make sure your acrylic paint is a nice thin consistency. If your paint is too thick, thin it down with a bit of water, like a thick soup consistency. I like to to brush on my paint on the bok choy for even coverage, but you can also dip it in your paint. Watercolor paints would also work nicely here.
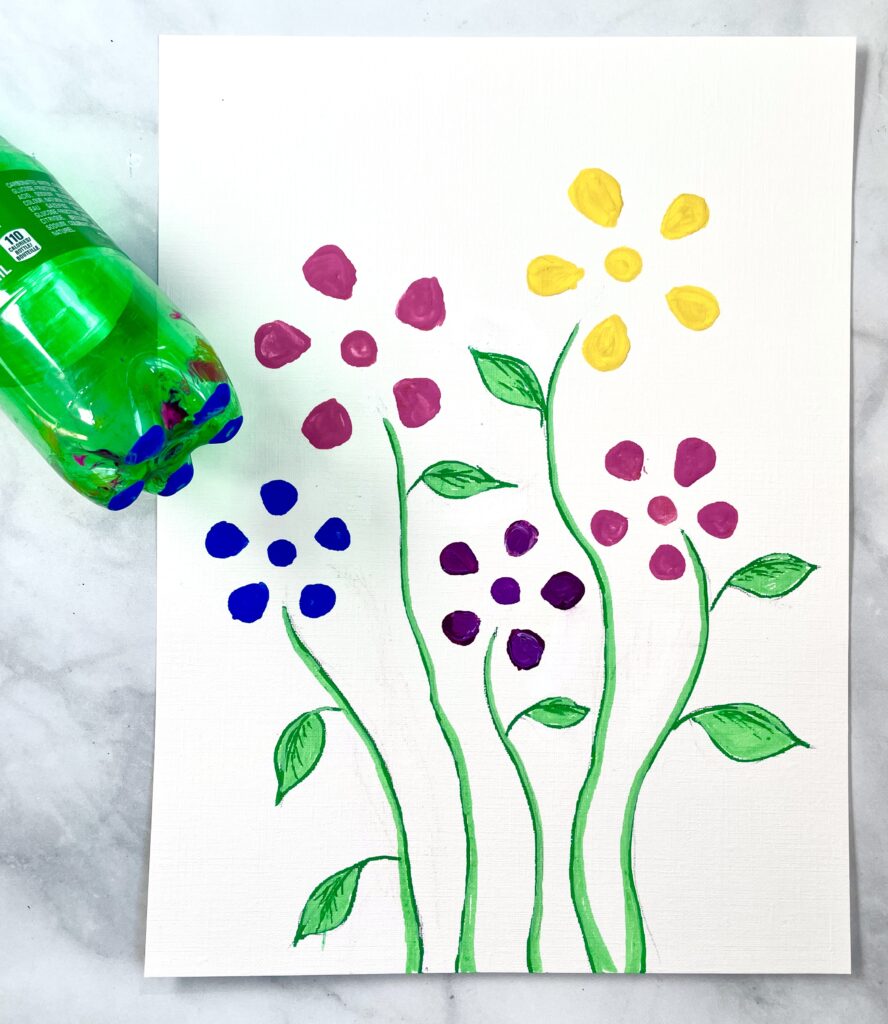
5. Simple Flower Painting with Plastic Bottle
If you are a beginner who has never painted before, you should consider using this technique to draw your first flower painting.
The first thing you'll have to do is find an empty soda or water bottle/ juice bottle with a raised bottom with five distinct divisions. Make sure to clean the plastic with a cloth before covering the bottom of the bottle with paint. Next, firmly press the bottle onto the paper or canvas to create a perfect impression of a five-petal flower.
If you are drawing a bouquet or a garden, you may have to repeat the process a couple of times before cleaning the bottle and covering it with new acrylic color.
Once you are happy with what you have created, use a paintbrush to fill in the blank spaces and draw the stems to connect everything together.
In case you don't want to use a brush, consider using your fingers to paint the leaves and add other details.
On a side note, if you are looking for ways to personalize your water bottle, our DIY Hydro Flask painting ideas and tips will surely help you out.
6. Flower Painting with Okra and Green Beans
Did you know you could use okra as a stamp to create small and delicate flowers?
To use this acrylic painting tip for beginners, take okra and cut it through the middle to take out as many seeds as you can. Since this vegetable can be particularly sticky, make sure to blot it out on a kitchen towel before dipping it in paint.
Depending on the flower you are painting, you can dip the okra into more than one color before stamping it onto the canvas.
You will probably have to dip the vegetable into the paint multiple times to create a complete flower. If you want to add a few more petals in a different hue, consider using new okra for the purpose.
Now that you have your flowers, it's time to paint the stems and leaves using green beans. All you need to do is dip the bean into green paint and stamp it sideways onto the canvas. You can also dab it a few more times to create an impression of grass.
7. Painting Chrysanthemum Flowers with Celery
Painting or printing flowers with vegetables is a fun and easy painting idea for both kids and adults. Like the Okra/green beans and bok choy above, there are many vegetables to choose from. Another one of my favorite techniques is using a celery stalk to paint chrysanthemum flowers.
Wash and fully dry a stalk of celery, then dip one end of the celery in acrylic craft paint. Stamp down on your canvas or paper to create a rose petal. repeat this stamping technique in a circular pattern to paint the whole chrysanthemum flower.
Extra tip: Use darker colored paint for first layer of the flower. Wait for the layer to dry, then re-layer the same pattern with a lighter paint color to create depth and dimension to your flowers.
Final Thoughts
Flower paintings are nothing to be scared of. Even if you are still learning about different brushes or don't feel too confident using them, there are a lot of creative ways you can paint show-stopping floral designs without breaking a sweat.
Whether you choose Q-tips, forks, plastic bottles, okra, celery or go all-in with your fingers, the bottom line is that you should have fun creating your flower painting.
If you put your heart (and some effort) into your artwork, you can even frame and display it in your living room or hallway. It would be a perfect way to add a pop of color to your home décor while providing an excellent opportunity to highlight your talent.
For more tips, don’t forget to check out my complete collection of acrylic flower painting ideas and tutorials.


Excellent Practice and Create Flowers = My Favorite is Fork Made Tulips
Thanks so much Rose! I love the tulips too - they're fun!
Cheers,
Jasmine
Your content is being shared without credit in a facebook group called Crafty Fun Group. ‘Digital creator’ Mackenzie Rose is posting dozens of ideas from others without due credit or any attribution. I can send you a screenshot if you want via email.
Thanks so much Becky, I really appreciate you letting me know. I will take a look at the group.
Cheers,
Jasmine
I love all YOUR techniques and creations!!!
Awww, thank YOU so much- that's such a beautiful thing to say!! Really appreciate that 🙂
Cheers,
Jasmine