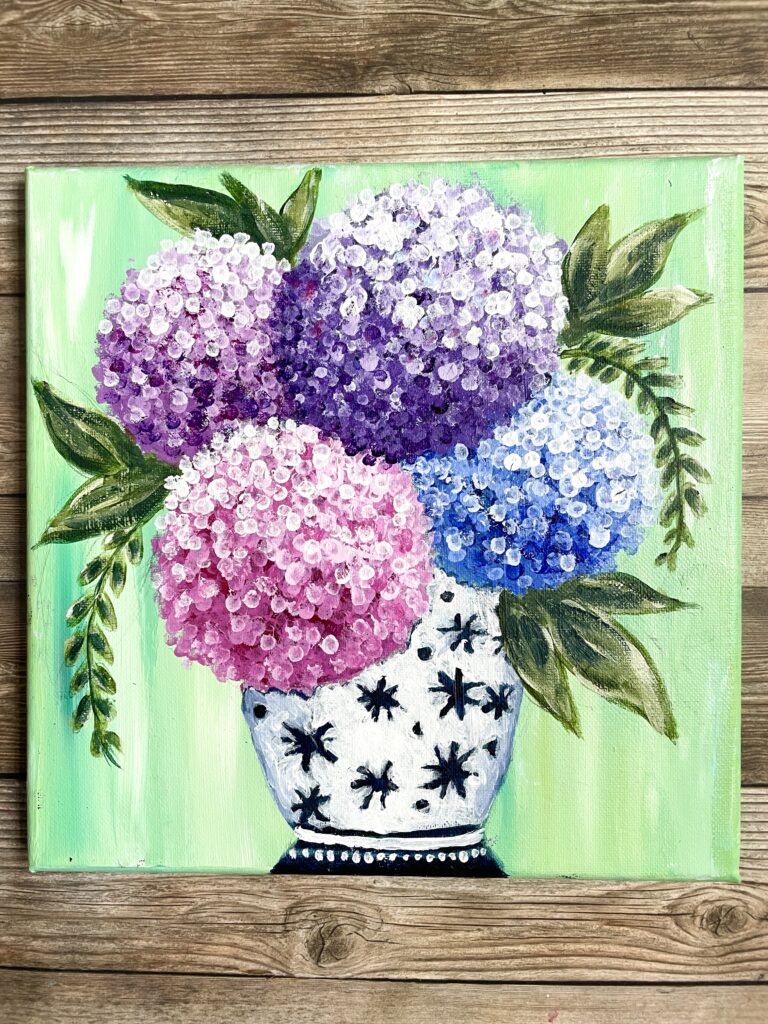
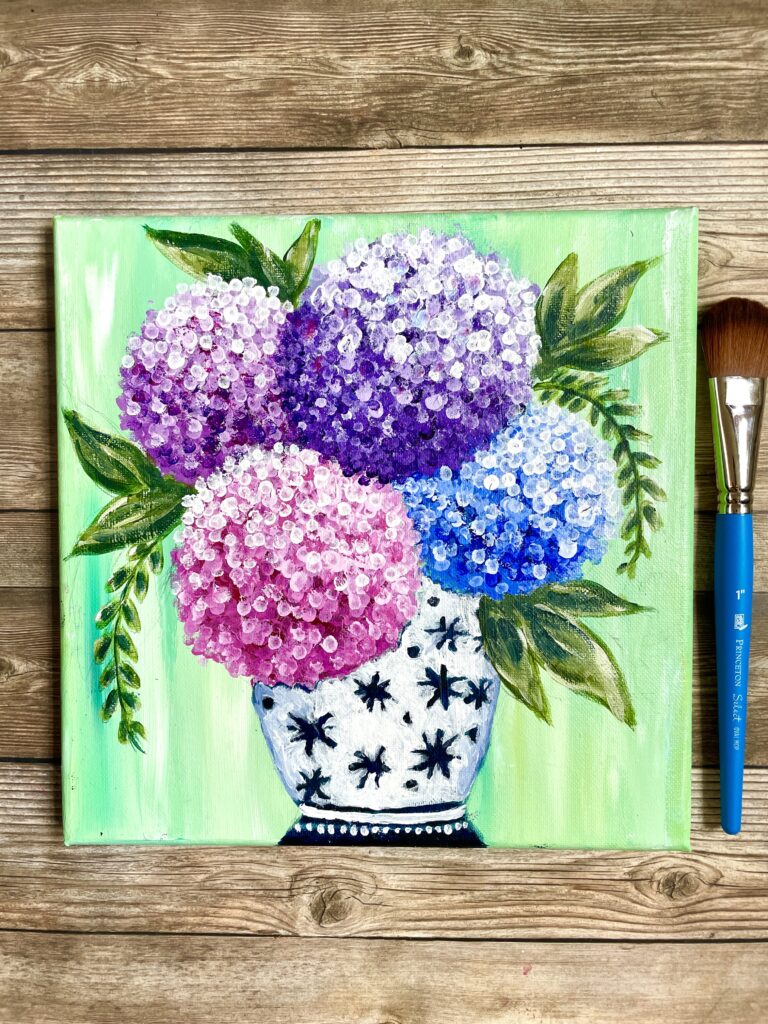
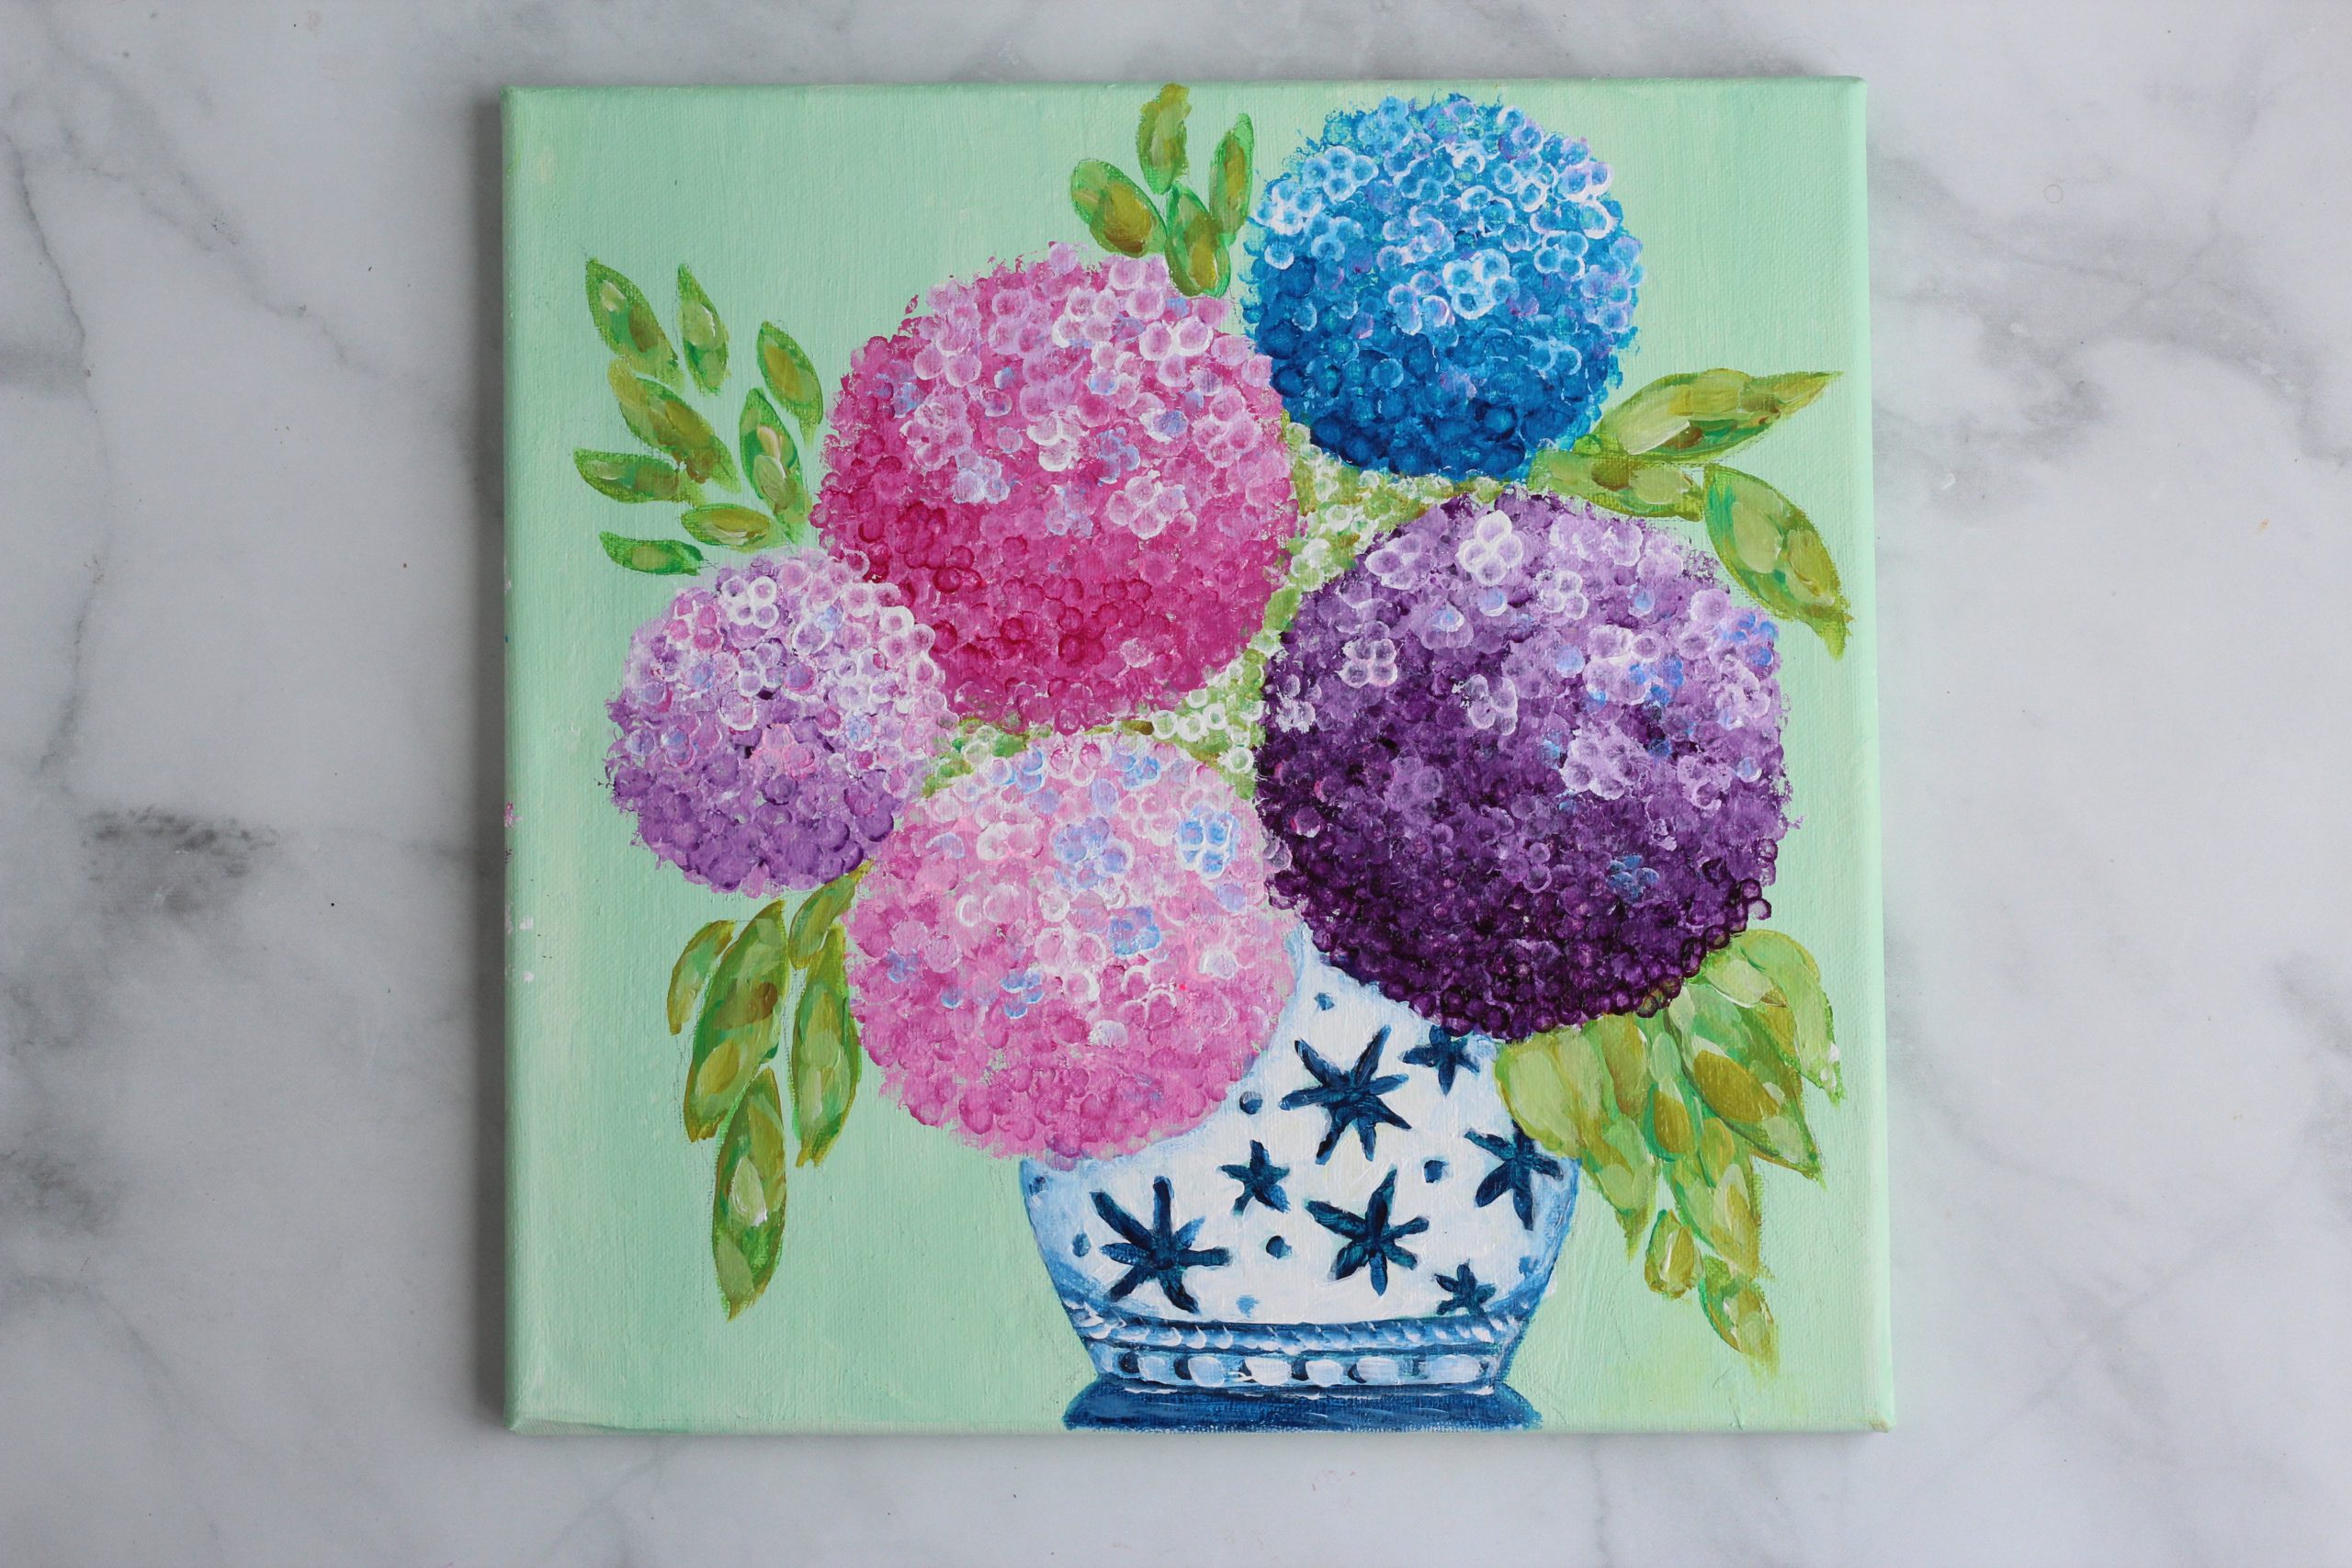
How to Paint Hydrangea Flowers in a Jar using Q-tips/ Bubble Wrap
How to Paint Hydrangeas Step-by-Step Tutorial
Learn how to paint Hydrangeas in this step by step painting tutorial.
Hydrangeas are easy flowers to paint when you break down the steps and use simple painting tools. In this tutorial, I teach you how to use Q-tips to mimic the beautiful flowers on the hydrangea globe- which works perfectly for beginners with acrylic paint.
And, this technique is fun!
If you've done any of my other beginner Q-tip painting tutorials and enjoyed them, then you're going to love this one. If you haven't done one yet, you are in for a treat! I'll introduce you to one of my favorite painting tools, the simple household Q-tip/cotton swab, and teach you how you can use them to paint lovely Hydrangeas.
If you're looking for more easy flowers painting techniques check out the post.
How to Paint Hydrangeas Youtube Tutorial
Hydrangeas Flower Colors
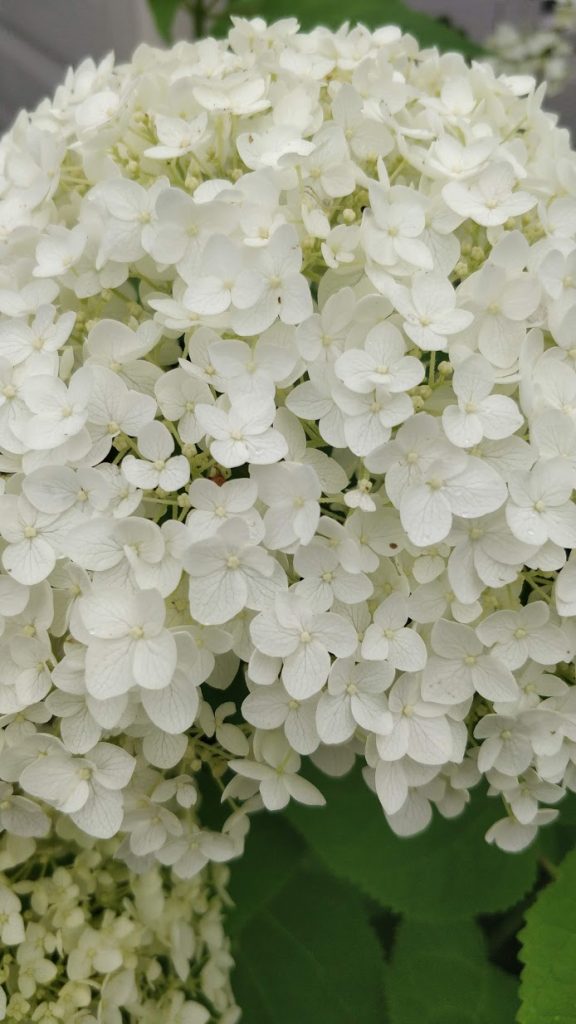
You can use the following hydrangea pictures to help inspire you with the shapes, colors and patterns, leaves of the hydrangea blooms.
In terms of hydrangea flower colors, they come in tones of pink, purple (violet to lavender), blue, green and white. In terms of intensity they can be vibrant and saturated or more muted and pastel like.
The hydrangeas in the picture below are from my garden and were given to me (and planted) by my mother 10 years ago, whose an amazing gardener and a self-made flower connoisseur. I wasn't lucky enough to be passed her green thumb- but because Hydrengeas are so hardy and low maintenance, mine bloom beautifully every year without too much extra care.

How to Paint Hydrangeas for Beginners
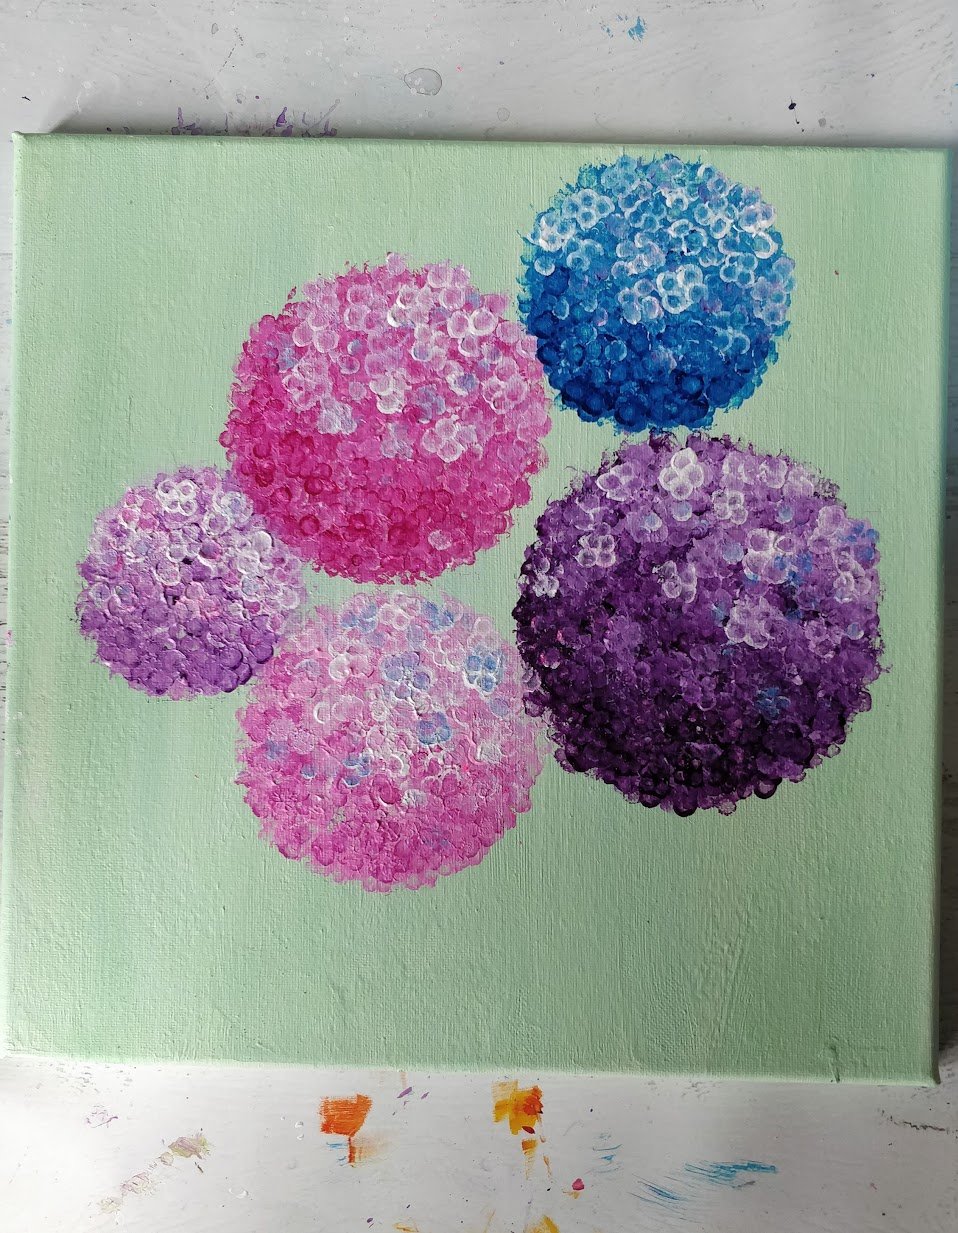
If you take a close up look at Hydrangeas, they're simply a globe of mini flower. And each mini flower has 4 petals. That's all you really need to remember when making this tutorial.
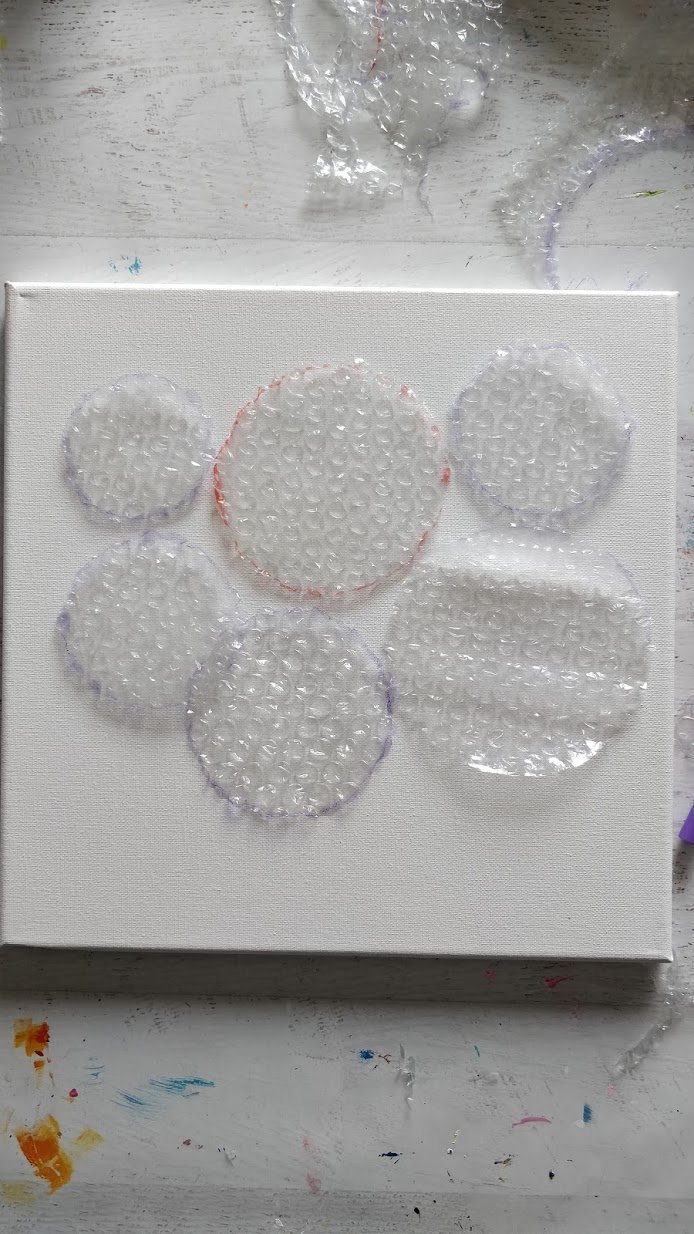
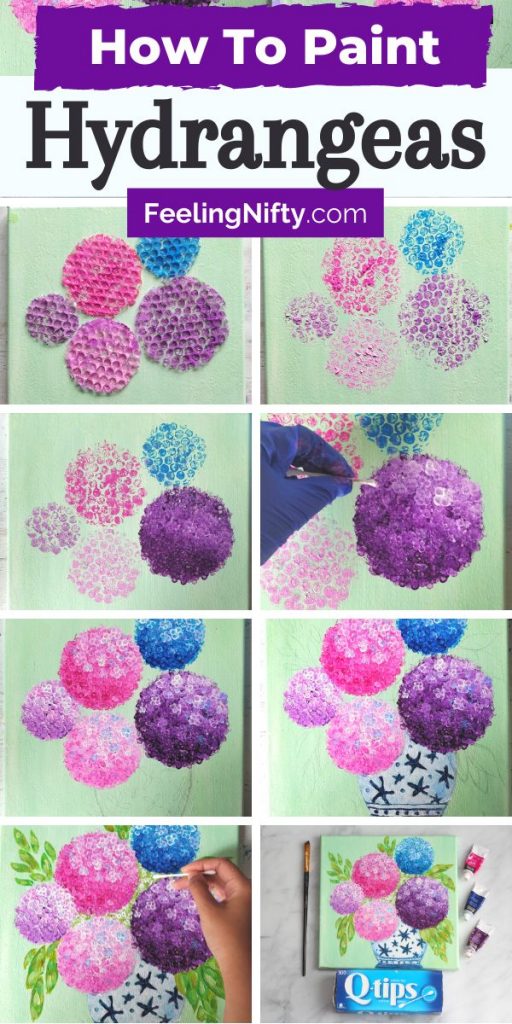
How to Paint An Hydrangea Globe with Bubble Wrap
Since the overall shape of Hydrangeas is round like a globe, one option is to trace circles onto your canvas before you start painting them. This helps to to know where to paint your mini flowers for each Hydrangea. You can also vary the size of each circle to keep the painting composition interesting.
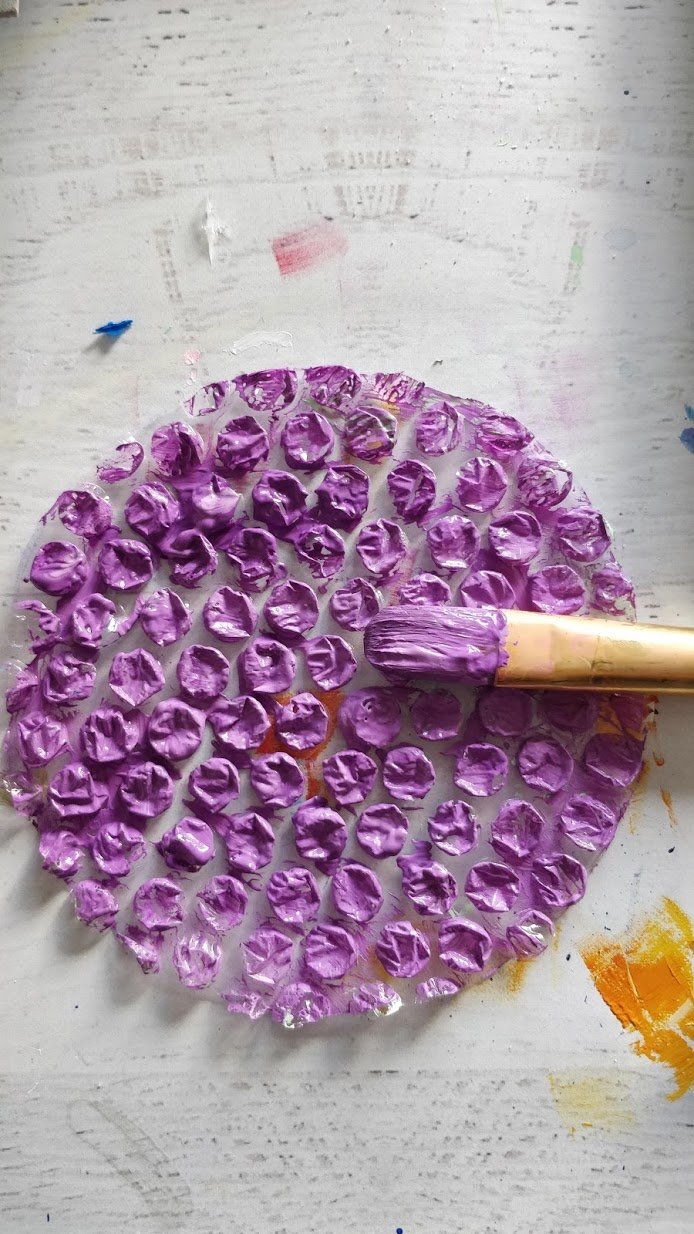
Another super fun option is to use bubble wrap, if you have some laying around!
The bubble wrap method is optional. Check out the video tutorial and I'll show you the alternate method without bubble wrap.
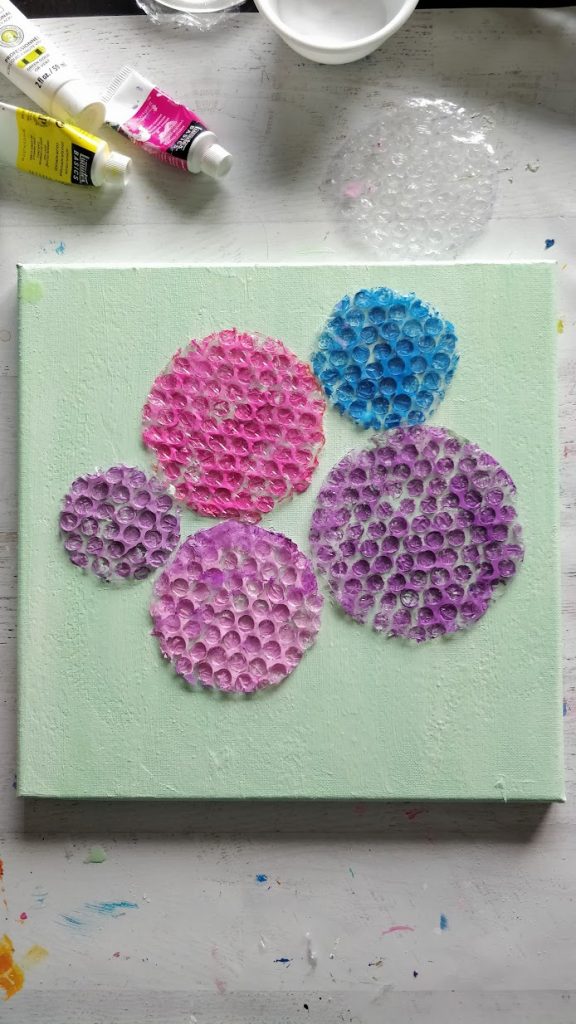
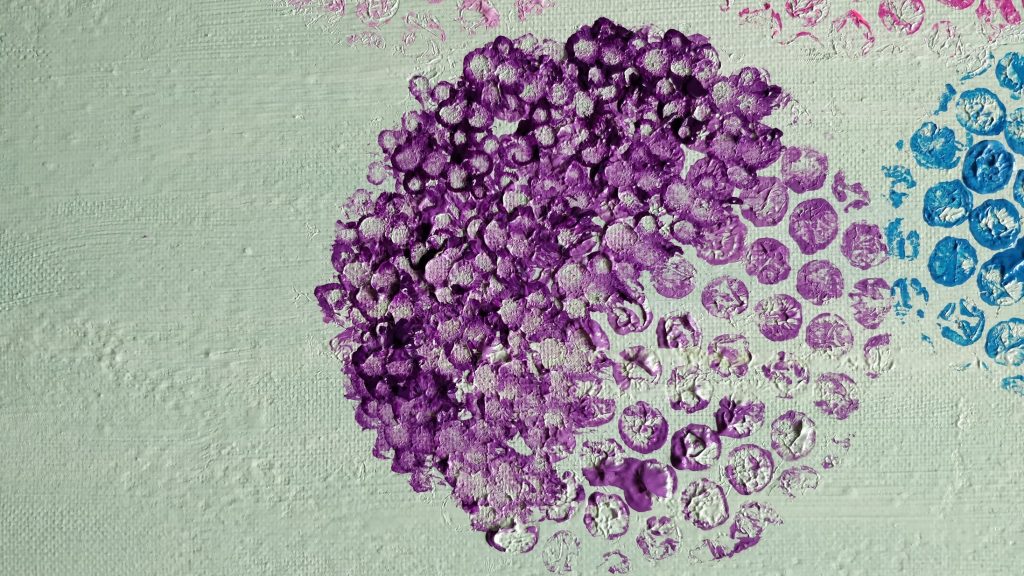
I cut varying sized circles from my bubble wrap, then brushed on paint onto one side and "stamped" it down on the canvas where I wanted them to go. It gives a super nifty texture - I am so using this technique again in an abstract piece!


How to Paint Hydrangea Mini-Flowers with Q-tips
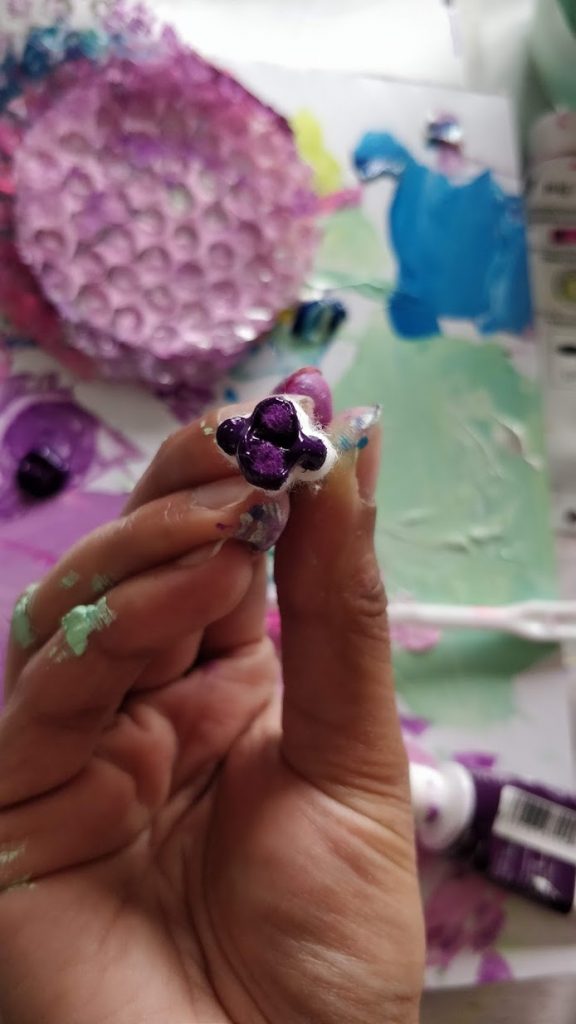
Once you have your basic hydrangea globes in place using the above techniques, you can start having fun with the mini-flowers. Using Q-tips in a group of 4 (like pictured below) is an easy way to represent each flower on your hydrangea globe.
Simply pick up the paint onto your q-tip bunch and then press down on the canvas, where you want your flowers to go. The key to getting really nice round petals is to firmly press down onto your canvas with your bunch of Q-tips each time , kind of like you're using a stamp. Dabbing too lightly might cause this technique not to work as well. Firm downward pressure helps.
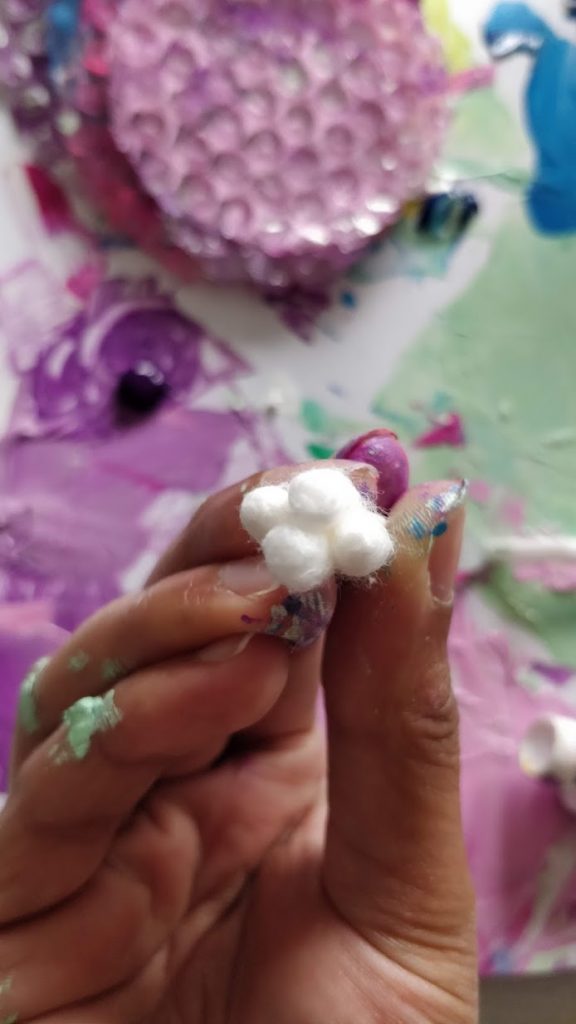
Another option is it use a single Q-tip and form each 4-petal flower on your own. I did this for the more detailed flowers towards the end. I found I had more control of what the flower looked like using a single Q-tip.
For a complete step-by-step instructions for each layer of the flowers, please see the full tutorial below.
How Do You Paint Hydrangeas In a Vase?
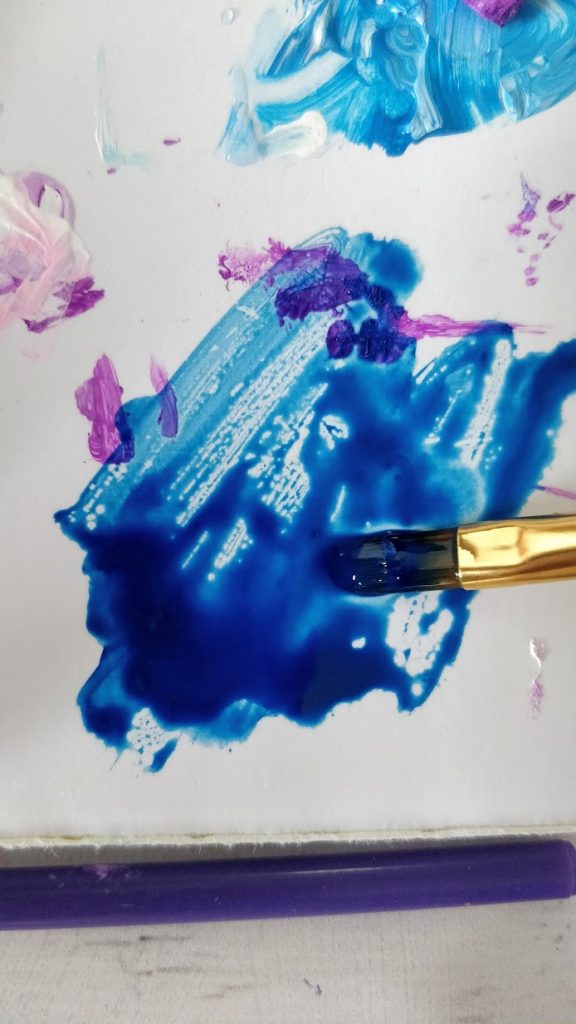
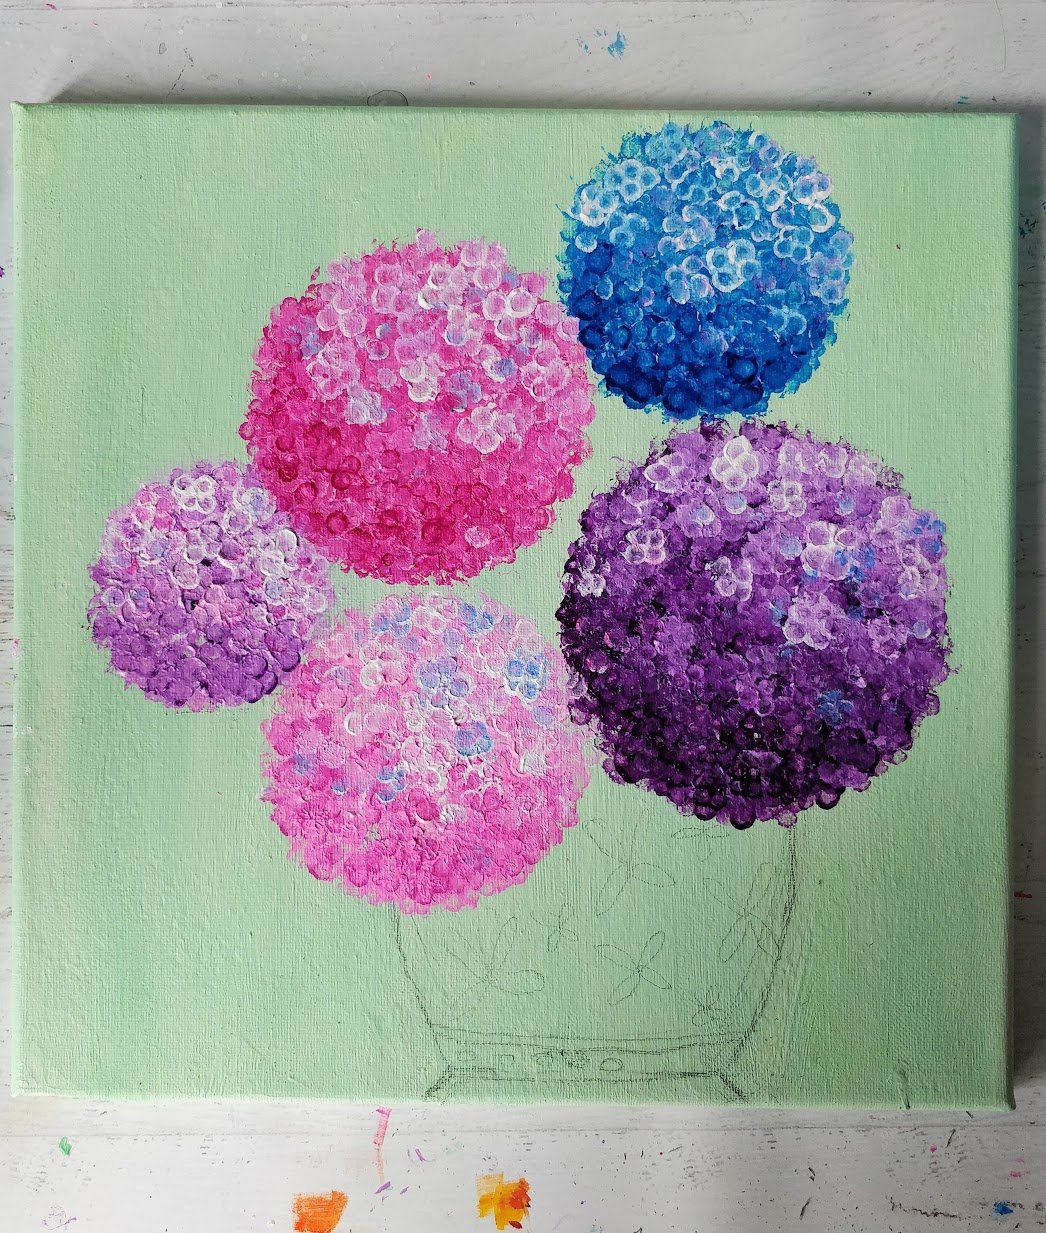
All you need to do is first sketch the vase shape and design with a pencil onto your canvas. Then using a deep blue paint ( prussian blue OR blue mixed with a smidgen of black paint) outline the vase shape and also outlined the flower design.
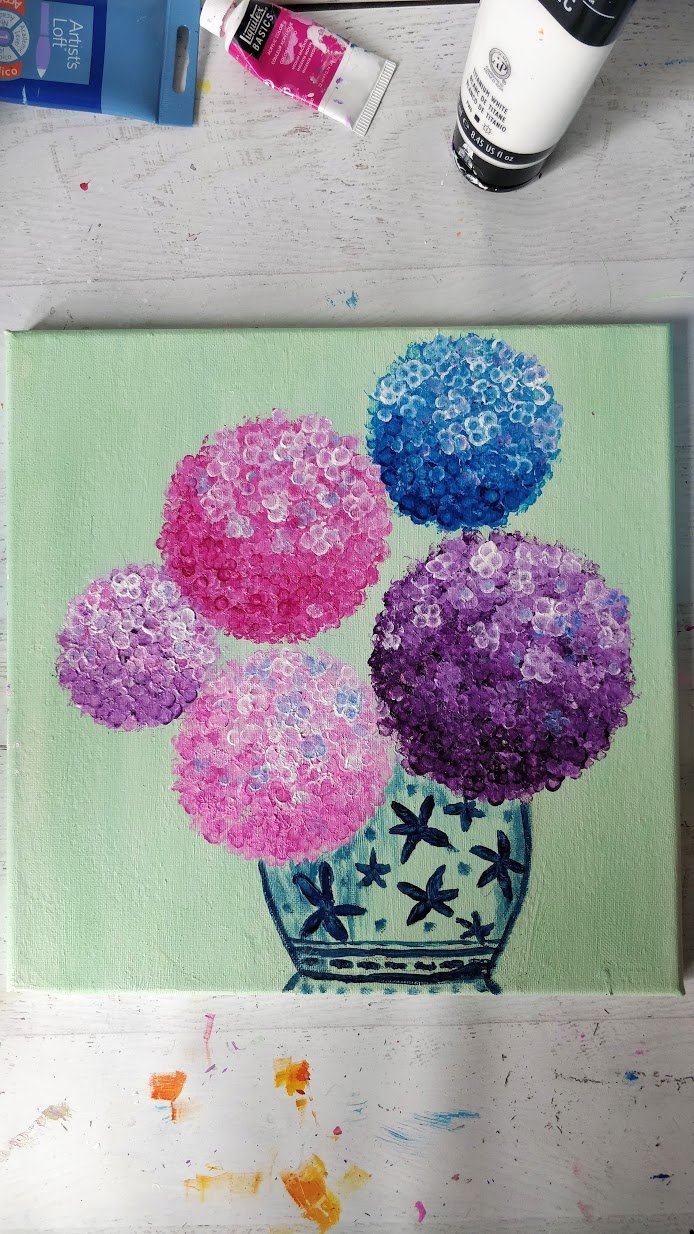
Using the same blue paint, I thinned it down so that I can use it as a "wash", I.e when painted-on, becomes translucent in quality allowing the paint underneath to show through.
I filled in the entire vase with this "thinned" paint- and when it dried the flower design underneath still showed through.
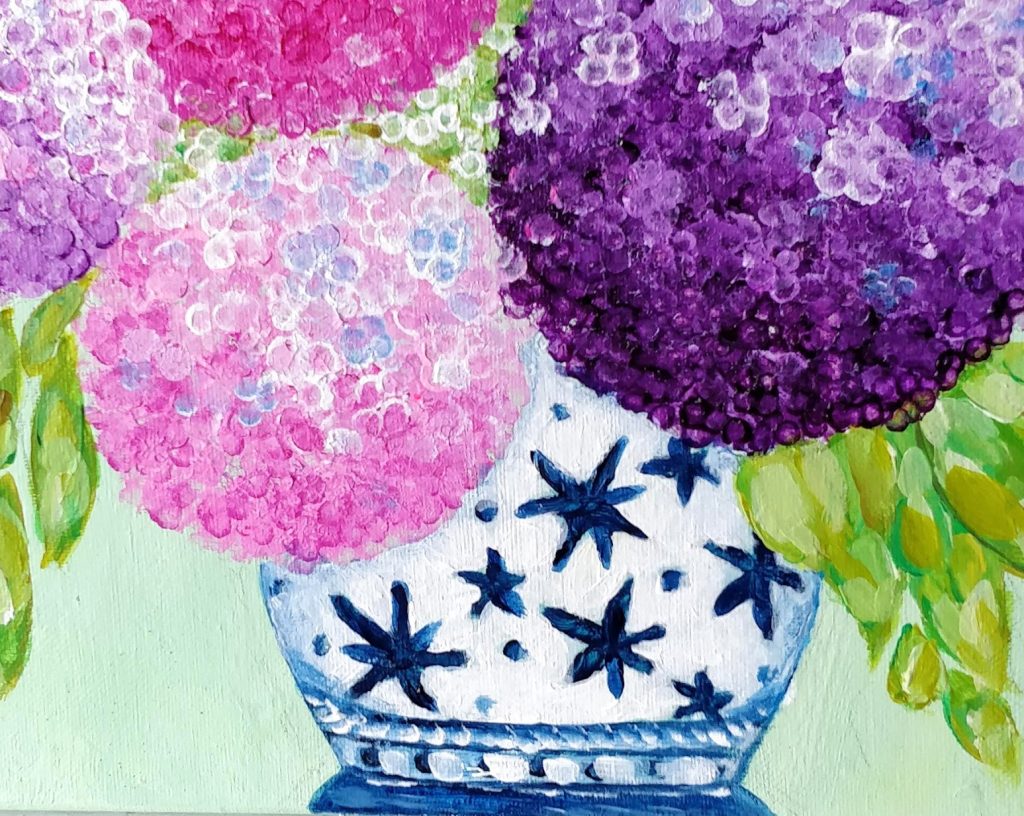
Then, I took some pure white (titanium white) and painted overtop the translucent blue (and around the flower designs). Don't focus on being perfect here, it actually looks better if some of the blue underneath still shows through in some places.
Try to focus on adding more white along the center of the vase (from top to bottom) if you can. This technique brings the vase to life and gives it dimension. To finish things off, I took the blue paint (regular consistency) and embellished the vase a bit more.


How To Paint Hydrangeas with Q-tips
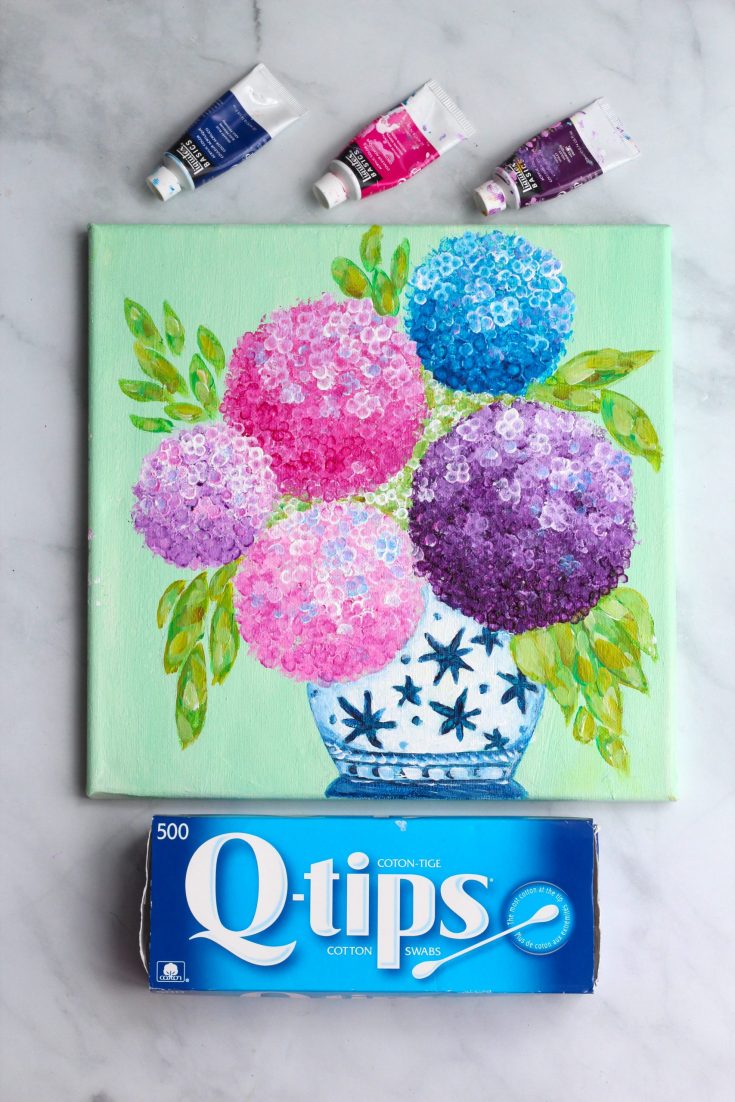
Learn how to paint Hydrangeas with q-tips in a beautiful antique vase. A perfect beginner acrylic tutorial.
Materials
- Dark blue paint (Prussian blue)
- Medium Blue paint (Ultramarine Blue)
- White paint (Titanium white)
- Pink paint (Medium Magenta)
- Purple Paint (Prism Violet)
- Green Paints (Green gold)
- Yellow paint (Cadmium Yellow Light)
- 12"x12" Stretched canvas
Tools
- Paintbrush
- Paint Palette
- Palette Knife for paint mixing (optional)
- Q-tips
Instructions
- Optional: Follow along with the Hydrangea Painting YouTube Tutorial
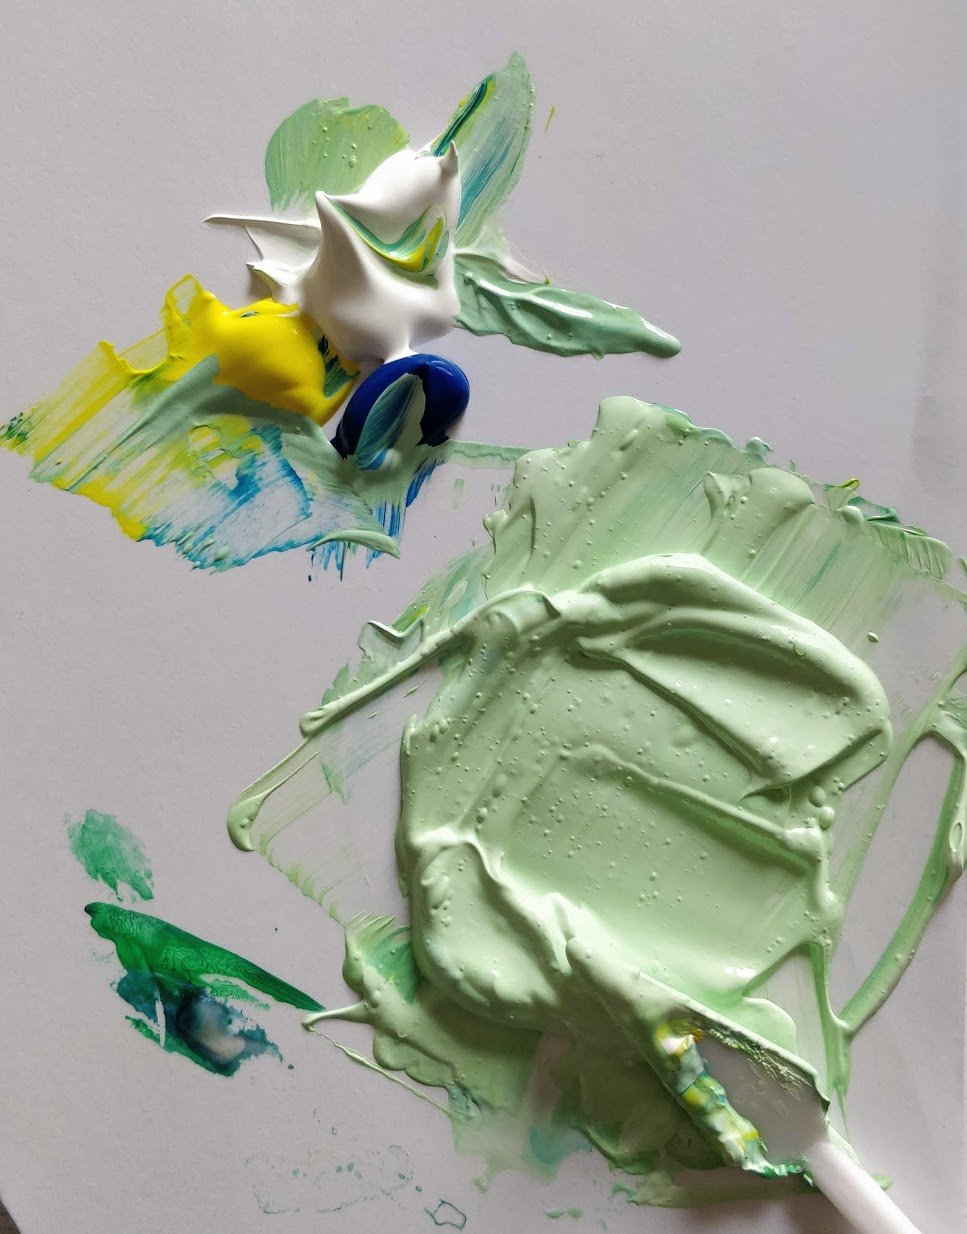
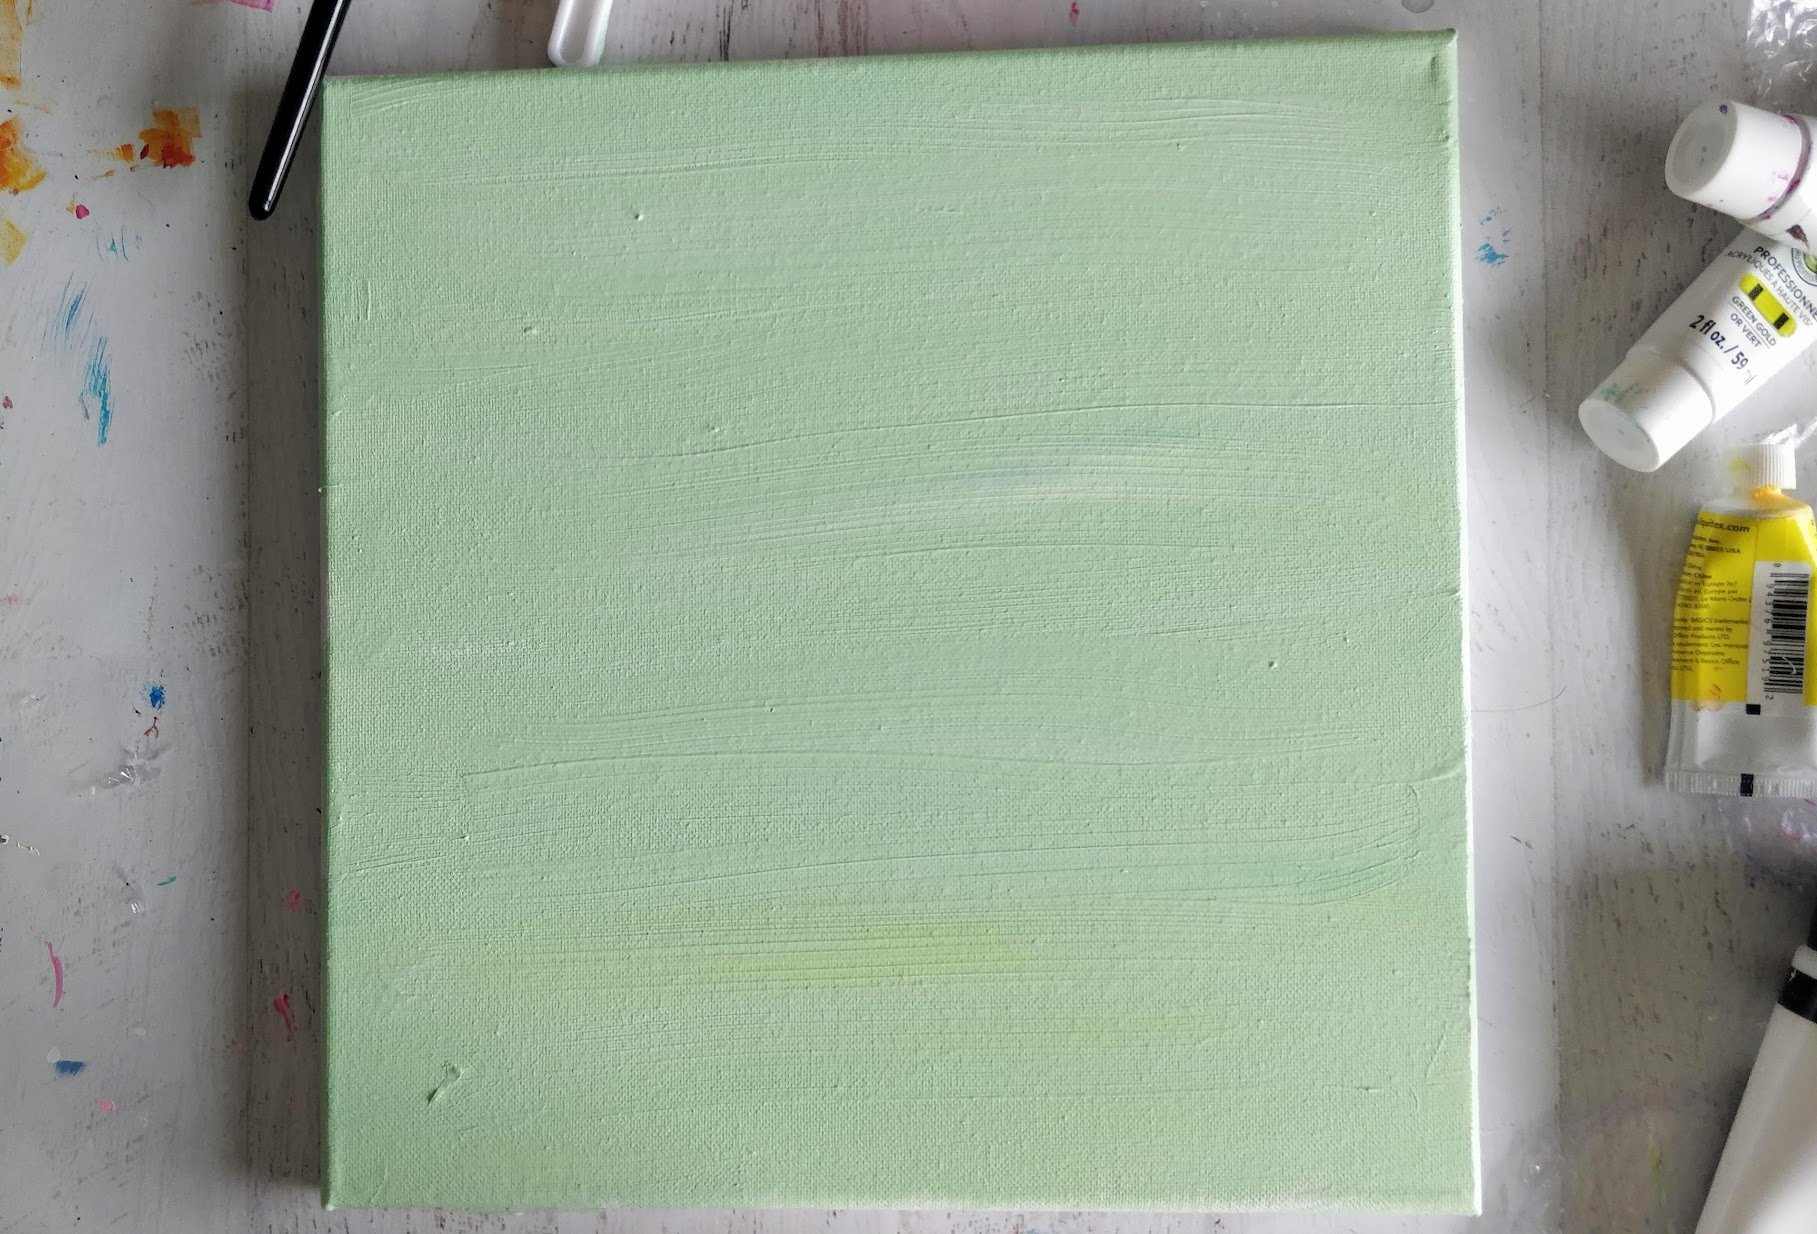
- Mix 2 parts white (Titanium white) & 1 part blue (Ultramarine Blue) and 1 part yellow (Cad Yellow Light) to make a mint color.

- Paint your entire canvas with the mint color. I used a 1" flat brush to make covering the large area easier.


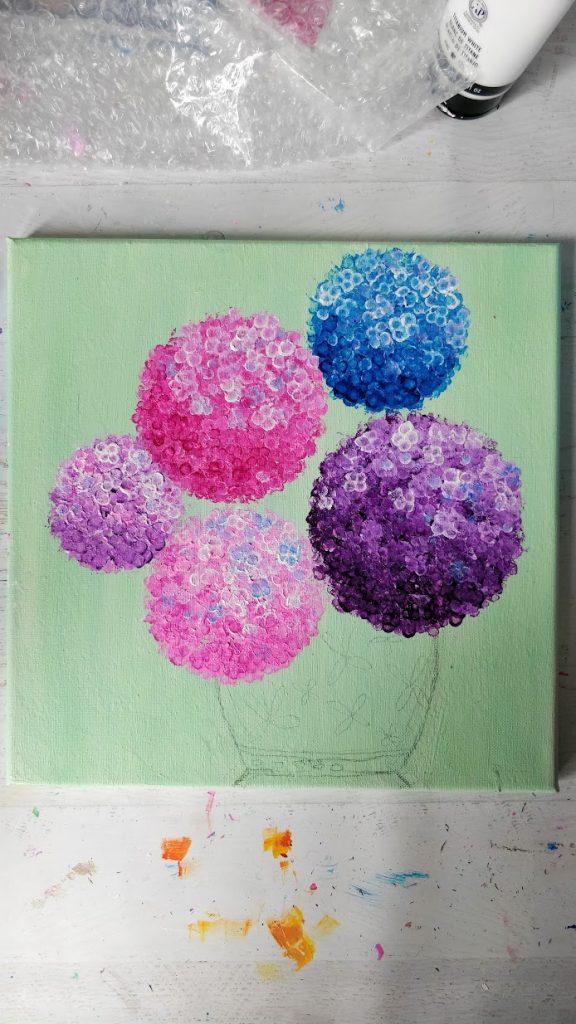
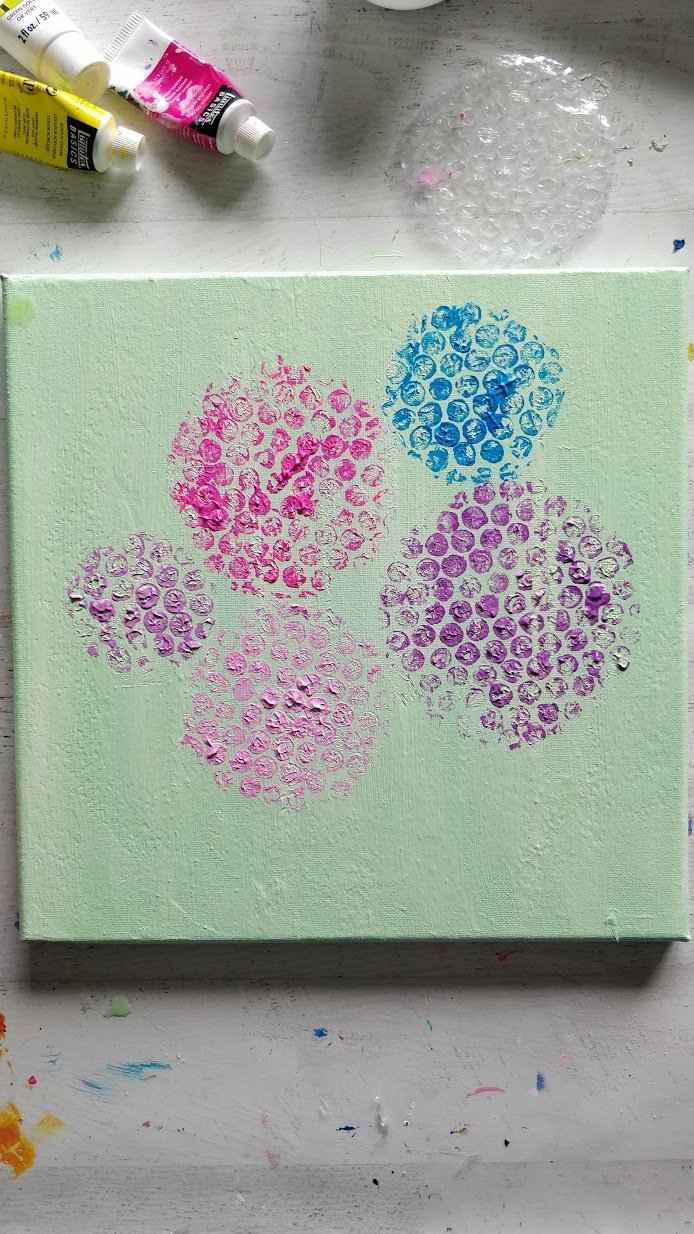
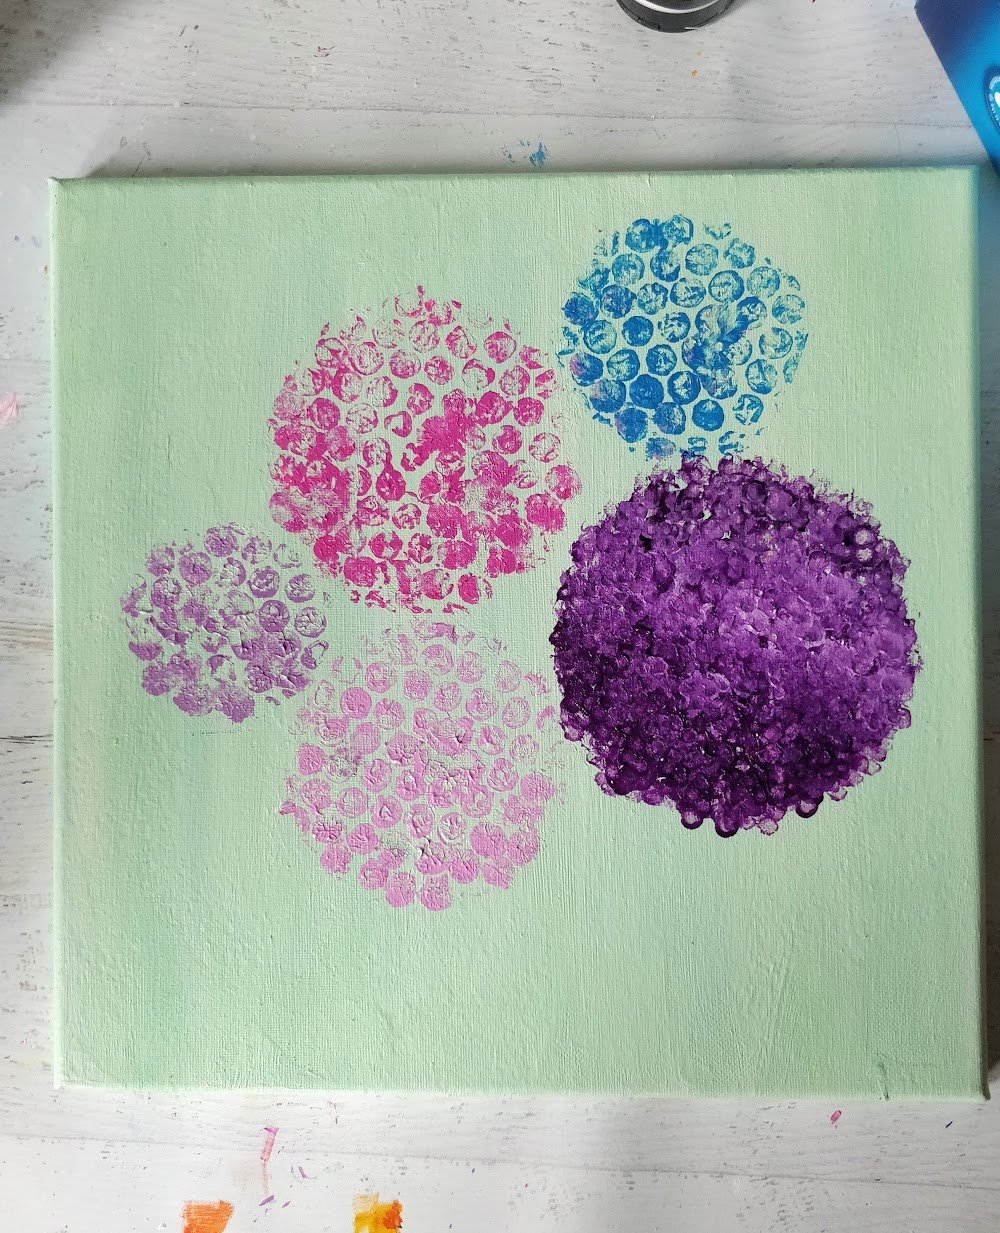
- Cut 5 circles out of bubble wrap. Place them on your canvas in the desired configuration, so you're happy with the design.

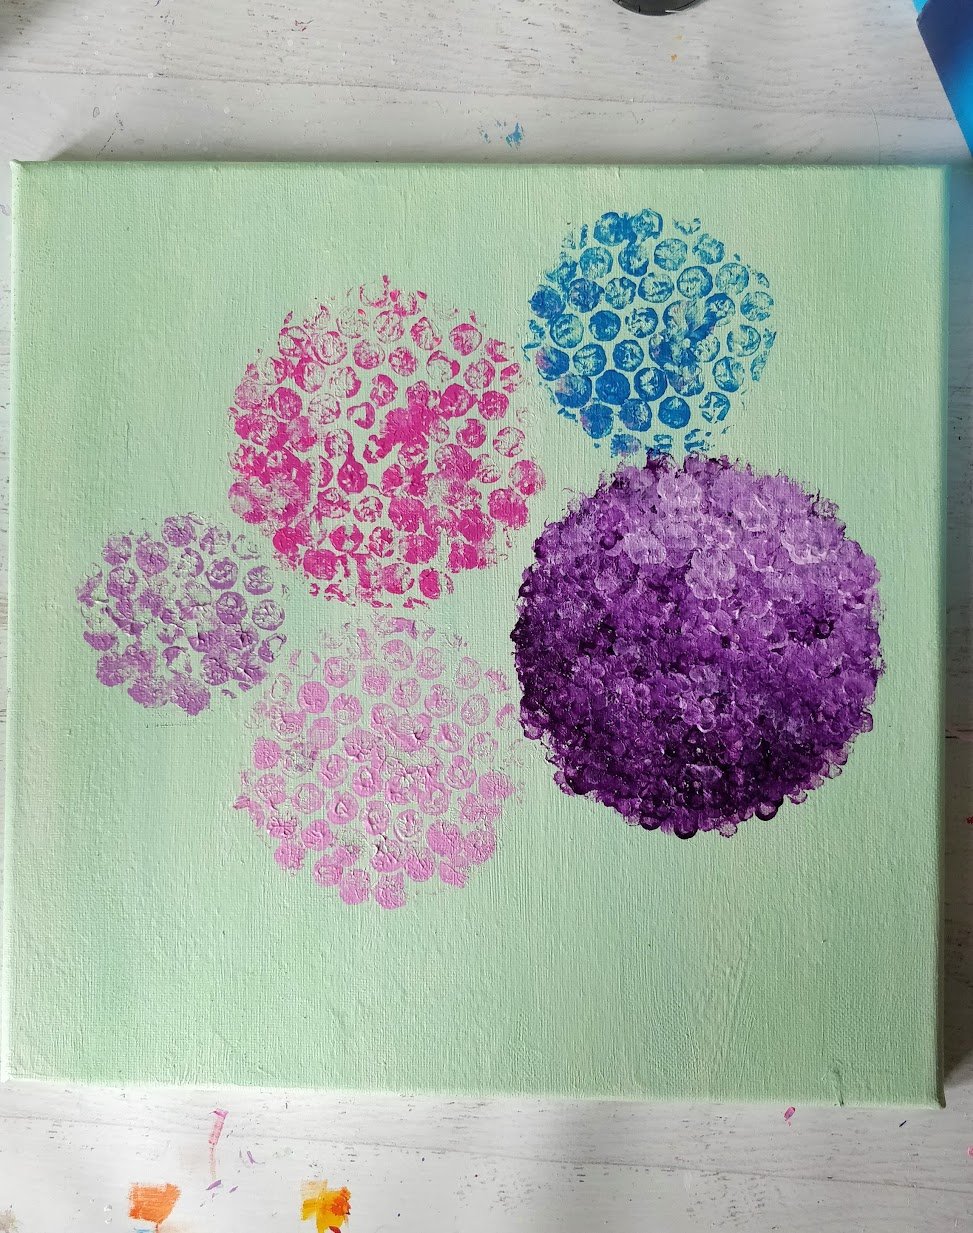
- Now it's time to make your Hydrangea Globes. Mix your choice of paints for your 5 flowers. I chose 2 different tones of pink (one dark pink, and one light pink by mixing white into it), 2 purples (one dark purple and one light purple by mixing white into it), and one blue. Paint each bubble wrap circle (one side) and then place it paint side down back onto the canvas and press down gently. Slowly peel the bubble wrap off the the canvas and a nifty pattern should be left behind.
- Once the paint has dried you can start painting on your Hydrangea mini flowers. A fun way to paint the flowers is by using Q-tips. Since Hydrangea flowers have 4 petals each, take 4 Q-tips in a bunch.
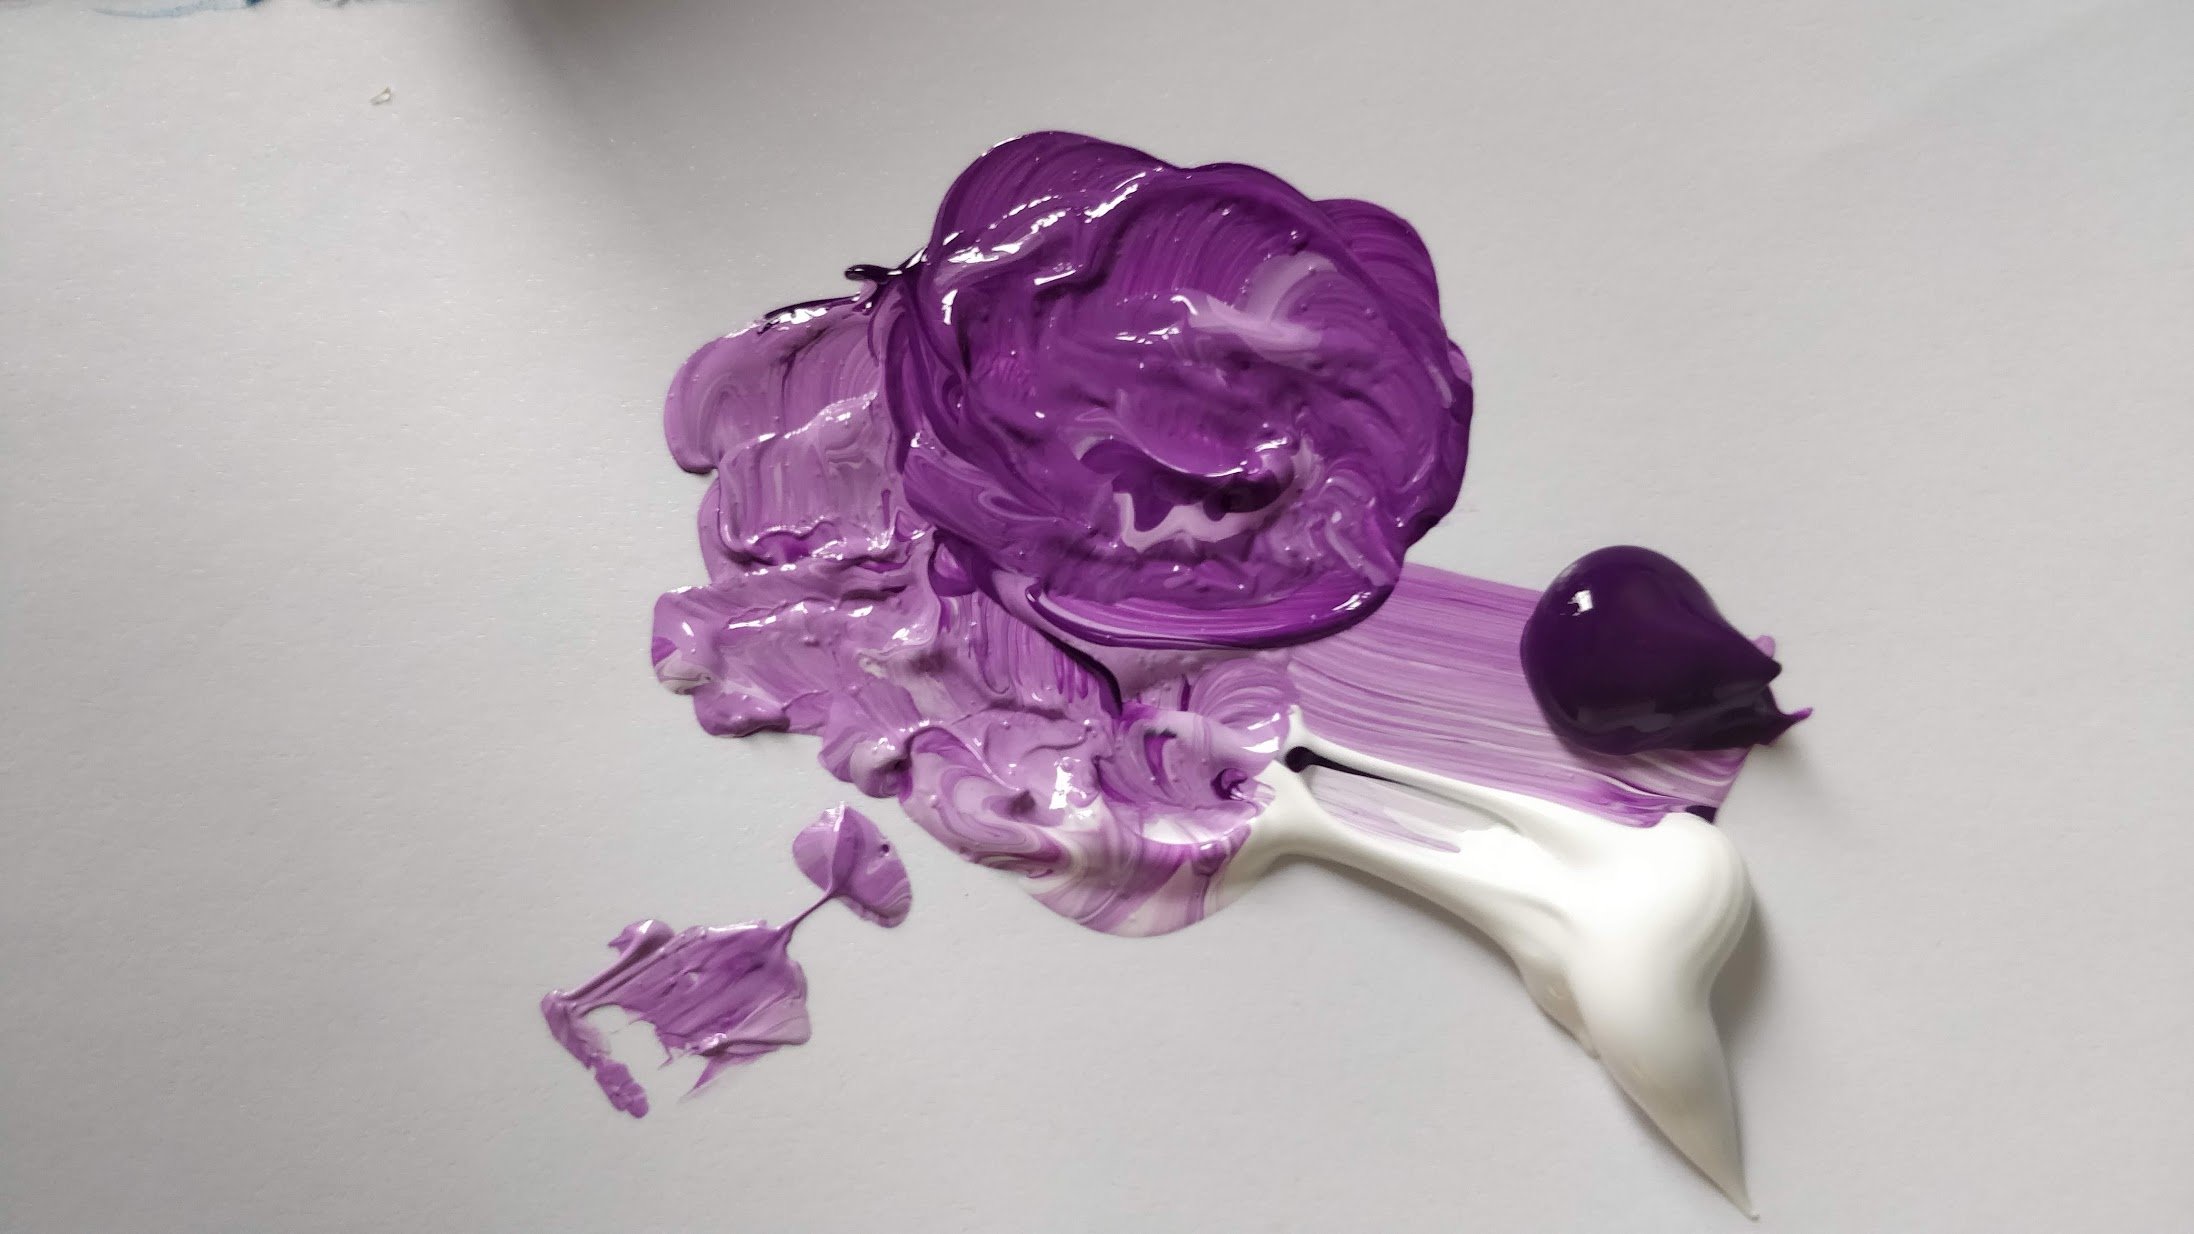
- For each flower, take your selected paint and make 3 tones of it by mixing a bit of white into it. On your pallete, you should have the darkest color (no white mixed), a medium tone color (a bit of white mixed in), and the lightest tone color (more white mixed in).

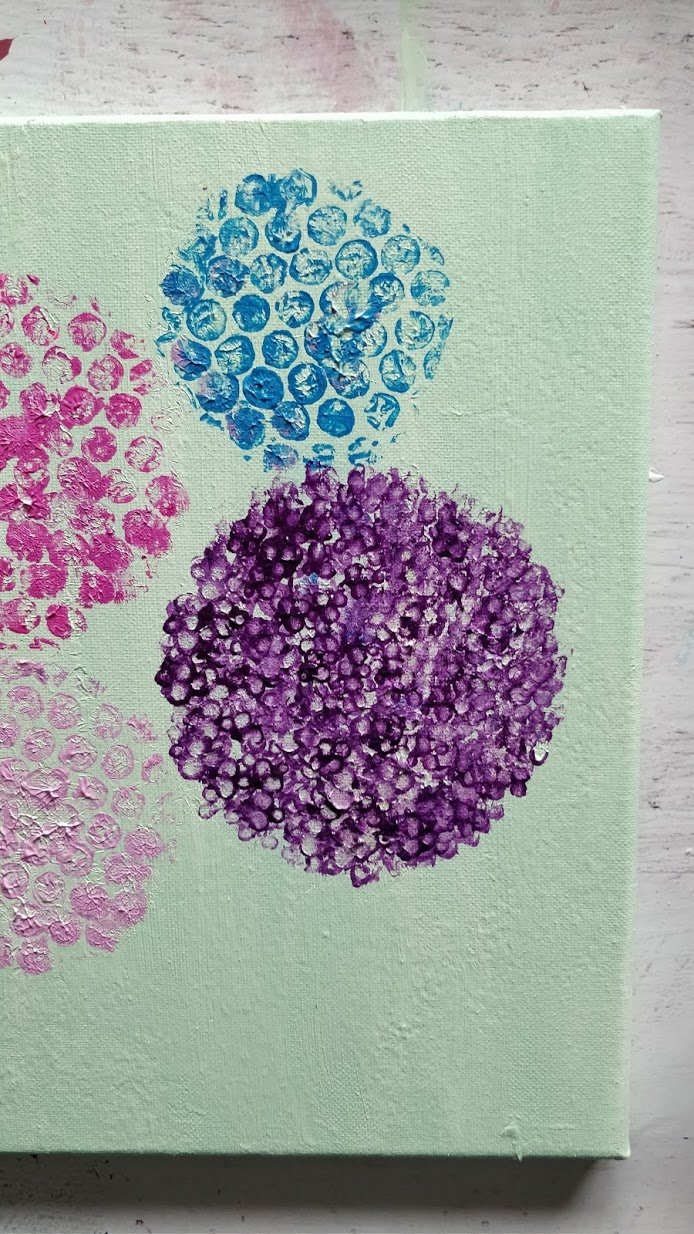
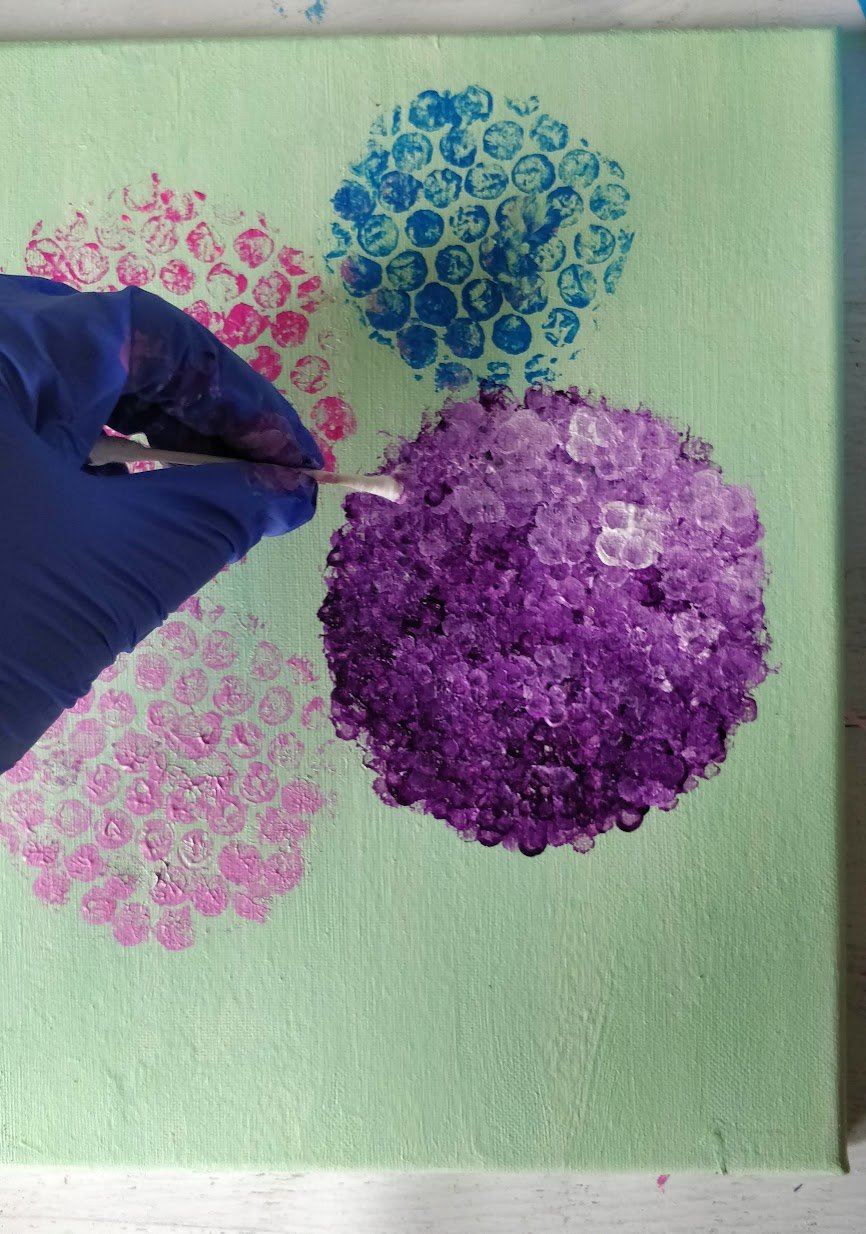
- Take our Q-tip bunch and dip it into the darkest color and stamp them down on one of your flower globes. To get the nicest petal shapes, make sure you firmly press the q-tips down on the canvas. If you don't press down firmly enough the technique might not work as well. You might need to layers of this step so the background color doesn't show through anymore.
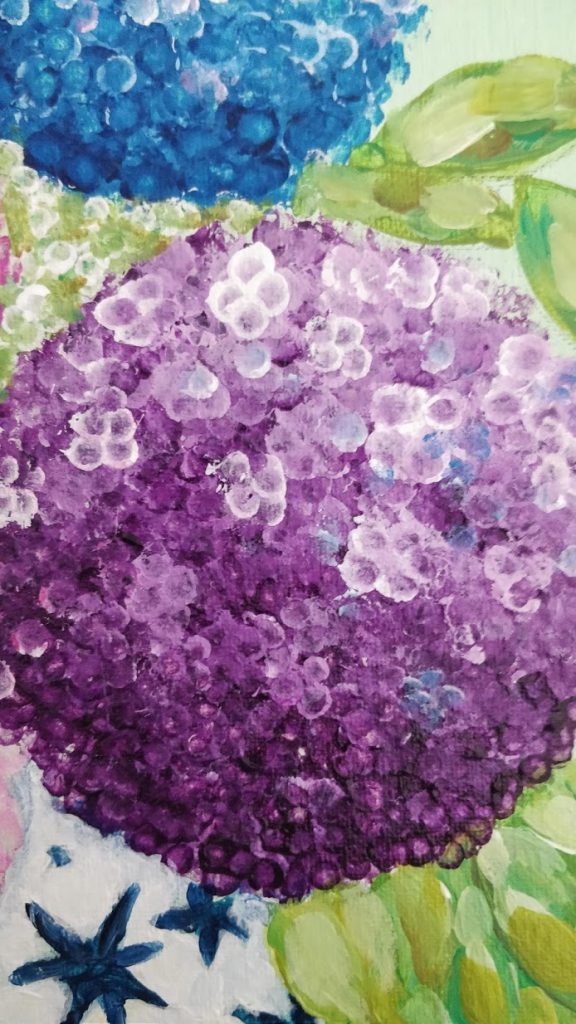
- Using the same technique as as above, dip your q-tips in the medium tone color and make flowers over the top half of the globe. Essentially the darkest flowers will be at the bottom half of the globe, and they will get lighter towards the top. This will give the flowers dimension and realistic shading.

- Using the same technique as above, dip your q-tips in the lightest tone color and make flowers over the top ⅓ of the globe.

- The last step to complete your first hydrangea flowers is to take some pure white on a single q-tip and make a few 4 petal flowers sparingly at the top of your Hydrangea where light would hit it first.


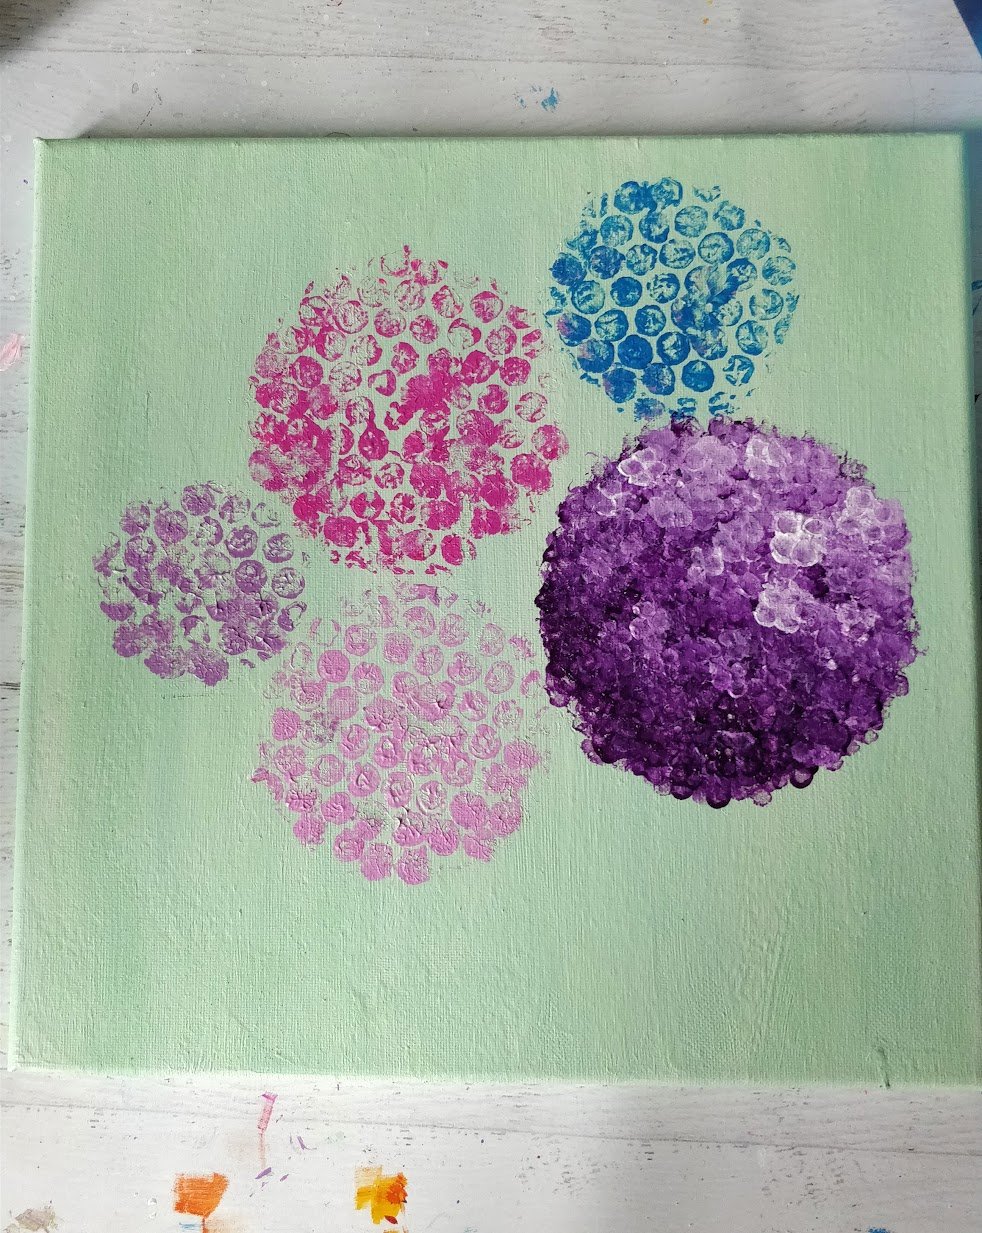
- Repeat steps 6-10 with all your other flowers. For my flowers I used the following paints colors (from the Liquitex Basics Line, please see below for the links): Medium Magenta, Prism Violet, Ultramarine Blue, and Titanium white. For the lighter purple and pink flowers I simply added some white into the darker hues to get a lighter version of that color.

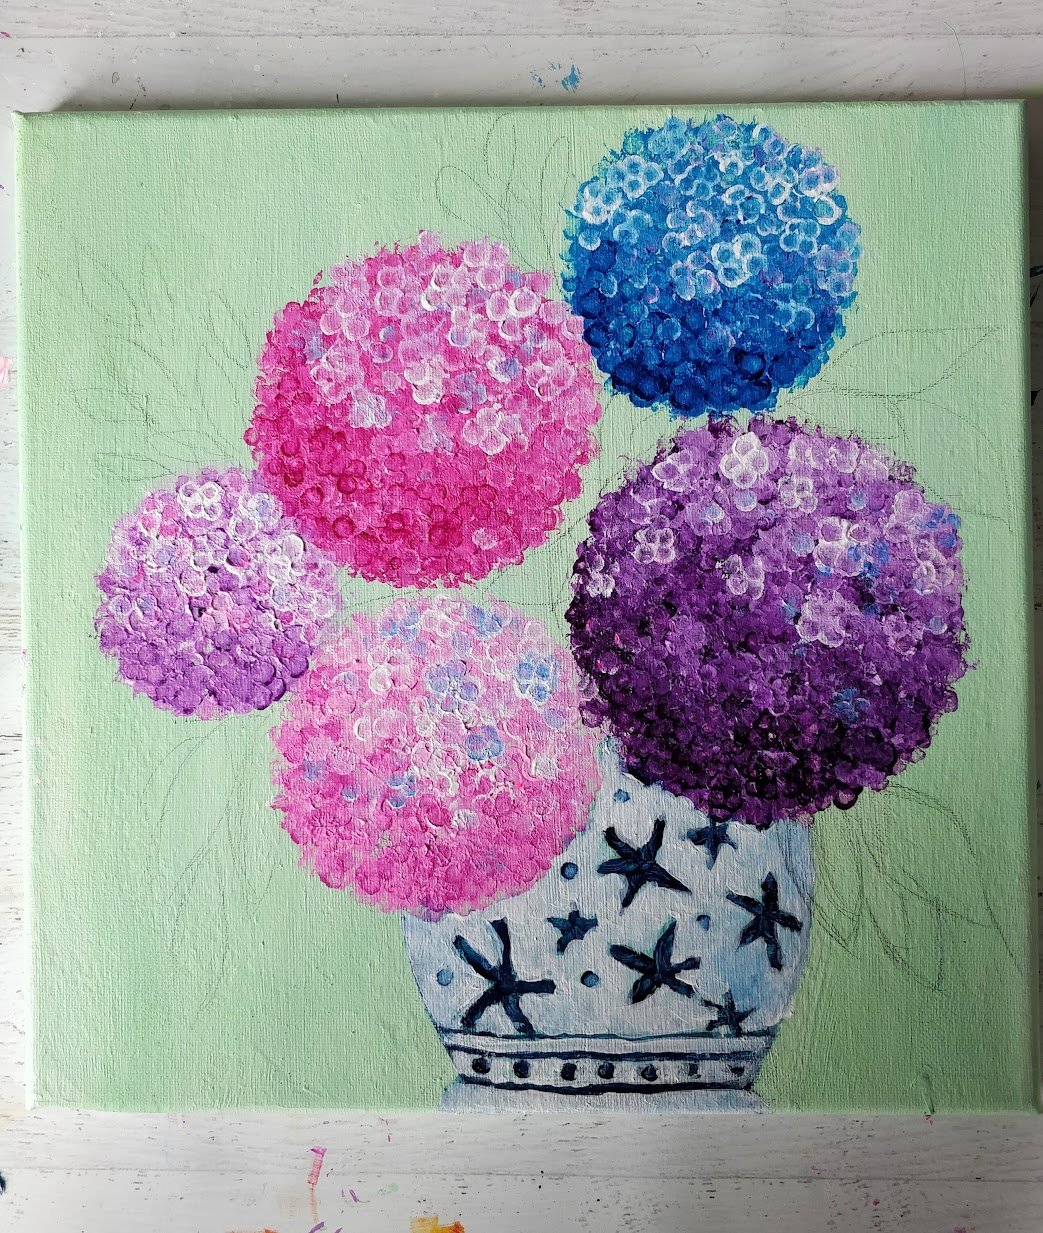
- Now the flowers are done you can move on to the lovely Chinoise vase. Sketch your vase on the canvas with a pencil, you can add in your design too ( I chose whimsical flower shapes).

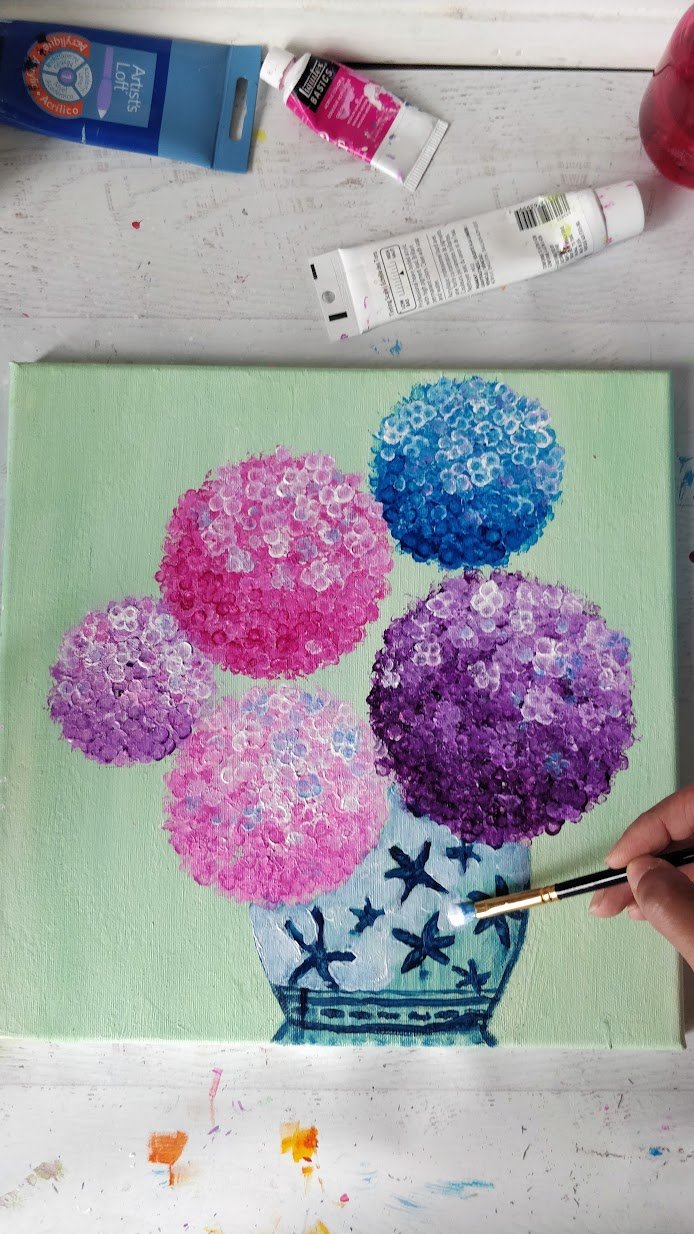
- Take your dark blue paint(Prussian blue) and paint the outline of the vase and the designs inside.
- Make a "wash" by taking your dark blue color and adding some water to it on your palette. It should be liquidy, like in the picture below. Use this wash to paint in inside of your vase (you can paint right over the designs, since the wash will be transparent in nature).
- Clean off your brush and pick up some white paint. Paint the inside of the vase, omitting the designs. You dont have to be perfect in this step, it actually looks better if some of the blue underneath shows through in some places (especially the edges of the vase and designs). Have fun with it! Another thing is try to focus more white in the middle of your vase (from top to bottom). This will give your vase dimension.
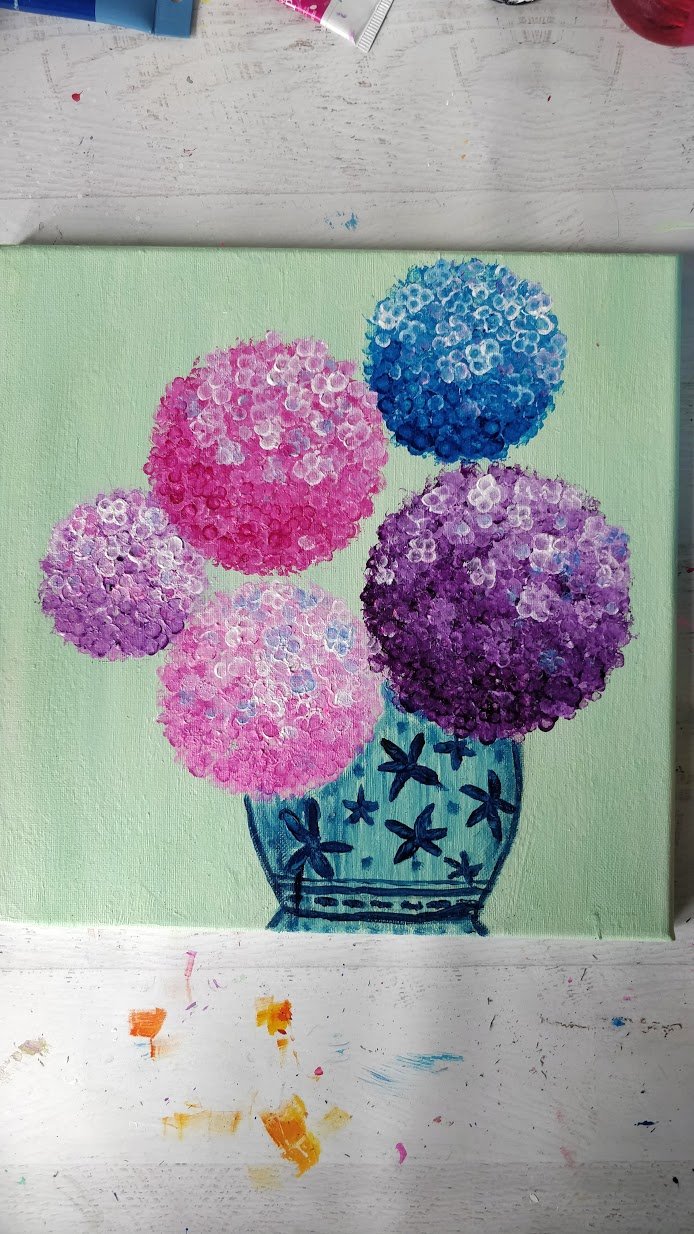
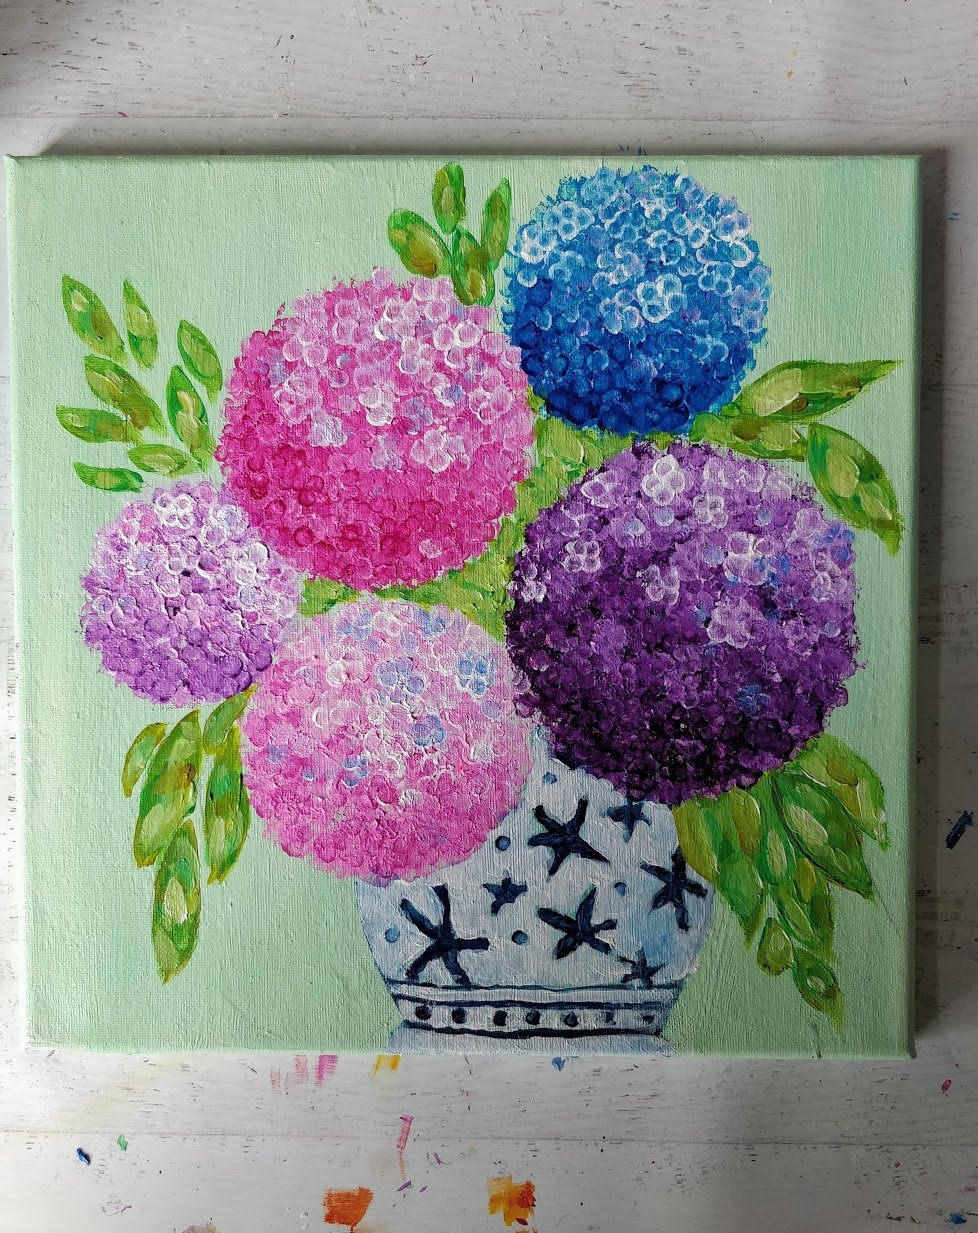
- Once your vase is dried, you can add in some fun whimsical leaves. Go with the flow and add in different shapes/sizes.

- Using different colors of green (or simply take 1 green color and add in different amounts of white into it to get some tints). Paint in your leaves with the green paints.

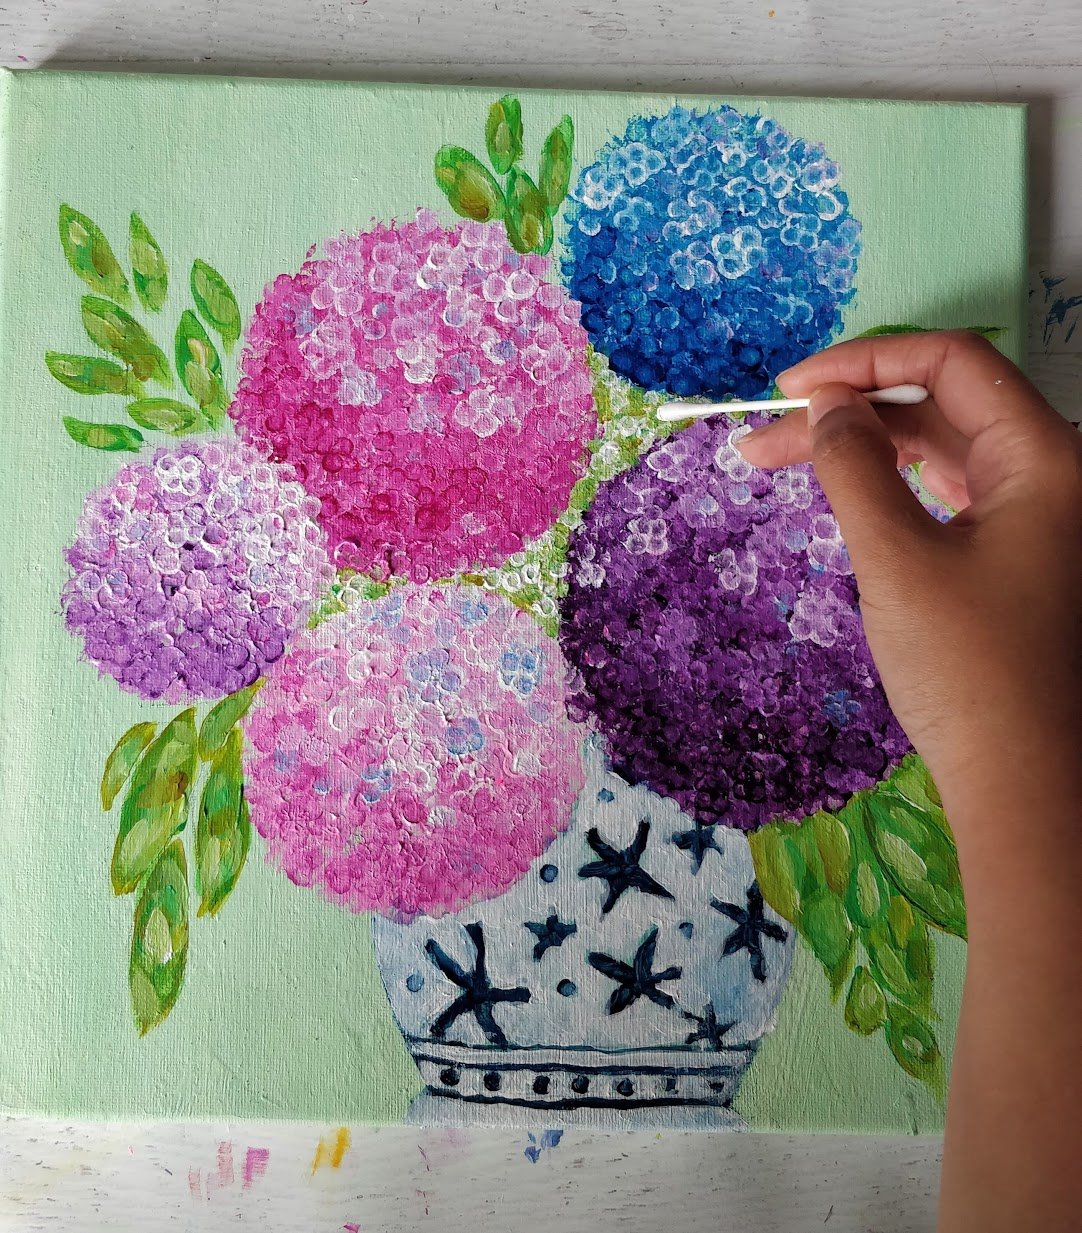
- For the greenery in between the the flowers, I took a single Q-tip and dotted in some white dots.
 .
. - Optional: To make the painting more cohesive, I took a single Q-tip and doted some of my lightest blue color (from the top Hydrangea) subtly to each other flower.
- Optional: Finally, I chose to embellish my vase again by adding more blue to it, especially to the edges and bottom of vase. I made sure to keep more white in the middle, for dimension.


 .
.
Recommended Products
As an Amazon Associate and member of other affiliate programs, I earn from qualifying purchases.
-
 2-Pack Bubble Cushioning Wrap Rolls, 3/16" Air Bubble, 12 Inch x 72 Feet Total, Perforated Every 12", 20 Fragile Stickers Included
 -
Mont Marte Art Paint Brushes Set, Great for Watercolor, Acrylic, Oil-15 Different Sizes Nice Gift for Artists, Adults & Kids, Black
-
Arteza 12x12” Premium Stretched Canvas, Bulk Pack of 8, Primed, 100% Cotton for Painting, Acrylic Pouring, Oil Paint & Wet Art Media, Canvases for Artist, Hobby Painters & Beginner
-
SC Johnson 623181 Q-Tip Cotton Swab, Standard, White (Pack of 500)
-
Liquitex BASICS Acrylic Paint, 8.45-oz tube, Ultramarine Blue
-
Liquitex BASICS Acrylic Paint, 8.45-oz tube, Cadmium Yellow Light Hue
-
Liquitex BASICS Acrylic Paint, 8.45-Oz Tube, Titanium White
-
Liquitex Professional Heavy Body Acrylic Paint, 2-oz Tube, Green Gold
-
Liquitex BASICS Acrylic Paint, 4-oz tube, Prism Violet
-
Liquitex BASICS Acrylic Paint, 4-oz tube, Medium Magenta
-
Liquitex BASICS Acrylic Paint, 4-oz tube, Prussian Blue


If you liked this tutorial please pin it!


I am so happy I found your tutorials, looks so easy. Thank you
Terry
Thank you Terry 🙏!! It was a fun tutorial to make and paint- hope you enjoy painting it!
How pretty! I love your technique of bubble wrap and q tips to get those hydrangeas just right. So cheerful. I love this DIY painting tutorial.
Thank you so much Scarlet!! I find Hydrangeas cheerful and happy too!
Thank you CC!!
Hi, I followed your guidelines and painted lavender fields. It came out so pretty. So much praises from family and friends. Thank you Jasmine. I'm glad I found your website.
Hi Neeghu, I'm so glad you found me too! And very happy to hear you enjoyed painting the lavender fields and got such lovely feedback from your family and friends. That must have felt so great!! 🙂 Hope you have a great weekend.
Cheers,
Jasmine
FABULOUS!!!! You make it look so easy!! Thank you!!
Thank you Chris!