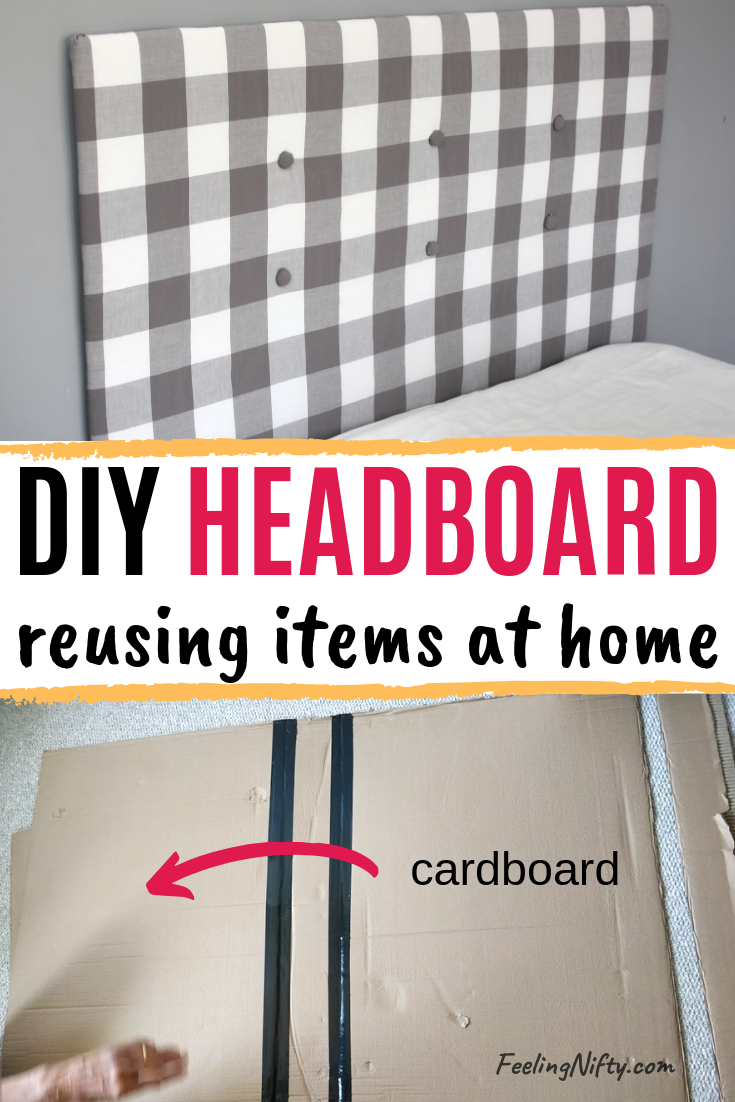
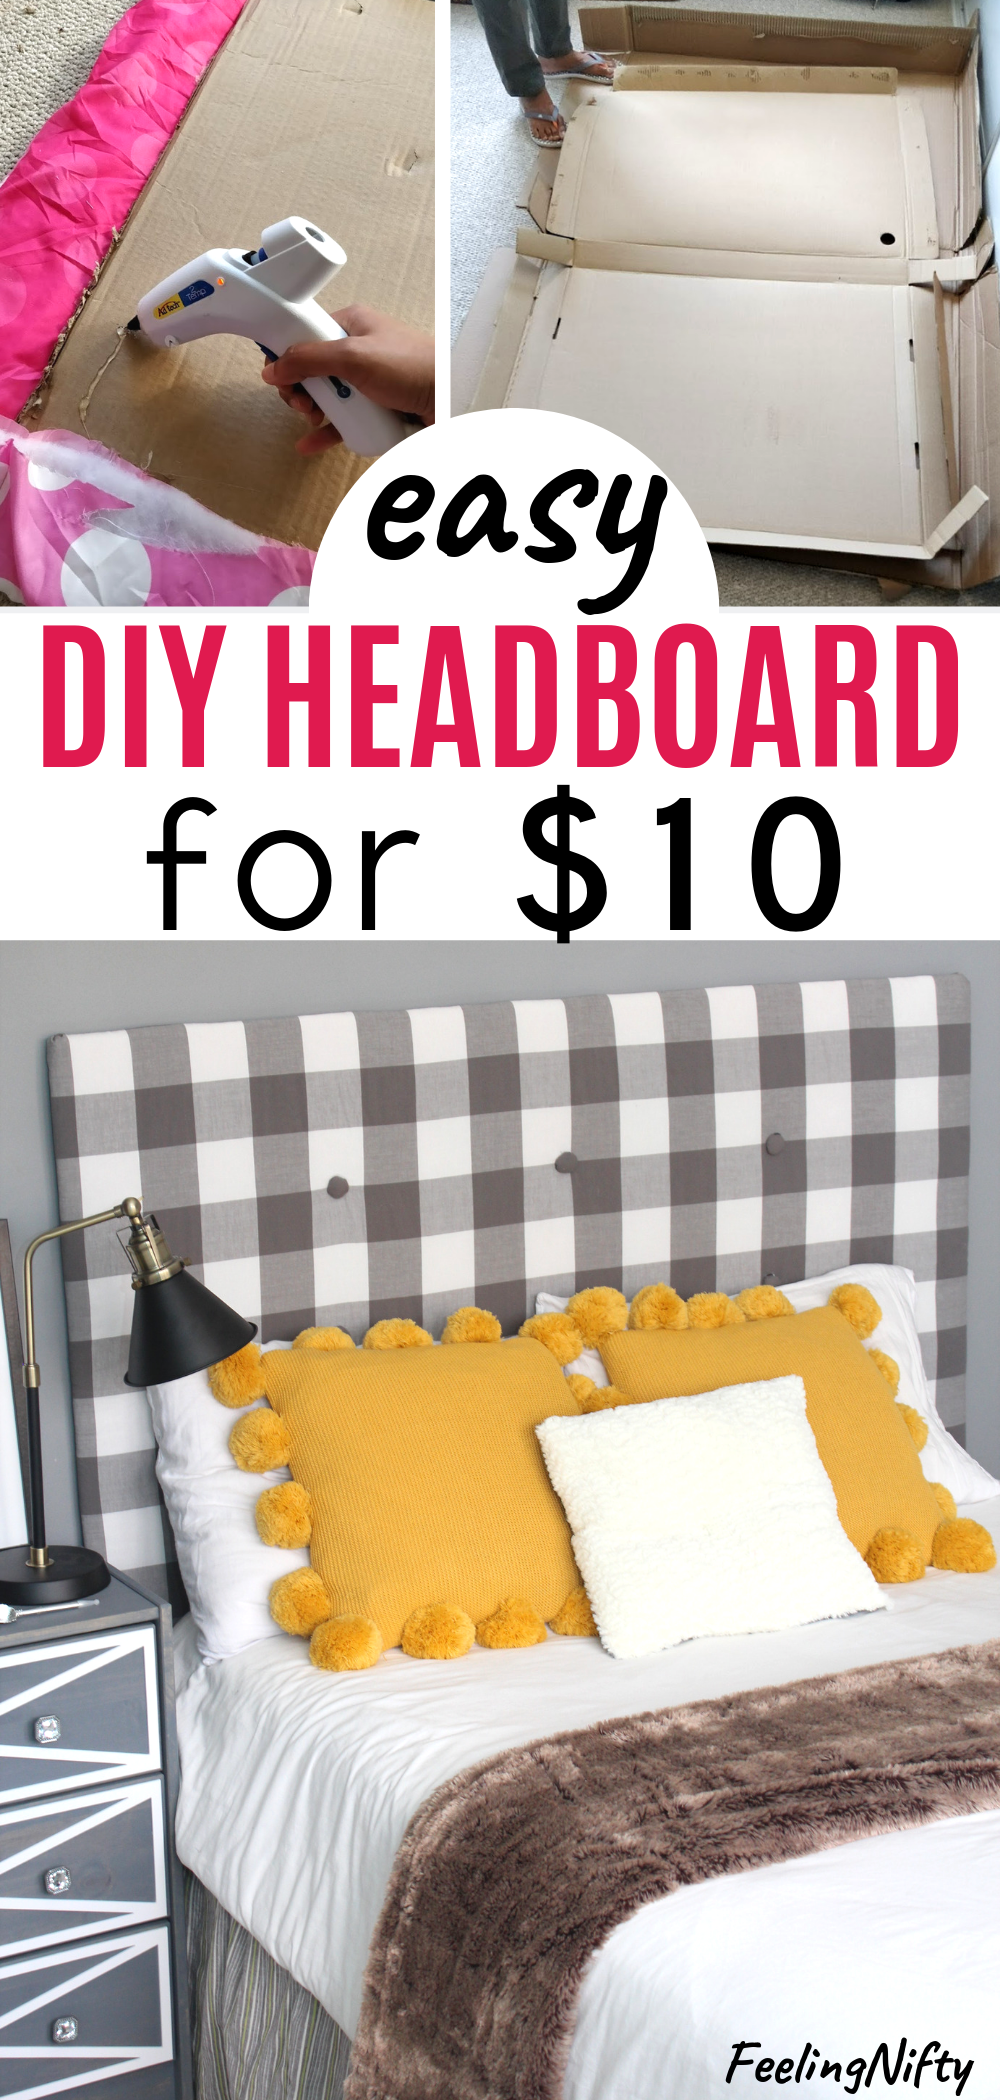
Easy DIY Upholstered Headboard for $10- with Farmhouse Style
If you've ever wondered "how can I make a headboard at home?" (cheap and easy), then this project is for you!
Learn how to make a farmhouse plaid fabric headboard with tufting for a cheap and easy DIY that ANYONE can do. This rustic DIY upholstered(padded) headboard uses cardboard/ foam board, some fabric (surprise hack below!) and a hot glue gun - no sewing or power tools required.
This post includes step-by-step instructions for how to make this easy full size headboard that's perfect from master bedrooms, to kids rooms to the dorm room.
Inspiration for this DIY Upholstered Headboard
I was in full DIY mode after making this Ikea RAST Nightstand hack last week. To keep my creative energy going ( while sticking with bedroom decor) I decided to do something I've been itching to do for a while:
Make a cheap DIY upholstered headboard.
It had to be cheap AND easy to make, since I had never made one before and had no idea how it would turn out.
To keep costs low, I challenged myself to put it all together by reusing things I already had at home.
Less waste + save money = my kinda project!
My mother-in-law was visiting us so we ended up making this headboard together. We're both creative souls so it was a fun experience making it with her 🙂
First, we did some research on the easiest/cheapest way to make a DIY headboard. We found some amazing hacks that used foam boards and cardboard as the backing, which was pretty darn neat.
The Materials
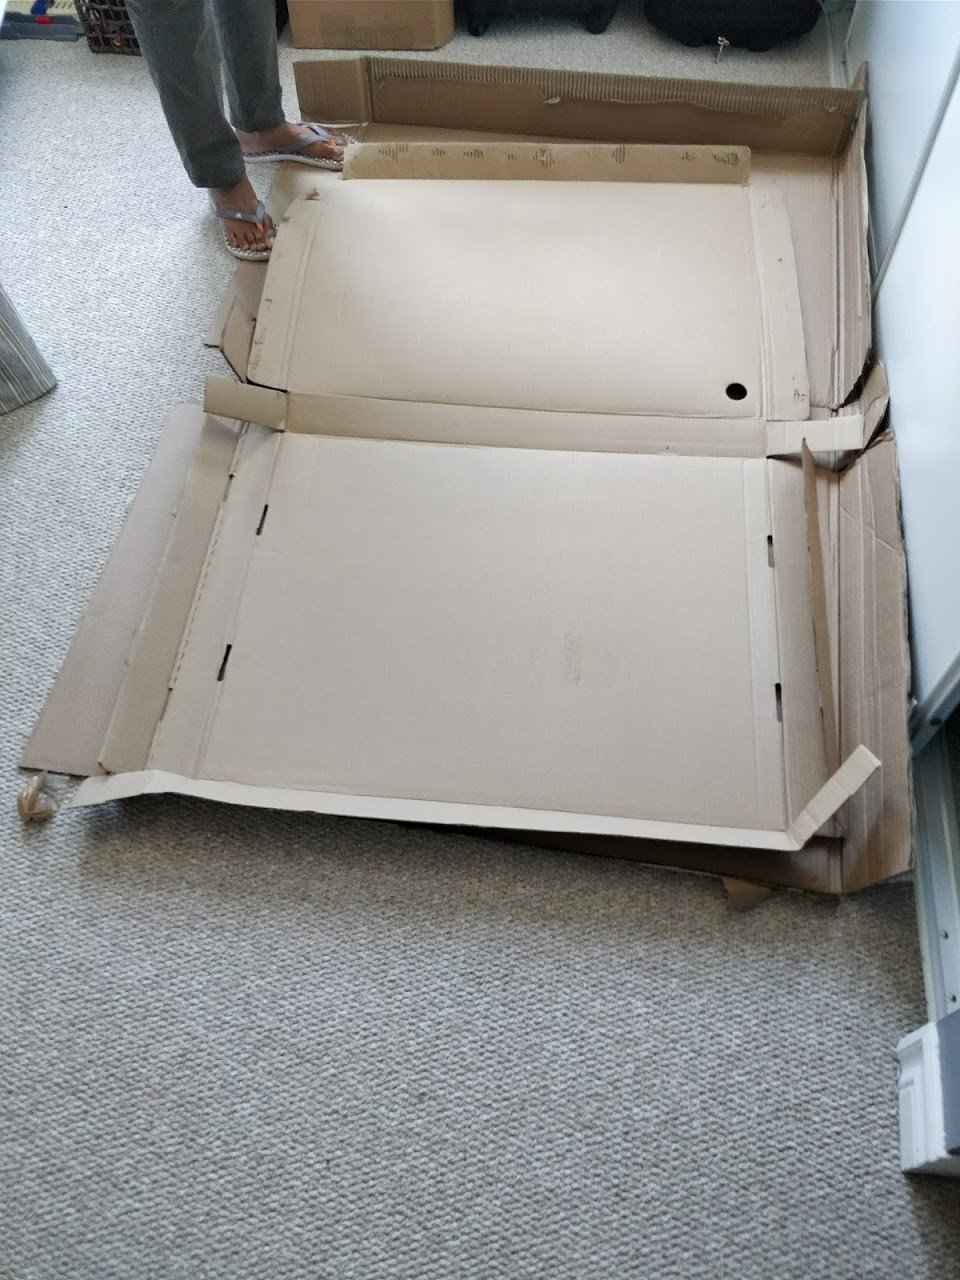
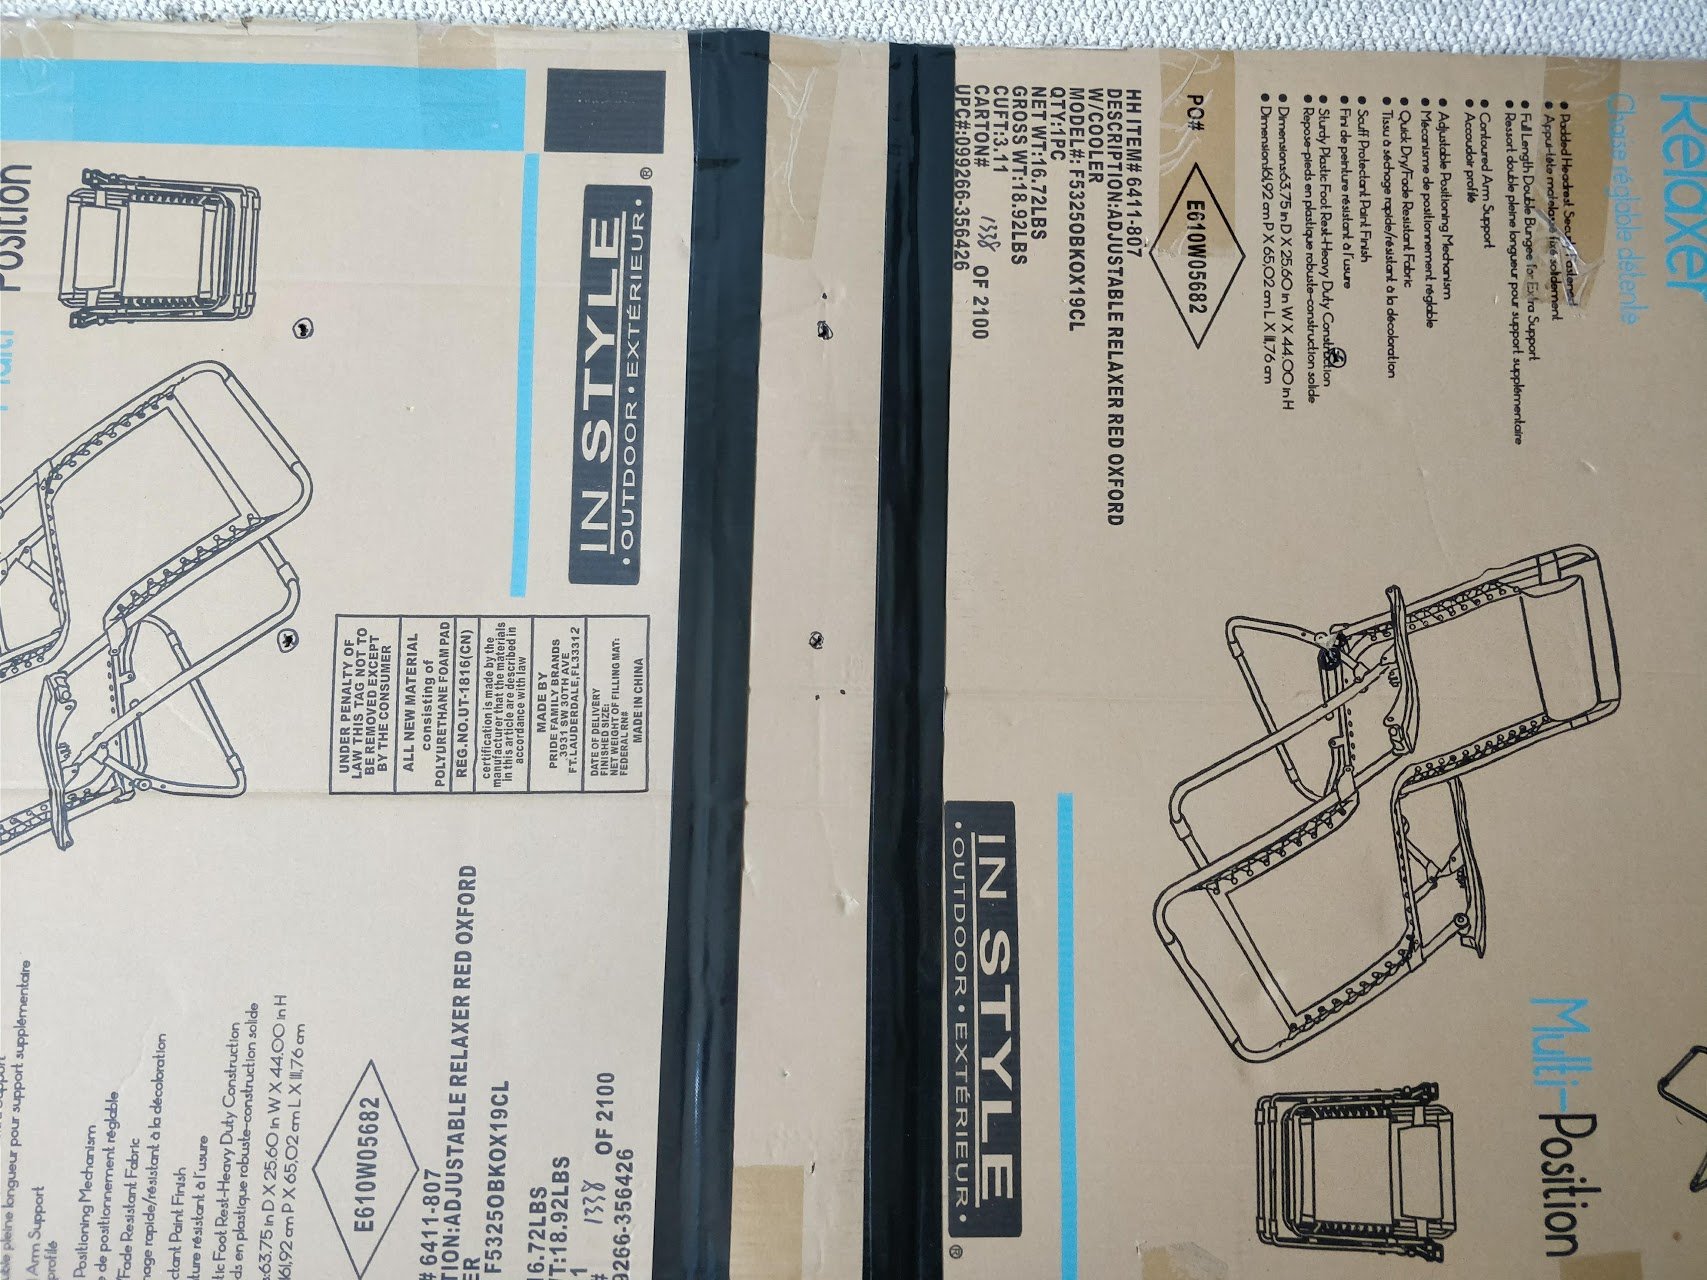
We had a HUGE cardboard box in the garage so decided to use that for the backing of the headboard - to keep with the no-buy challenge.
Cardboard...check!
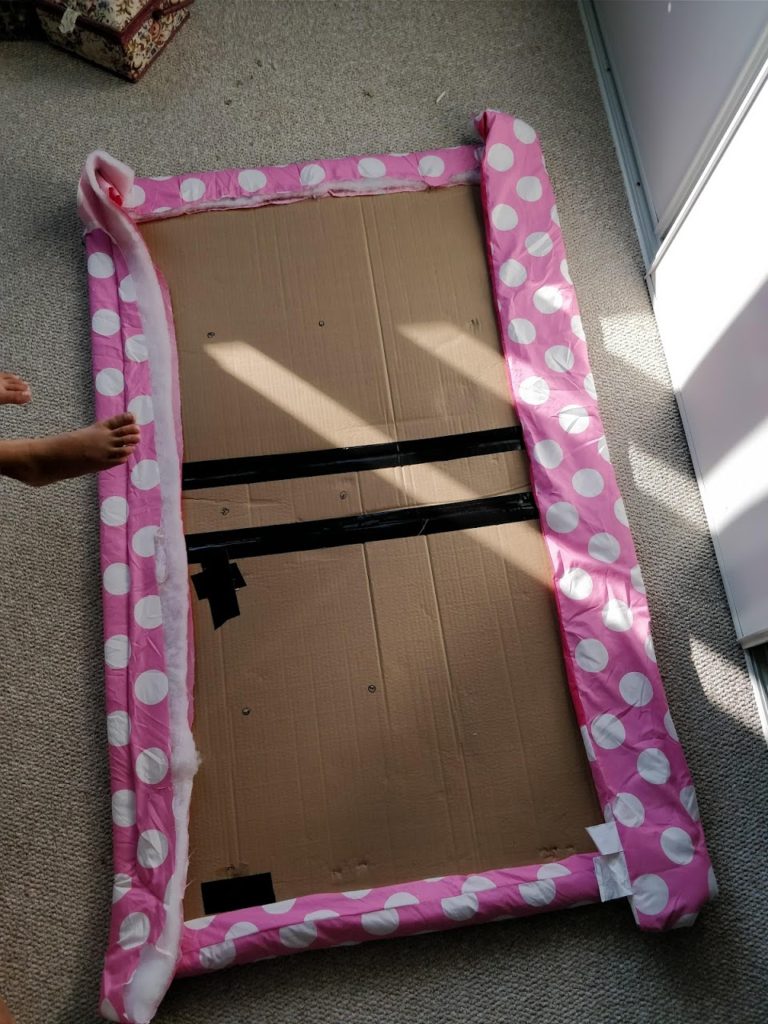
The next thing we needed was cotton batting (to make the headboard softer and plush). My mother-in-law suggested using an old kids duvet - one we no longer needed.
She explained that the cotton batting we needed to upholster the headboard was the same thing found in duvet.
Brilliant!
I remembered my daughter had an old Minnie mouse duvet she no longer used, so we used that.
Cotton batting...check!
NIFTY TIP: Use an old kids duvet instead of buying cotton batting. If you don't have one, check your local Buy Nothing Group to get one for free.
The final item we needed was a nice upholstery fabric to cover the full size headboard with.
I had bought a rustic farmhouse plaid duvet cover (on sale) from Ikea a couple years back, and it had been laying in our linen closet since.
Although its not a thick upholstery fabric, it worked beautifully.
Some other cheap ideas for headboard fabric:
- old curtains
- fabric tablecloth
- duvet cover
- fitted sheets
- traditional upholstery fabric
Upholstery headboard fabric...check!
$10 Headboard
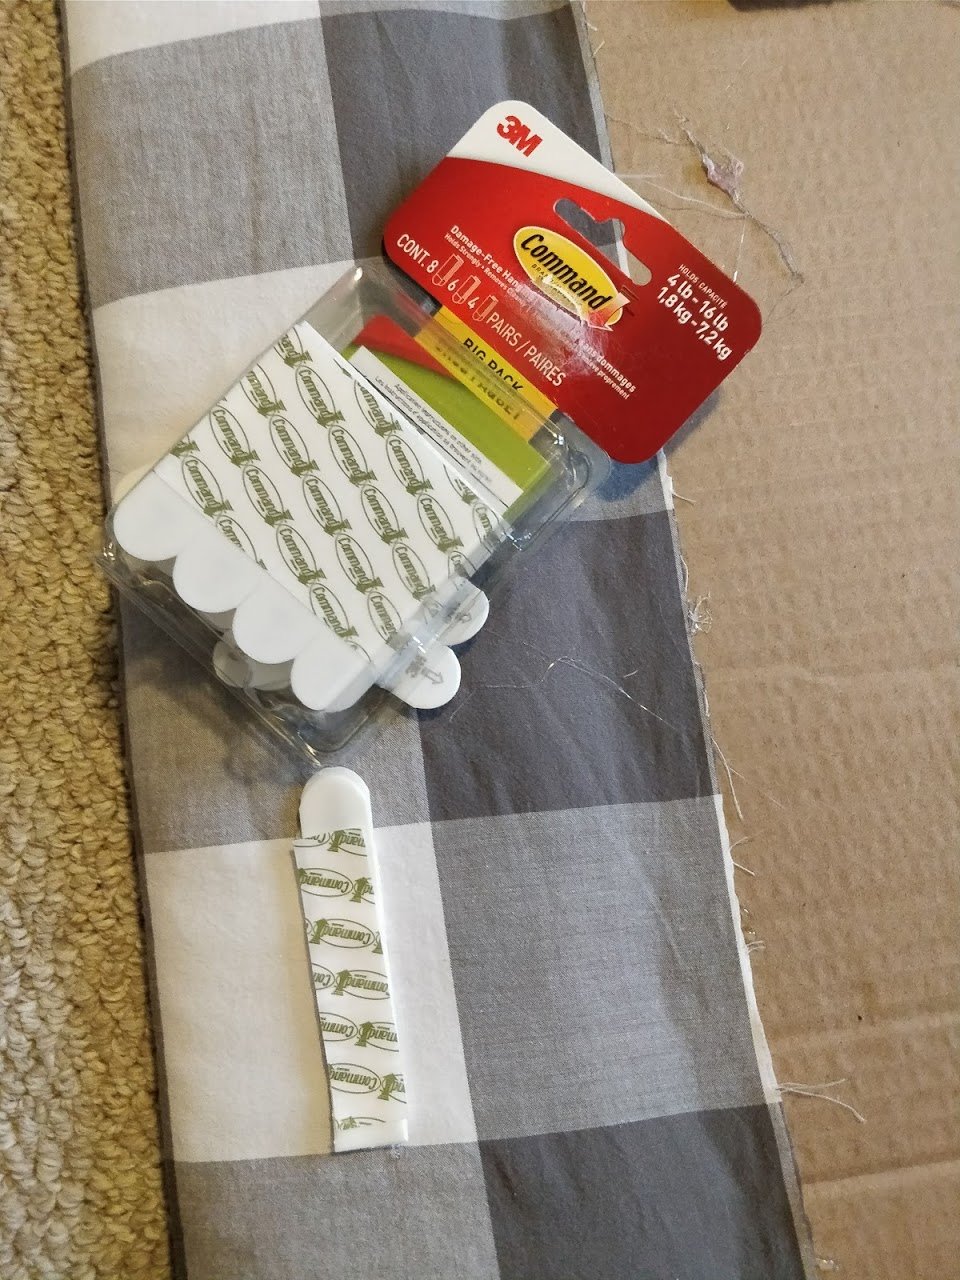
The only 2 items I needed to buy was some duct tape to tape the cardboard (from the dollar store),and some Command picture hanging fasteners- which is an EASY way to attach the headboard to the wall(without tools or damaging your wall). All together $10!
If you want to see how we put this super EASY and cheap headboard together, check out the tutorial with pictures below!
DIY Upholstered Headboard
Learn to make this cheap and easy upholstered headboard, perfect for any bedroom or dorm room!
Materials
- Foam board or a large cardboard box
- Cotton batting or an old duvet
- Fabric (old curtains, tablecloth or duvet cover works too!)
- Command Picture hanging kit
- Optional:
- Tufting snap-on buttons and upholstery string
Tools
- Hot Glue Gun
Instructions
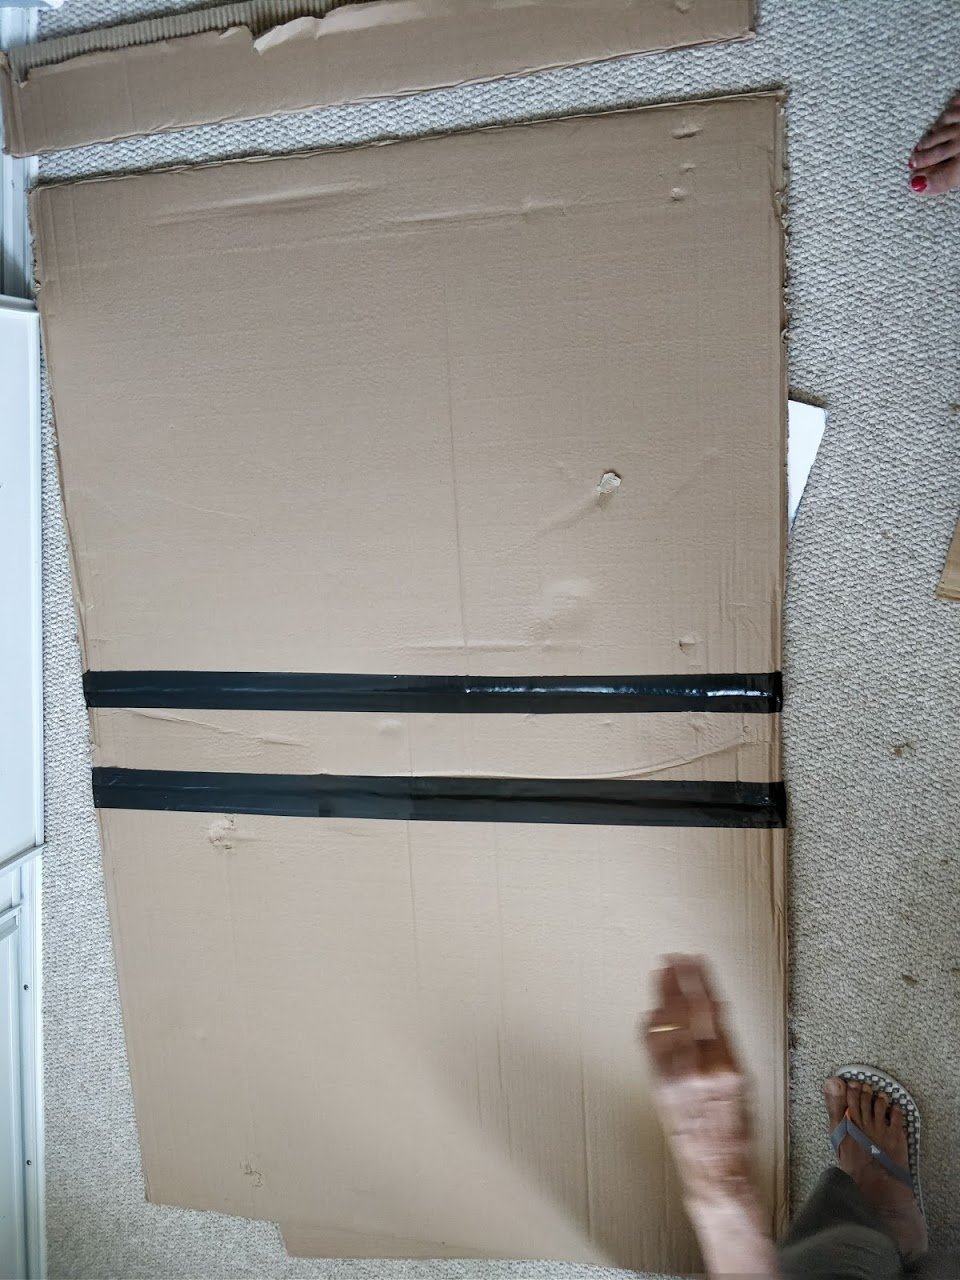
- Take your cardboard box and cut it to the shape and size of your headboard. We made ours 4 inches wider than the width of our bedframe (so there is overhang). Once its cut to the shape you like, take some duct tape and tape down any folds(tape both sides of the fold). This will keep the cardboard piece straight and prevent it from folding over

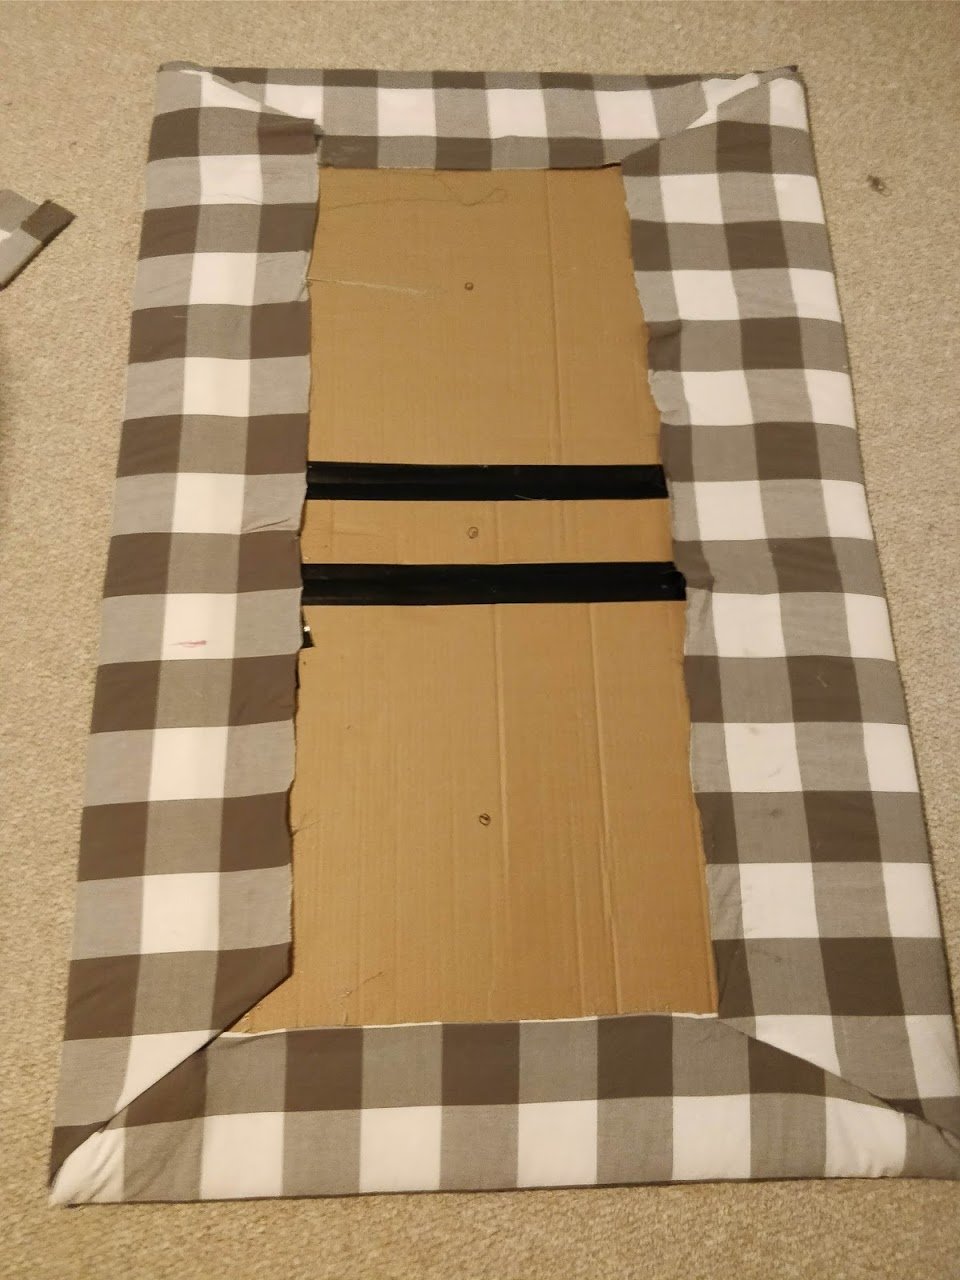
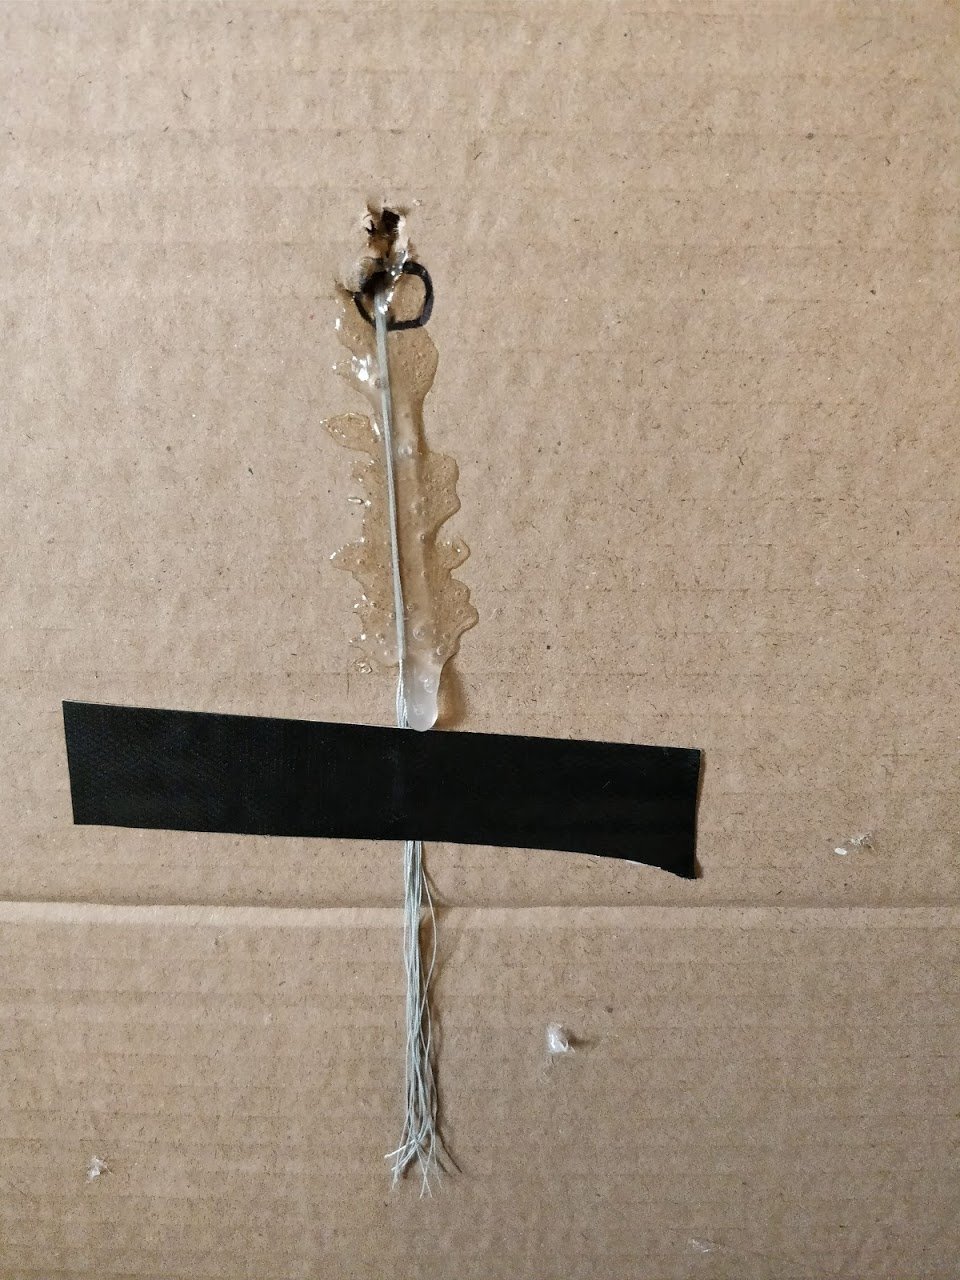
- If you decide you want to add in tufting buttons to your headboard measure and draw dots where you want your buttons to go. Use a scissor or knife to make holes in the cardboard. on these dots. This will make it easier to find the holes (for the buttons to go) when the cotton batting and fabric is covering the headboard in the final step.

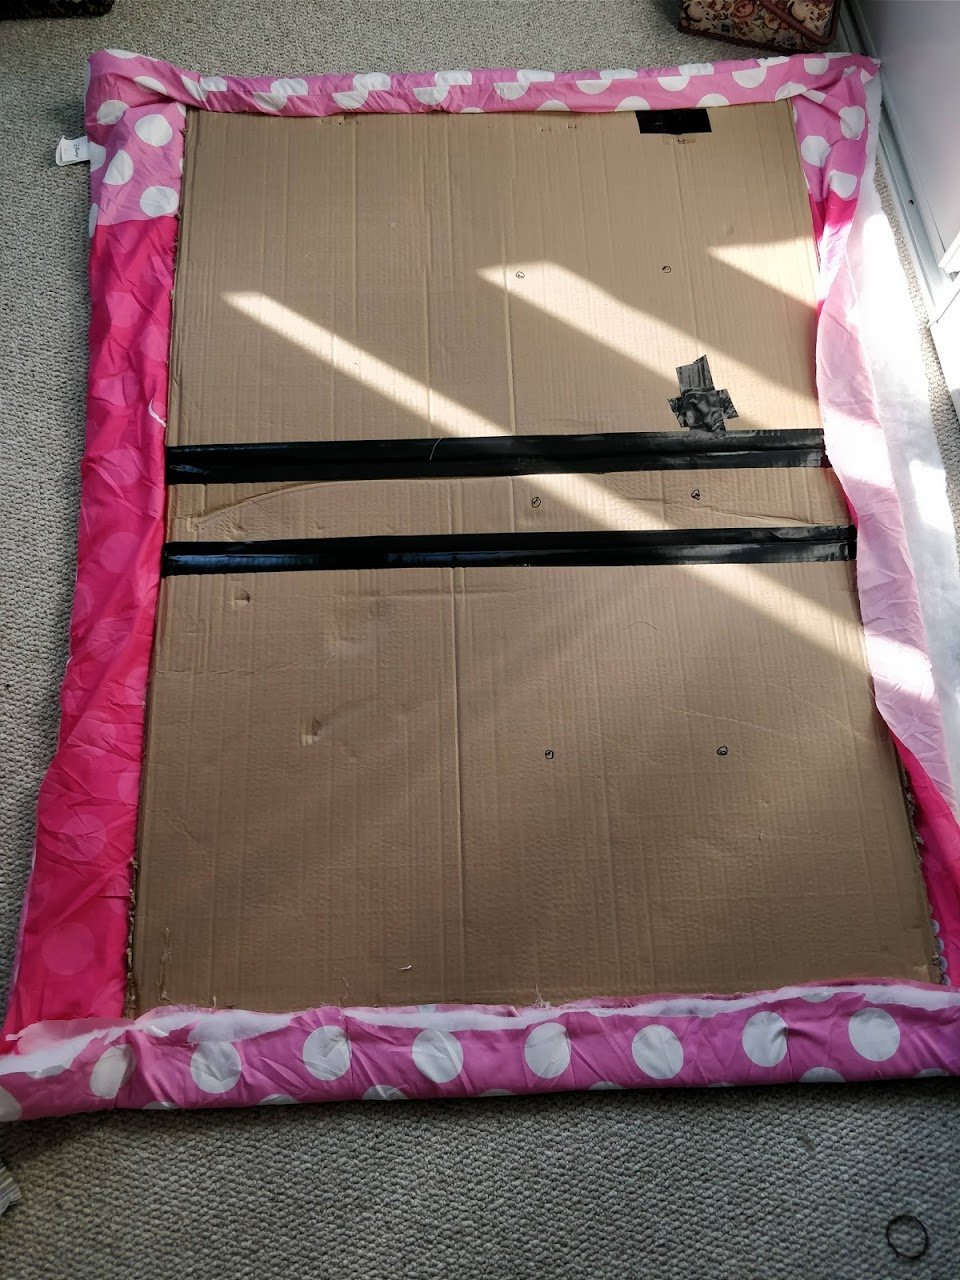
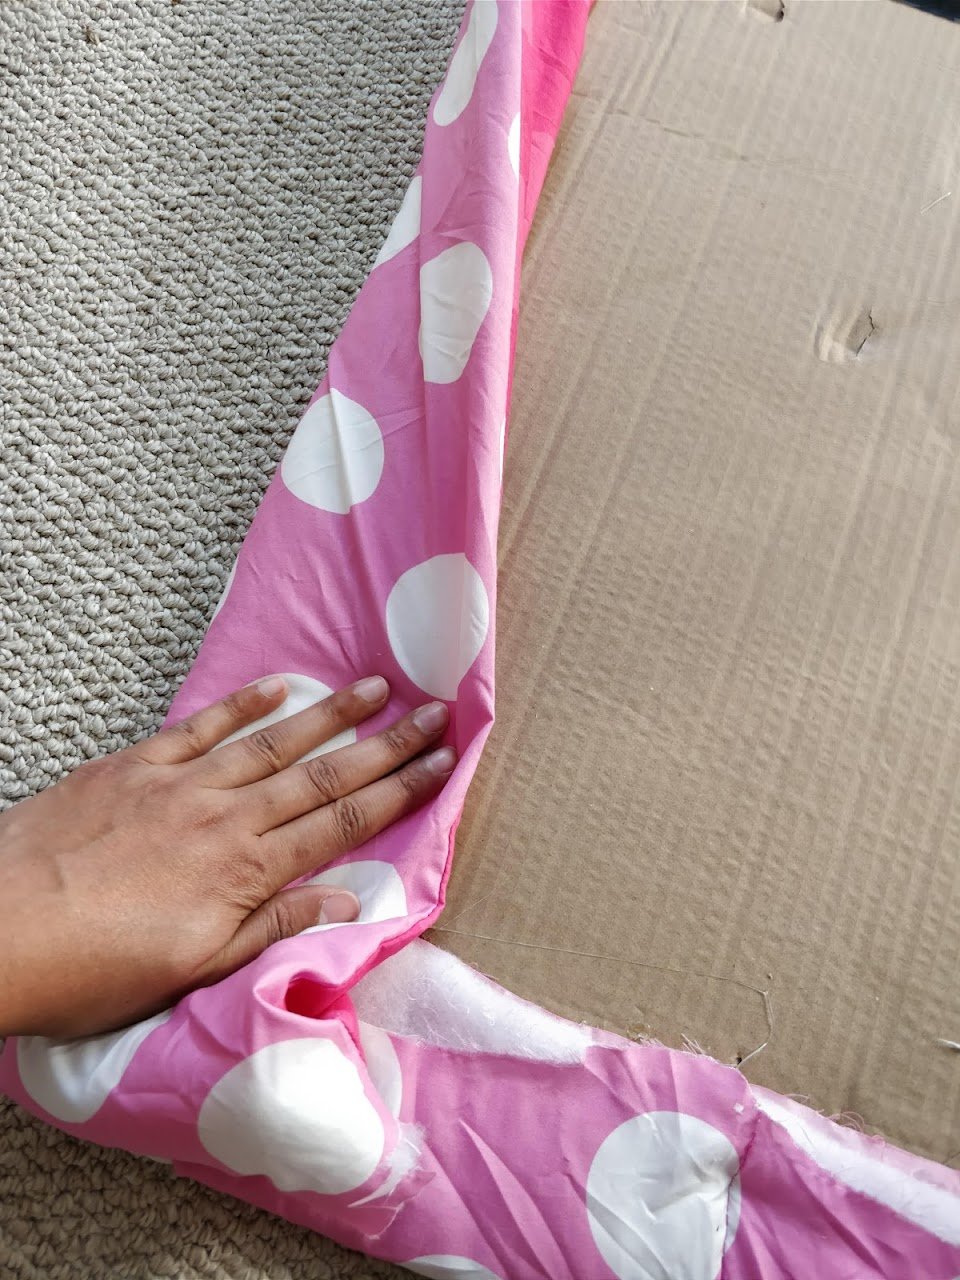
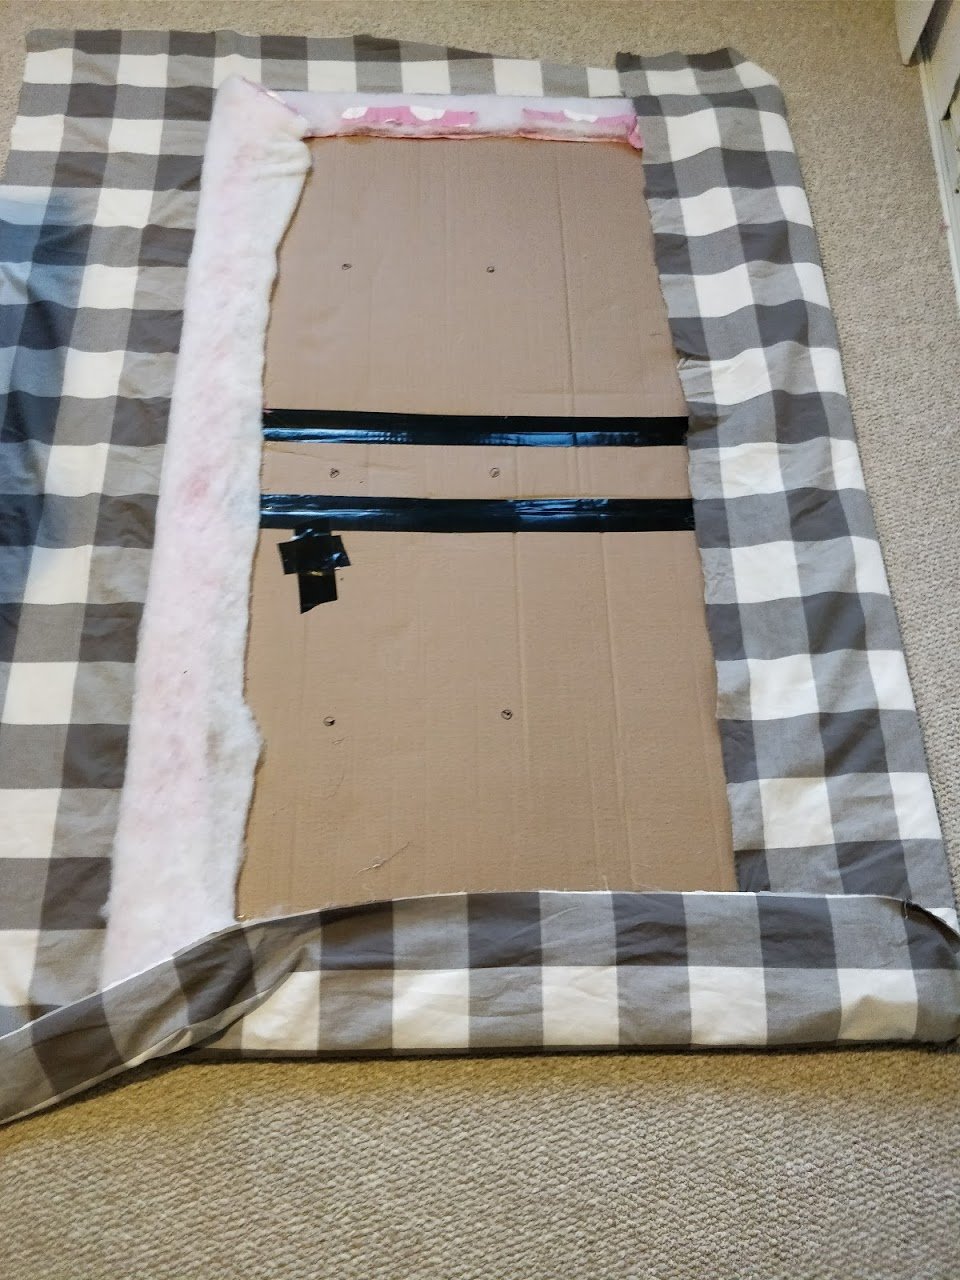
- Lay your cardboard piece over top the center of your cotton batting. We used an old kids duvet which has cotton batting inside it, which is why it's pink. We ended up removing the pink cover and just used the cotton batting iside the duvet (Since it showed through our final fabric)
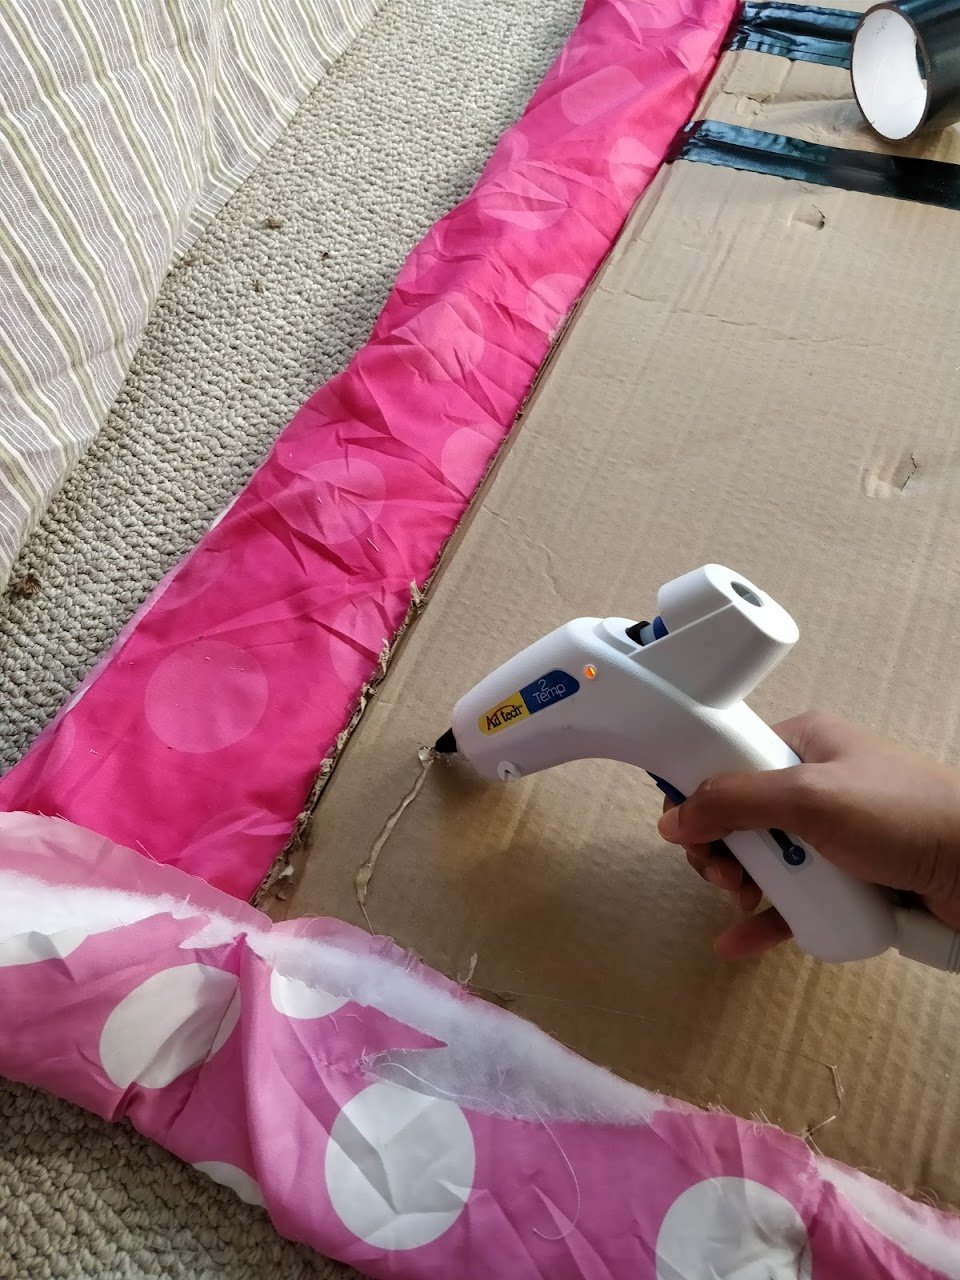
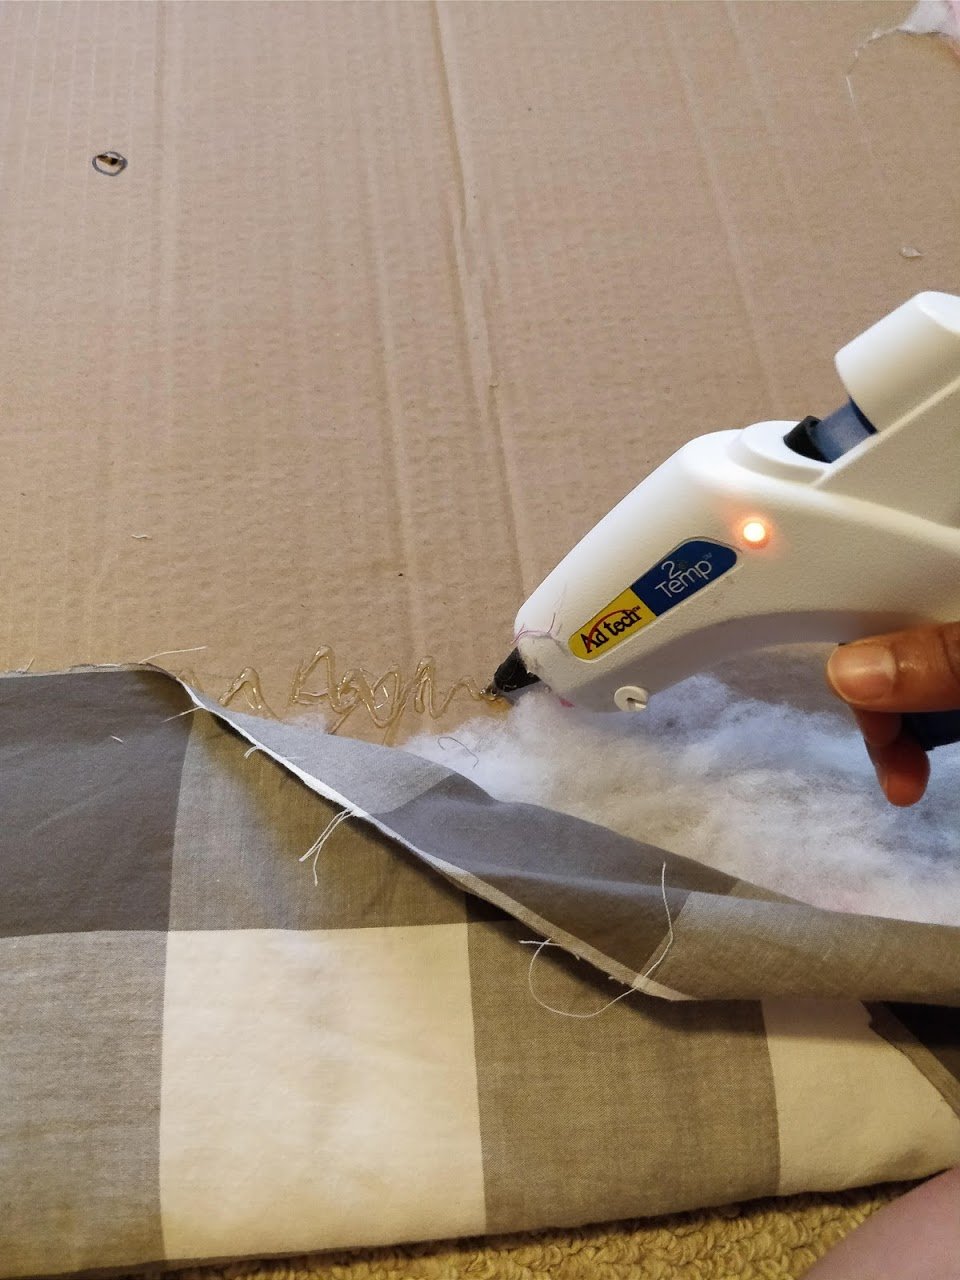
- Start gluing the cotton batting/duvet to the cardboard.
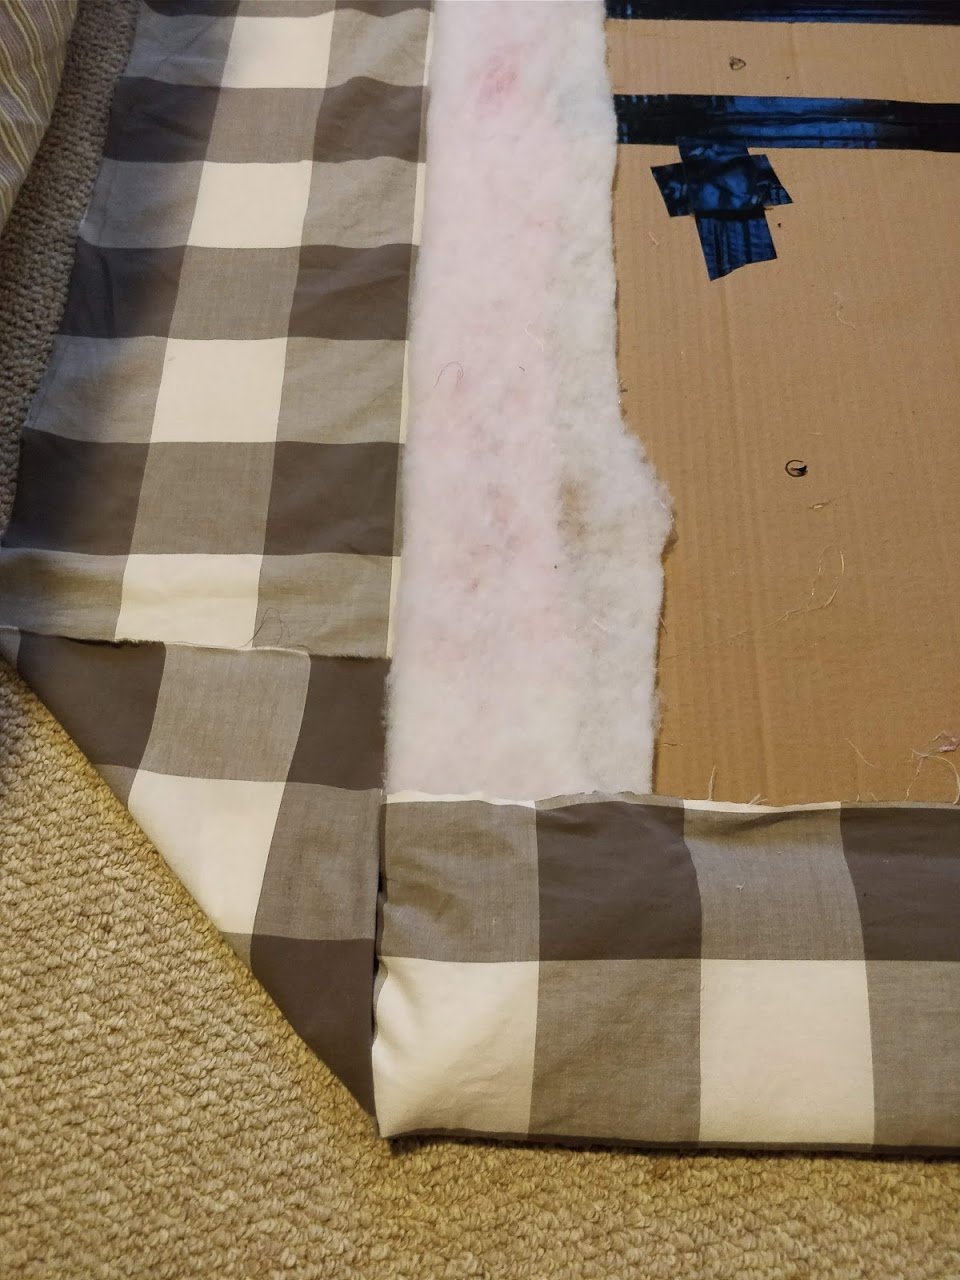
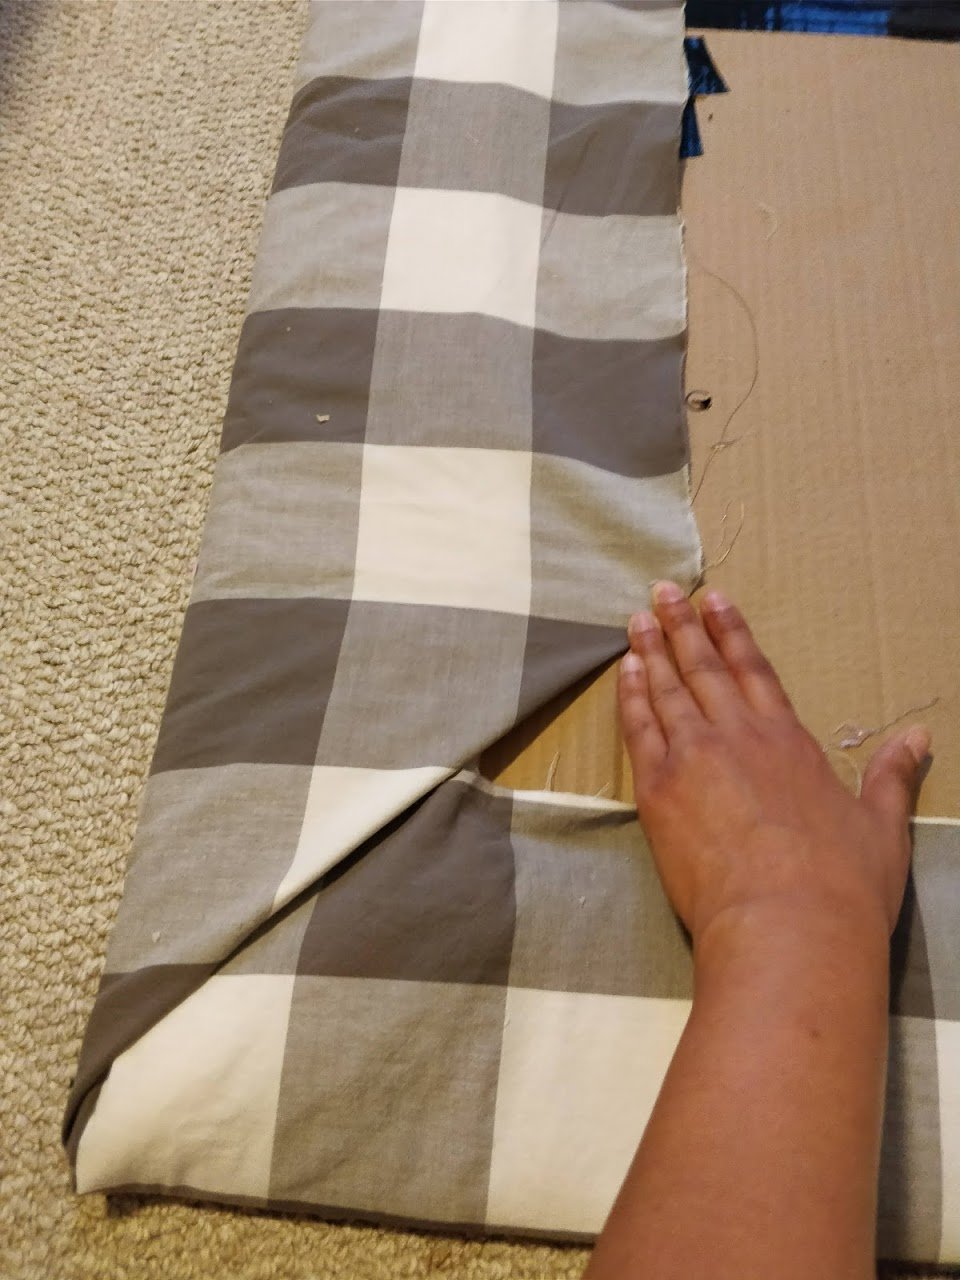
- Now wrap the cardboard headboard (from step 4) with your upholstery fabric and glue that in place the same as step 4.NOTE: we ended up removing the pink polka dot cover from the cotton batting inside the duvet, since it showed through the outer fabric.
- To make the corners sharp and crisp, fold the material like you would a gift and glue in place.
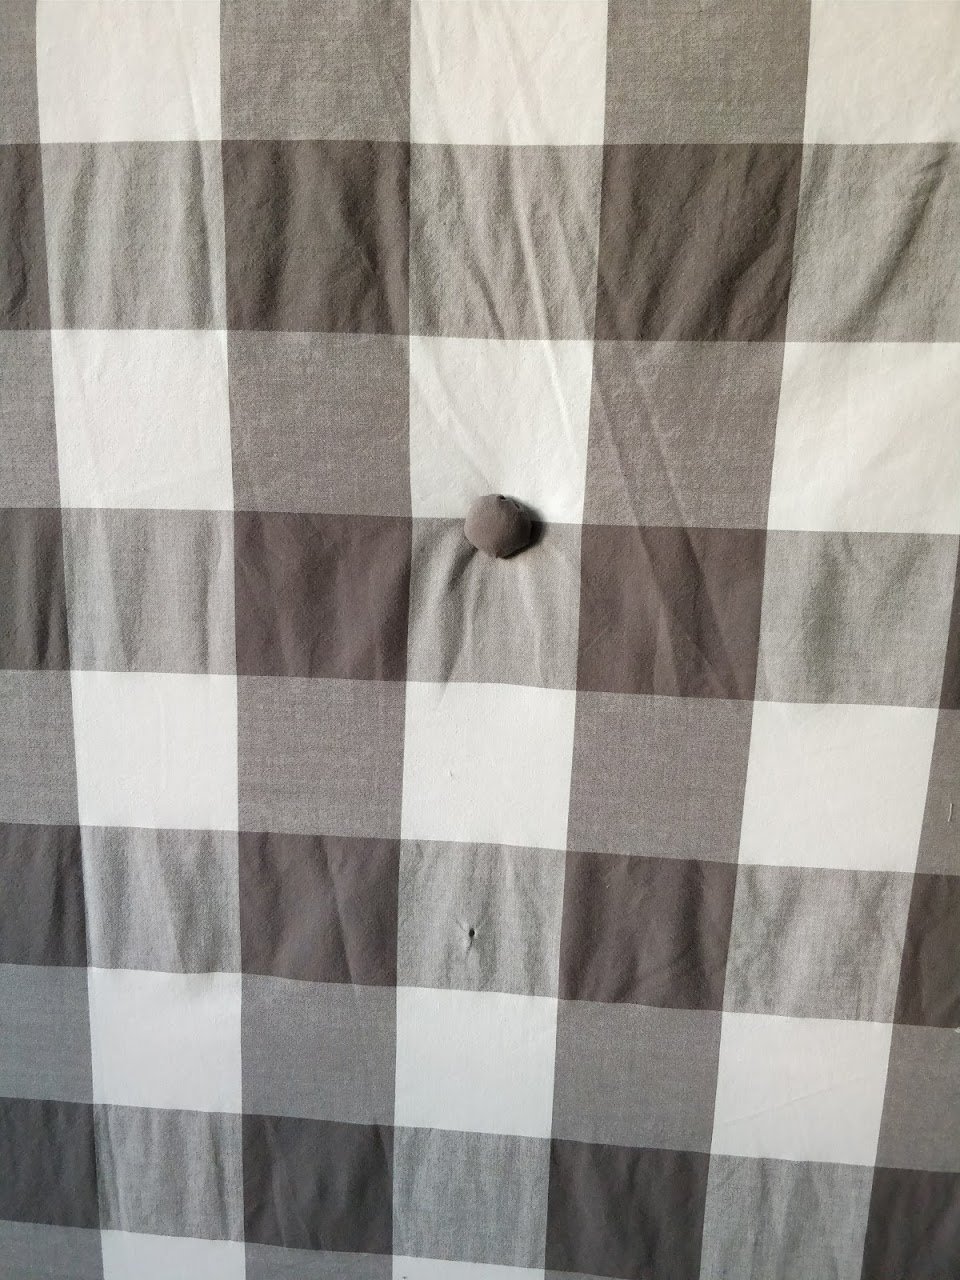
- To make your tufting buttons, follow the instructions on the packaging, or use regular buttons as an easier alternative! Hoop your upholstery thread in the button holes, and then string them through the holes you make in the cardboard in step 2. Pull really tight and then secure the string to the back using hot glue and an extra piece of duct tape.
- Last step is to attach your DIY headboard to the wall behind your bed. We hot glued the Command strips to the fabric on the backside of the headboard and then used the sticker part of the other side of the strip , to adhere to the wall. Worked beautifully! no tools needed and your walls will be damage-free!
- Stick the headboard to the correct position in the wall (centered behind the bed frame) and your done!


Recommended Products
As an Amazon Associate and member of other affiliate programs, I earn from qualifying purchases.
-
 ccbetter Upgraded Mini Hot Melt Glue Gun with 30pcs Glue Sticks,Removable Anti-hot Cover Glue Gun Kit with Flexible Trigger for DIY Small Craft Projects & Sealing and Quick Daily Repairs 20-watt,Blue
 -
Warm Company Batting 2391 72-Inch by 90-Inch Warm and Natural Cotton Batting, Twin
-
Command Picture Hanging Strips White Large 12 Pairs
-
Dritz 114-36 Craft Cover Button Kit with Tools, Size 36 - ⅞-Inch, 14-Sets
-
eLuxurySupply Fabric by The Yard - 100% Polyester Upholstery Sewing Fabrics - Blake Raven Pattern
-
Top Finel Decorative Throw Pillow Covers with Pom Poms Soft Particles Velvet Solid Cushion Covers 18 X 18 for Couch Bedroom Car, Pack of 2, Mustard Yellow


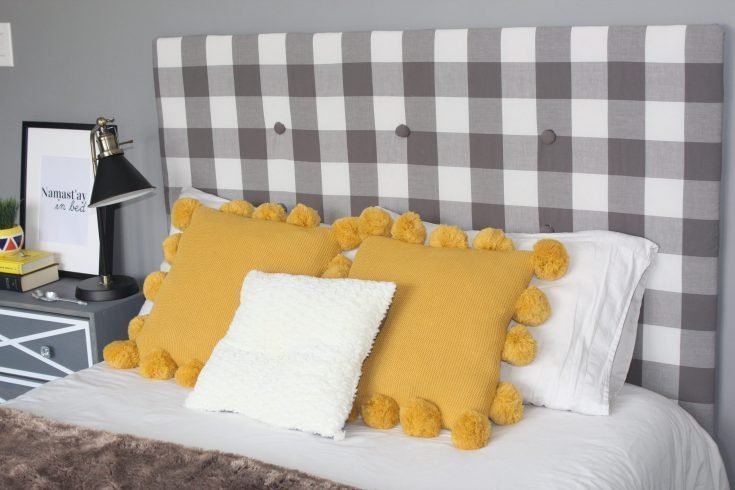
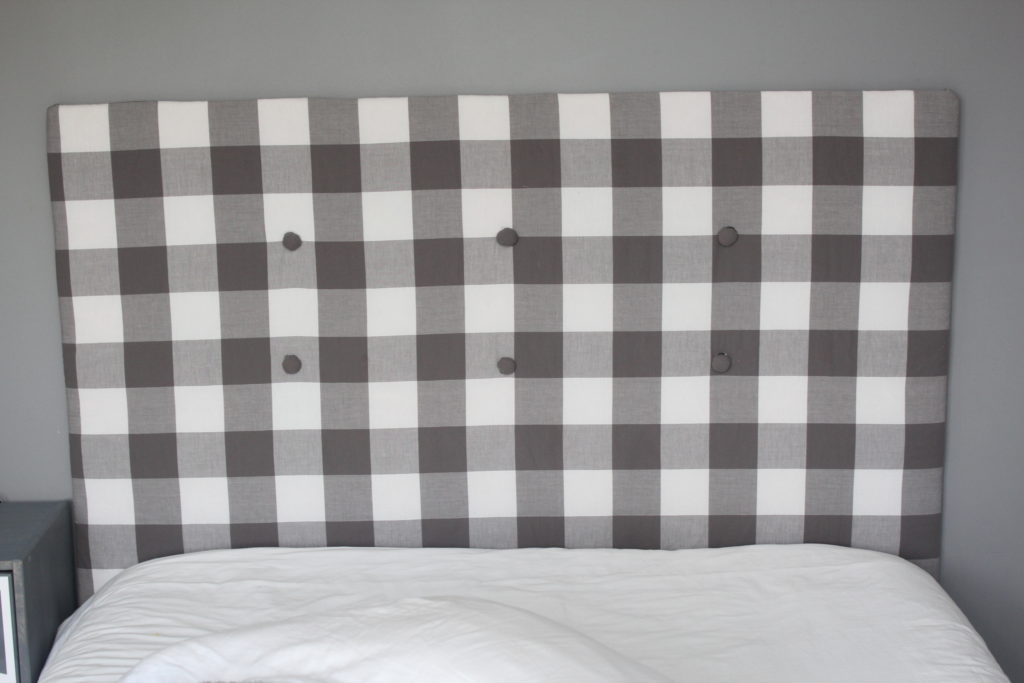
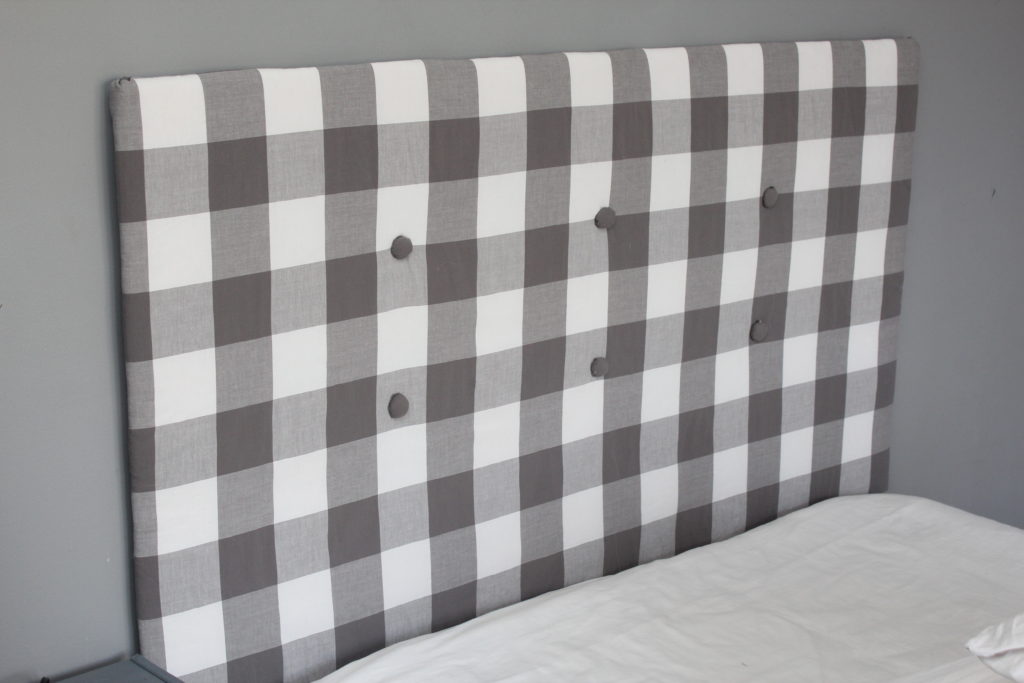
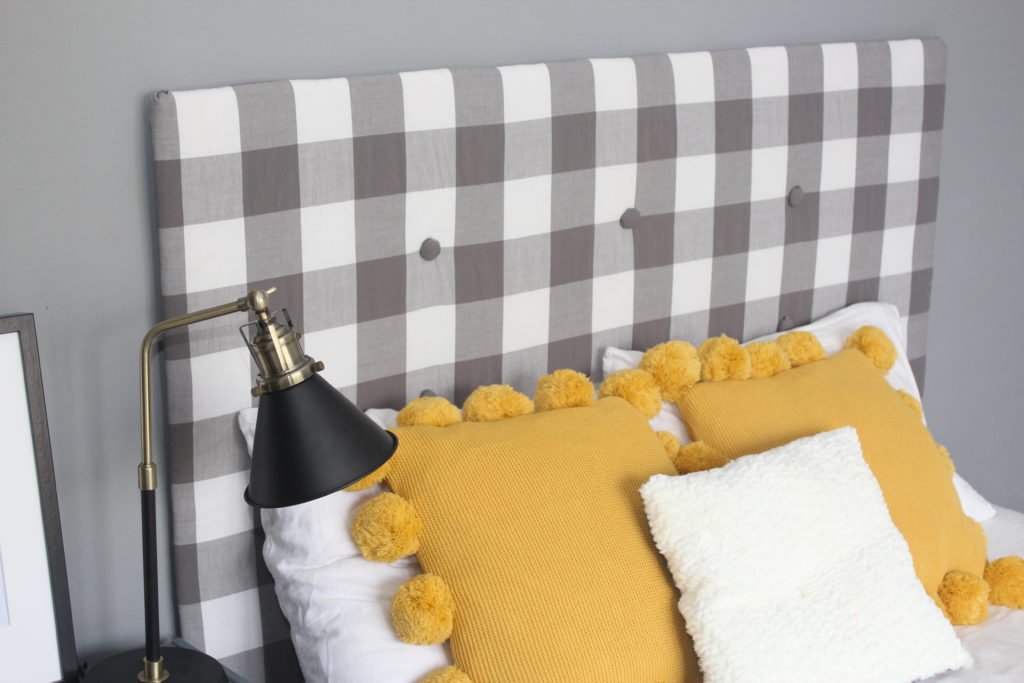
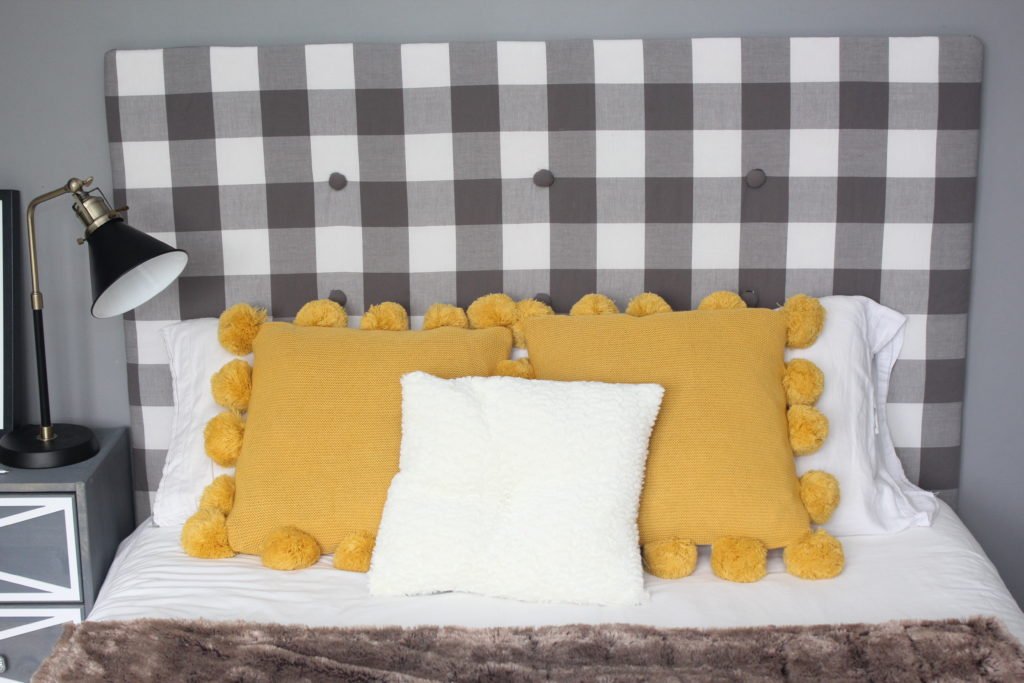
DIY Cardboard Headboard: AFTER pictures
I think this headboard turned out great - and people where shocked when I told them what it was made out of -cardboard!
For $10 you definitely can't go wrong with this project- whether for your master bedroom, kids bedrooms, guest bedroom or even a dorm room!
Here's some additional AFTER pictures of our easy and cheap DIY upholstered headboard. Enjoy!
Oh yes, if you like the "Namaste in Bed" framed print, checkout the end of the post. I've included a FREE printable that you can used in your own bedroom decor!


"Namaste in Bed" Free Printable
As a special bonus, I'm including a free printable of my "Namast'ay in bed" typography art print. It's a cute way to decorate you nightside tables, or even your bedroom wall. Hope you enjoy it!
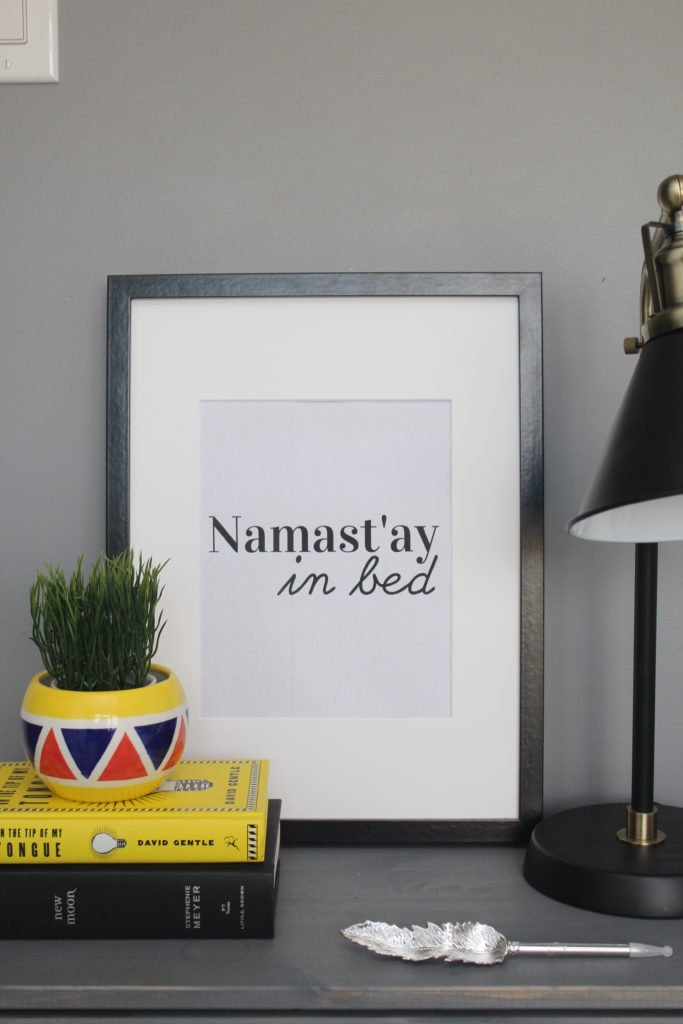
Instructions
Right click on the image below and "save as" a jpg picture (or you can save the PDF file below the jpg). Print out this picture on any standard printer paper (8.5x11).

Namaste In Bed PDF DOWNLOAD
Hope you enjoyed learning how to get creative and create a farmhouse inspired cheap DIY headboard for $10! You'll be amazed at it- and people will never guess its made out of cardboard!
If you liked this post please pin it!


This looks great! How frequently does the headboard get used and how well has it held up?
Thanks Roxy! The headboard is used daily and it's 1 year and going strong, haven't had to fix/adjust anything since the initial.install. Hope that helps!
Looks great! What dimensions did you cut your cardboard to? I know it says you made it wider than the bed but what height did you make it?
Hi Laura,
I just measured the headboard and it's 35" x 57" so the cardboard is very close to that (I would say minus an inch max).
Cheers,
Jasmine
Looks great! When putting the batting and the material on, how much of an overhang did you leave so you can glue the edges on the back?
Hi Karen,
I left around half a foot over hang but that was very generous. When I have upholstered my other furniture the rule of thumb is 3-4 inches so you can pull it taught when stapling/gluing.
Cheers,
Jasmine
We are moving in to new house and after painting He wanted to make a backing head board for the beds. Great Ideal!!!! We are going to try this. The rooms will be a two tone colors, blue, lave, green. This will be fun....
That sounds like an exciting project Charlene! Enjoy painting your rooms (love your color choices btw) and making these headboards 🙂
Cheers,
Jasmine
Thank you so much for sharing this with me! Our whole bedroom flooded recently and it has been a nightmare. We found a great water damage restoration service but they couldn't really fix everything so we decided to take it as a sign that we just needed to redecorate. Your DIY headboard has made a huge difference in the look of our home and the state of our budget.
Hi Alicia,
First, so sorry to hear about the flooding. That does sound like a nightmare- I can only imagine. But glad that you were able to take a positive out of it and redecorate your room, that is so nice to hear. And you are most welcome for the tutorial, so glad it helped!! 🙂
Cheers,
Jasmine
What size buttons did you use?
Hi Carrie,
Thank you for your question! The buttons are around 1” wide. Hope that helps!
Cheers,
Jasmine
This is PERFECT for me! I have the huge piece of cardboard, the old comforter and hot glue gun. I can easily get the fabric for a few $$ and the Command Strips... perfect for my new bed and living in an apartment!
That’s awesome Angela!! It’s a fun and easy project- hope you enjoy putting it together!
Cheers,
Jasmine
Hi Jasmine!
We're moving soon and I want to make my son's room extra special since he's struggling with the idea of leaving the only home he's ever known (so far). This headboard seems like a great touch to add! What size bed do you have/how wide is your bed?
Hi Summer,
Moving can be stressful on kids, and it's so beautiful that you're making it easier for him to adapt to change. You're an awesome mama!! My headboard was for a standard double sized bed, but you can make it on any sized bed, just have to adjust the width. I would make the headboard about 6" wider than the actual bed (so there's about 3" extra on each side). Hope that helps and all the very best on your move and new home 🙏🏽❤️🏡
Cheers,
Jasmine