Easy Tulip Painting: Acrylic Tutorial For Beginners
Ready for tulip painting fun? Grab your acrylic paints and let's dive into the world of vibrant tulip flowers, especially those in stunning pink hues at full bloom. Explore the easiest way to create this quintessential spring-time bloom, creating glass vases and embracing the artistry of this beginner painting idea. It's stress-free creativity with colorful tulips on your canvas.
In this step-by-step flower painting tutorial, I'll show you an easy-peasy way to paint the tulip flower shape (including front petals, back petals, stems and leaves). Then you'll learn how to make your blooms look more realistic through using different shades and lighter colors and other flower painting techniques.
Oh and if you're a a watercolor kinda artiste, then check out this fantastic tulip watercolor tutorial.And if you're in the spring painting mood, check out these 60+ Spring Painting Ideas.
Now, grab your paints and let's bring these blooms to life!

Easy Tulip Painting With Acrylic Paints

Learn how to paint tulip flowers with acrylic paints in this free online art lesson. You'll paint a full glass vase of pink tulips in full bloom.
Materials
- Titanium White
- Mars Black
- Quinacridone Magenta
- Fluorescent Pink
- Phthalo Green
- Cadmium Yellow Medium
- Dioxazine Purple
- Aqua Green
- ¾" flat brush
- Size 4 round brush
- Size 1 round brush
- 12x12 canvas
- Palette
- Chalk
- Rag/paper towel
- Jar of clean water
Instructions
- Watch and follow along with the YouTube tutorial for extra support.
- Double load your ¾" flat brush with equal amounts of black and white. Using up and down vertical strokes to cover the entire canvas. You want the grey to mix right on canvas and to be streaky. Don't over blend.Wait 5-7 minutes for background to dry to touch.

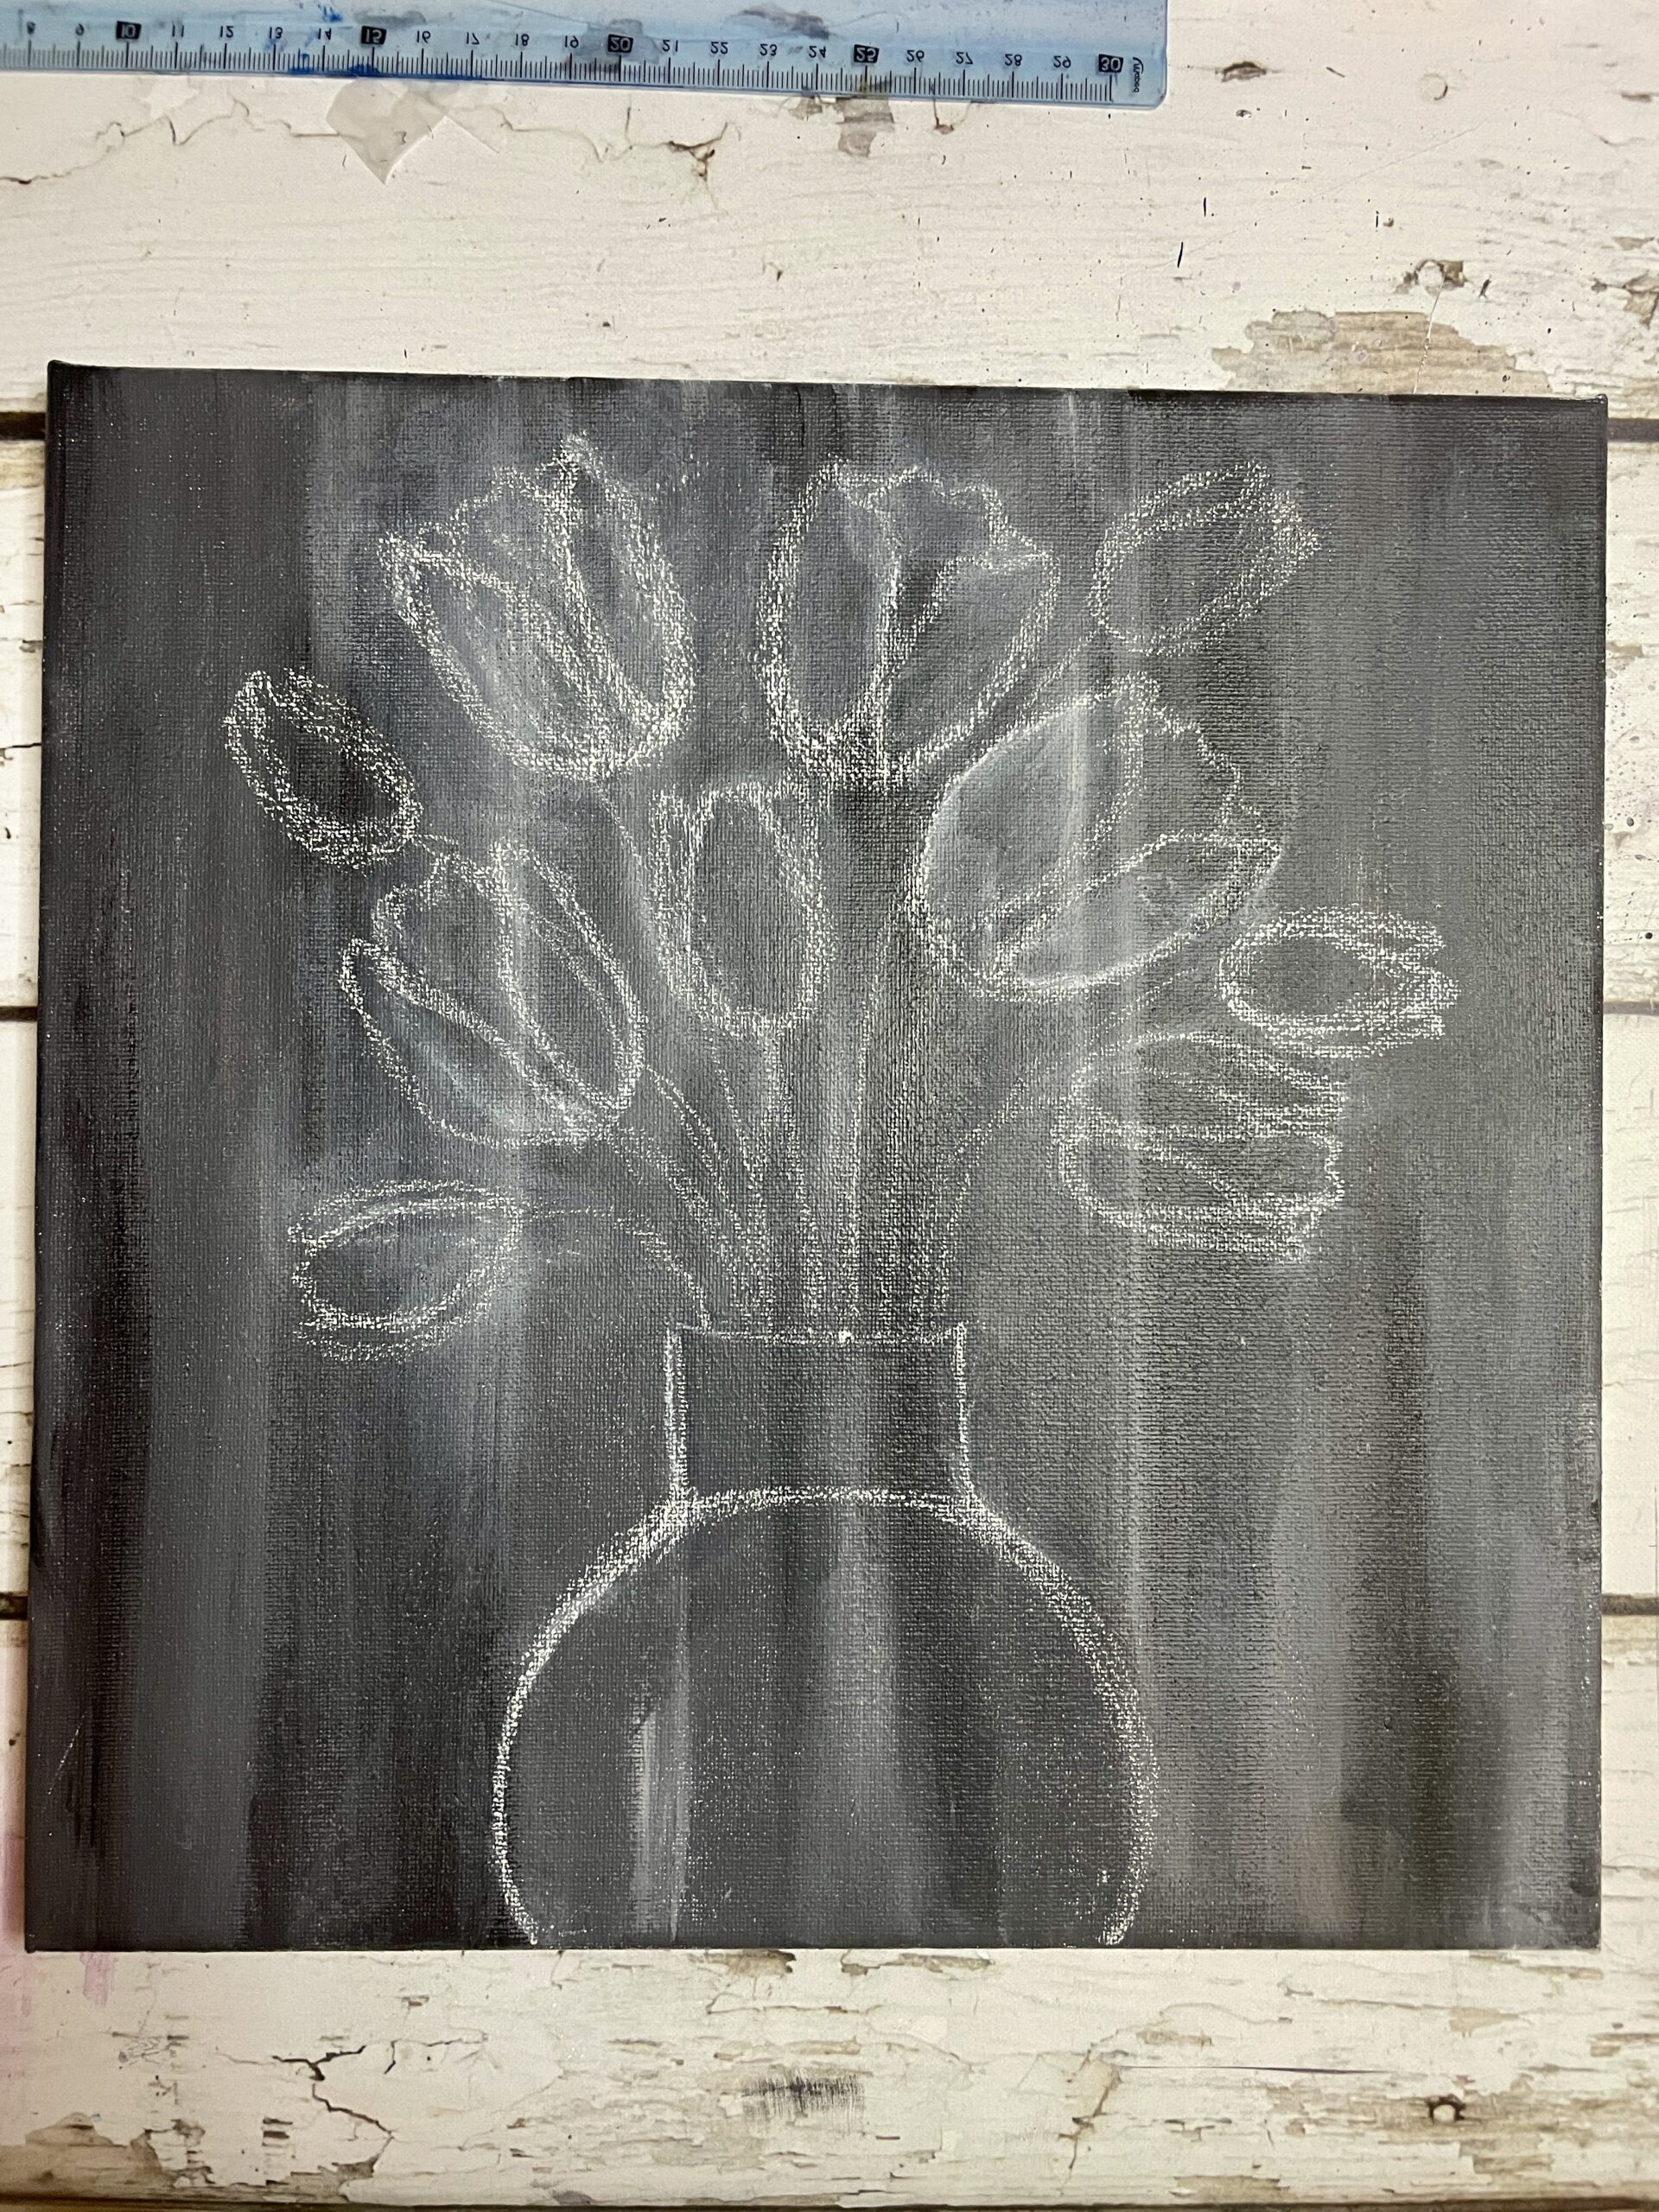
- Using a piece of chalk, sketch the outline of your tulip petals (back and front petals), stems, and vase. This is a rough sketch for placement, so don't feel you need to get the tulip shape perfect in this step. I will show you the easiest way to break it down in the next step. In this sketch I have tulips that are in full bloom, and some that are closed to give variety. You can choose arrangement to your liking 🙂 You can also refer to this how to draw tulips guide for more detail on tulip drawing technique.
- Mix 2 parts Quinacridone Magenta with 2 part white to get a medium pink. Use your size 4 round brush to paint in all the centre petals on all your flowers. Note the shape of the tulip petals are "U' shape, oval petals with 2 bumps at the top. You can make some flowers with bigger petals(bloomed flowers in the end) and some with smaller petals(un-bloomed flowers in the end) to give variety of tulip shapes.
- Mix 1 part Quinacridone Magenta to 2 parts white for a lighter pink color. If you have some paint still left from step 3, just mix in some more white to lighten it. Use your size 4 round brush to paint the front petals on each big tulip (bloomed flower). The shape of the tulip flower is kind of like a tea cup shape, so paint your front petals with this shape in mind. Some front petals can be overlapping, while some can be just barely touching.
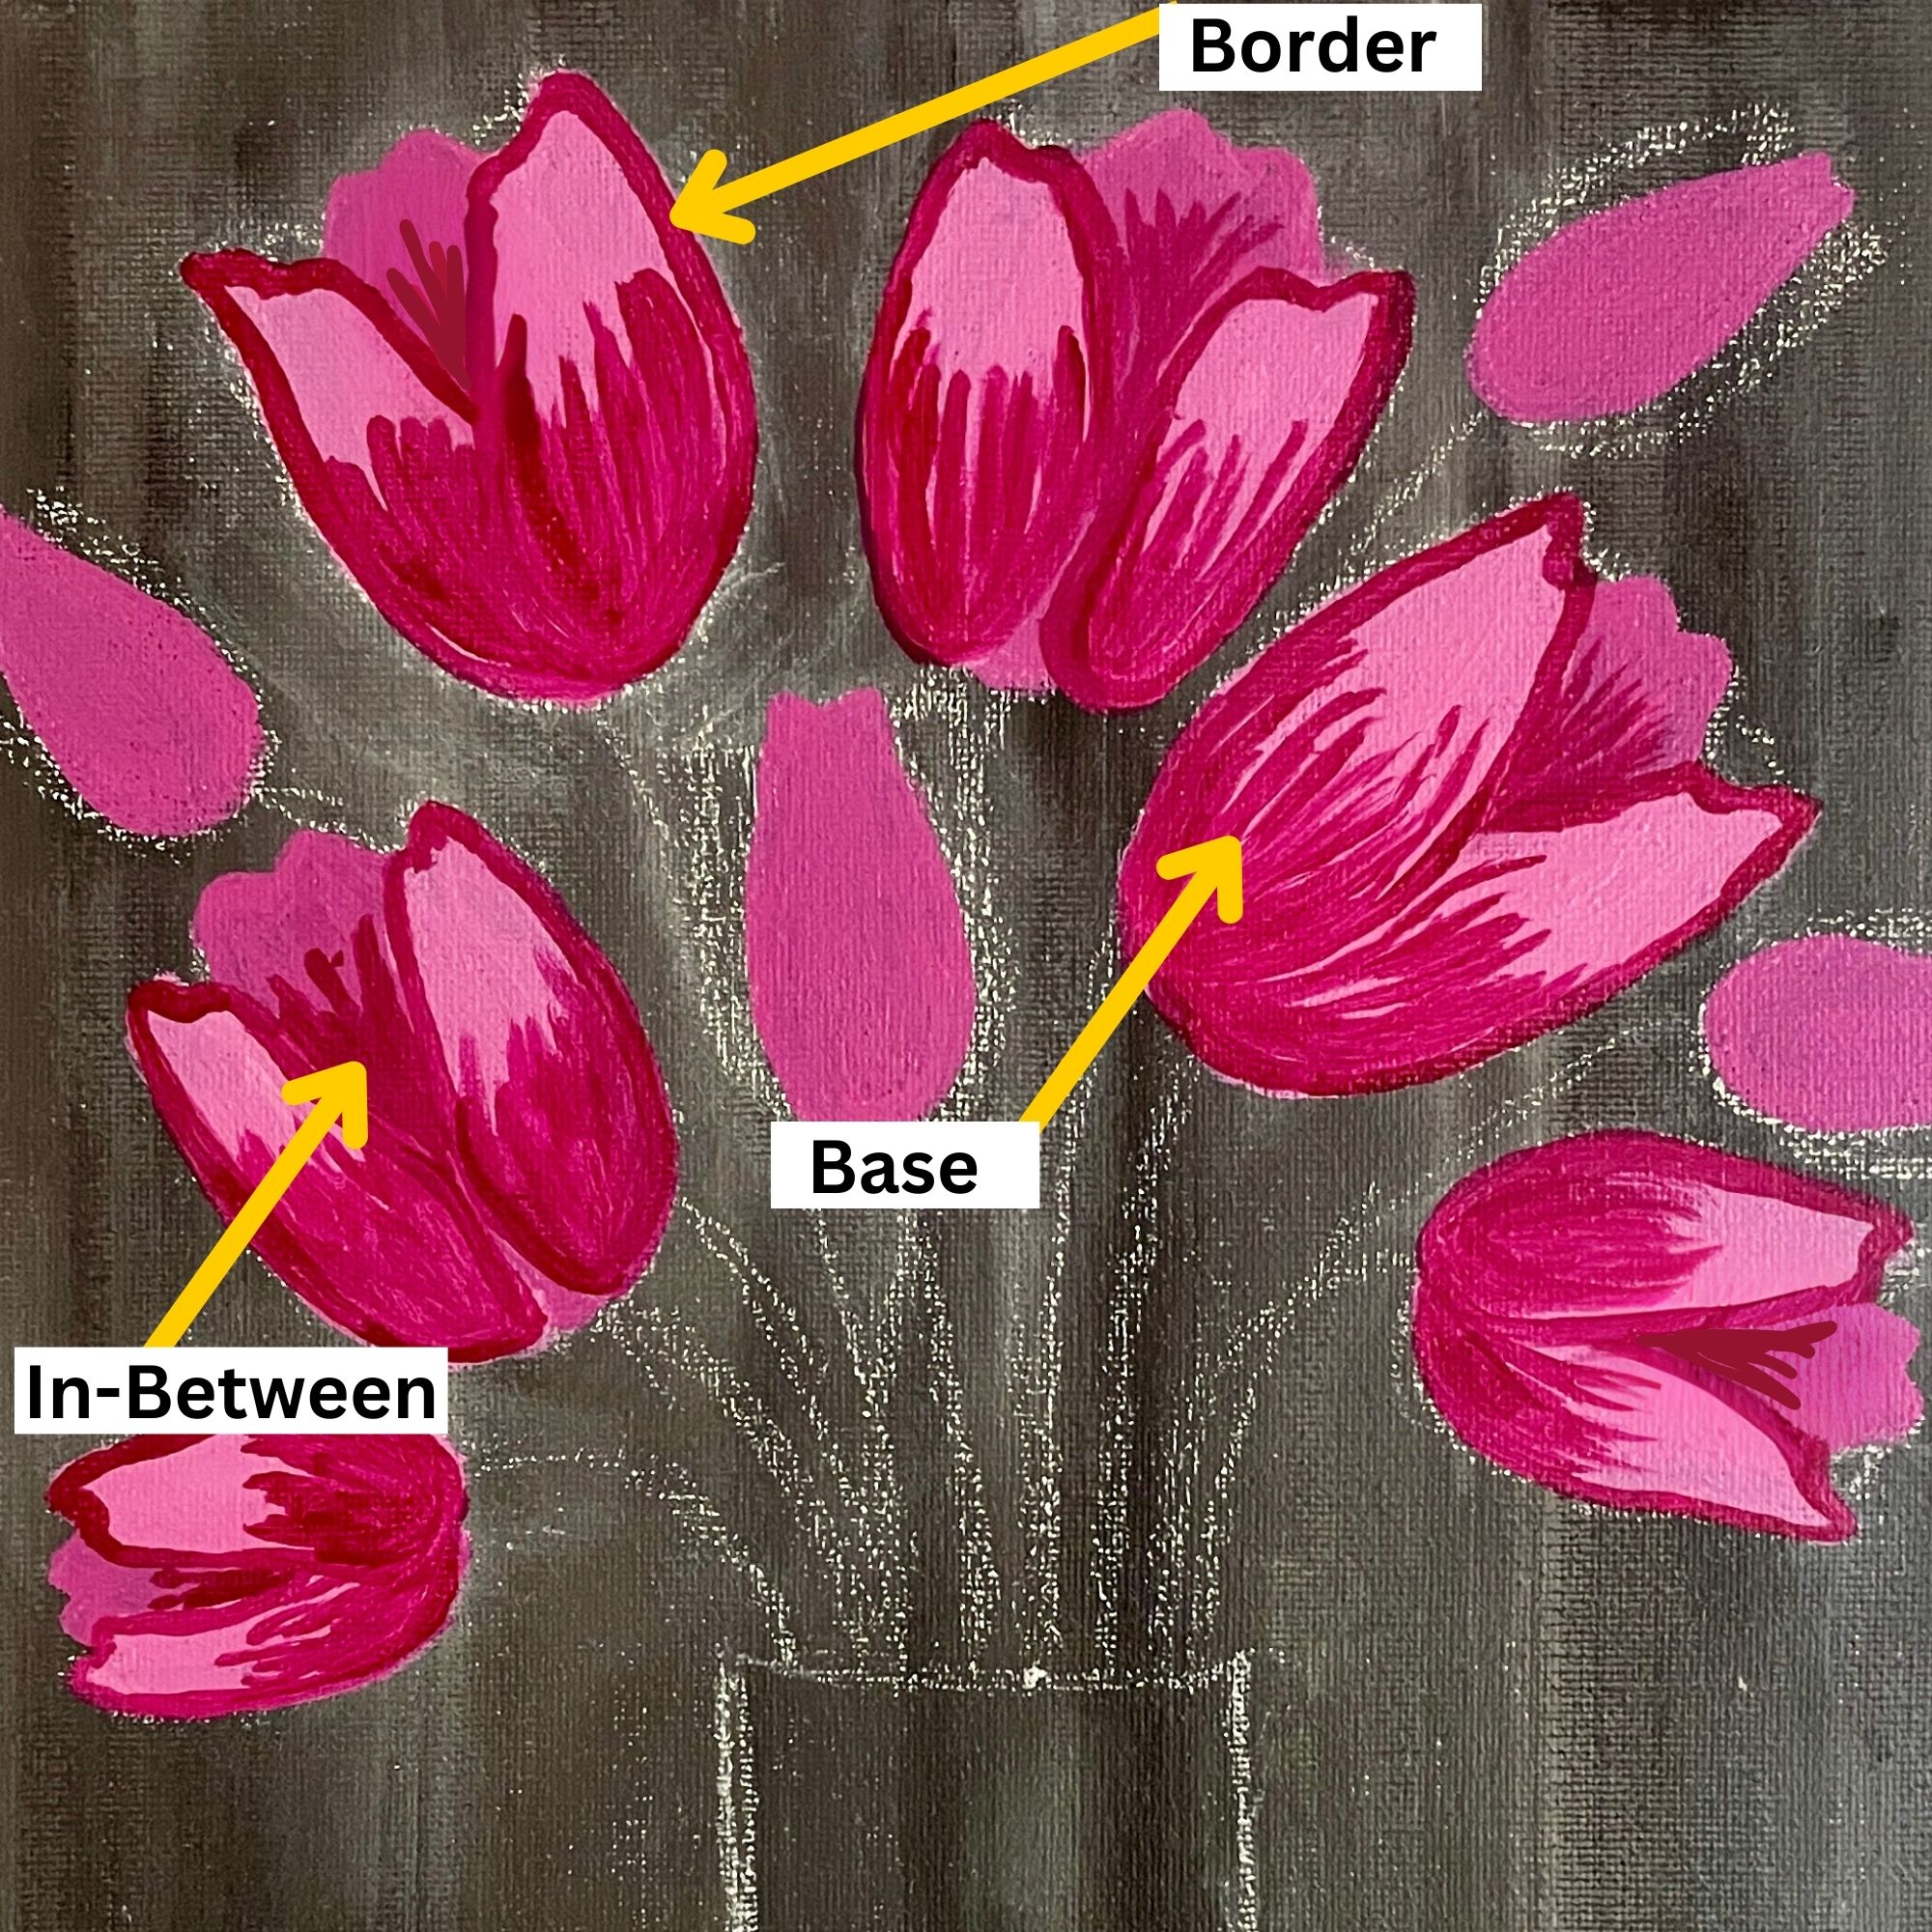
- Now time to added some darker shadows on our bloomed tulips. Take pure quinacridone magenta on your size 4 round brush and paint the border, the base and in-between the front petals on each tulip. Use upward light sweeping strokes when painting the base portion of each petal.

- Add some dark shadows on the un-bloomed tulips by painting a border and base of the front petals. Also add side petals that are barely visible and look like they are wrapping around the back.
- Mix some lighter & brighter pink by mixing 1 part quinacridone magenta, 1 part fluorescent pink and 2 parts white. Use your size 4 round brush to paint the top part of each front petal on all tulips. These should be light downward strokes so that it blends nicely into the dark shadowed portion. Try to curve each stroke (outward strokes) to show the curvature of each petal. Also, make sure you leave a very thin border around each petal that shows the dark shadowed color. The thinner the border the more realistic the tulips will look.
- Take the pink paint color from step 7 and lighten it with white. This will be the highlights at the top of the tulip petals. Take your size 4 round brush and paint the top third of the front petals with curved downward strokes (without completely covering the medium pink color below). Like in step 7, you want to preserve the thin dark border around the petal.

- Take your smallest brush (size 1 round) and take some pure titanium white paint and paint thin highlight lines around the top border of all of the front petals. You want to paint this this white line on the inside of the dark border. Basically from outside-in it'll be: dark border, thin white highlight line, followed by the colored portion of the tulip petal
- Optional step: if you feel your tulip is too bright and pink and want a bit more variation in color, then add a tinge of purple mixed with quinacridone magenta (equal parts). Add 3-4 thin upward and curved wisps of this color from the base of the tulip to halfway up. This will add a variegated look to your petals.
- Mix some quinacridone magenta with a tinge of black paint to create a dark burgundy. Use your size 1 round brush to paint thin centre lines on each front right petal. Make sure these lines don't go all the way down to the base, they only go about ⅓ or ½ the way down. Use white and paint the thin centre lines with white paint on each left front petal.
- Add some Phthalo Green, Cadmium Yellow and some Titanium White to your palette. Make an assortment of greens by mixing different quantities of green with yellow, green with yellow and white, Use your size 4 round brush to paint a variety of stems. Use the darker colors at the back and the lighter greens for the front stems. That will give the illusion of depth. If you have any open space around the stems feel free to add some leaves.

- Now let's paint the glass vase. Add a variety of different colors on your palette. From turquoise, light purple, bright greens, pinks, dark greens, light pink, etc. Add streaks of the cool blue/green/turquoise colors on the right side of the vase with your size 4 round brush. Add more of the pink/purple and a tiny bit of turquoise on the left side of the vase. You don't need to wait for each streak to dry, work with all the colors wet. Try to add the streaks in the shape of the vase (make them curved), while the streaks are straight and vertical on the neck of the vase.
- While the paint is still wet, take your size 4 round brush, that's completely dry, and pick up a tiny amount of pure titanium white on just the tip of the brush (you don't want too much paint on the brush here). You are going to dry brush over the entire glass vase using the same curvature of brushstrokes, like in step 13. With the dry brushing method you want to make sure you don't cover all the color below. Use the lightest downward sweeping strokes, If you find the white is covering all the color below, use lighter pressure on your brush (or less paint). You want the tip of the brush to barely touch down on the canvas, then sweep it down (like a flicking motion). The dry brushing method will give you a scratchy look with the colors below peaking through, this is the look we are going for.
- Double load your size 4 round brush with turquoise and white. Paint the rim of the glass vase with tiny downward and curved strokes. The white and turquoise will create a streaky look that will add dimension to the rim.
- Optional step: If you want to add some color back to the vase, feel free to add streaks of any color paint to your vase. I added more of the pink on the left side, which shows the glass reflection of the pink tulips.


 You can also refer to this


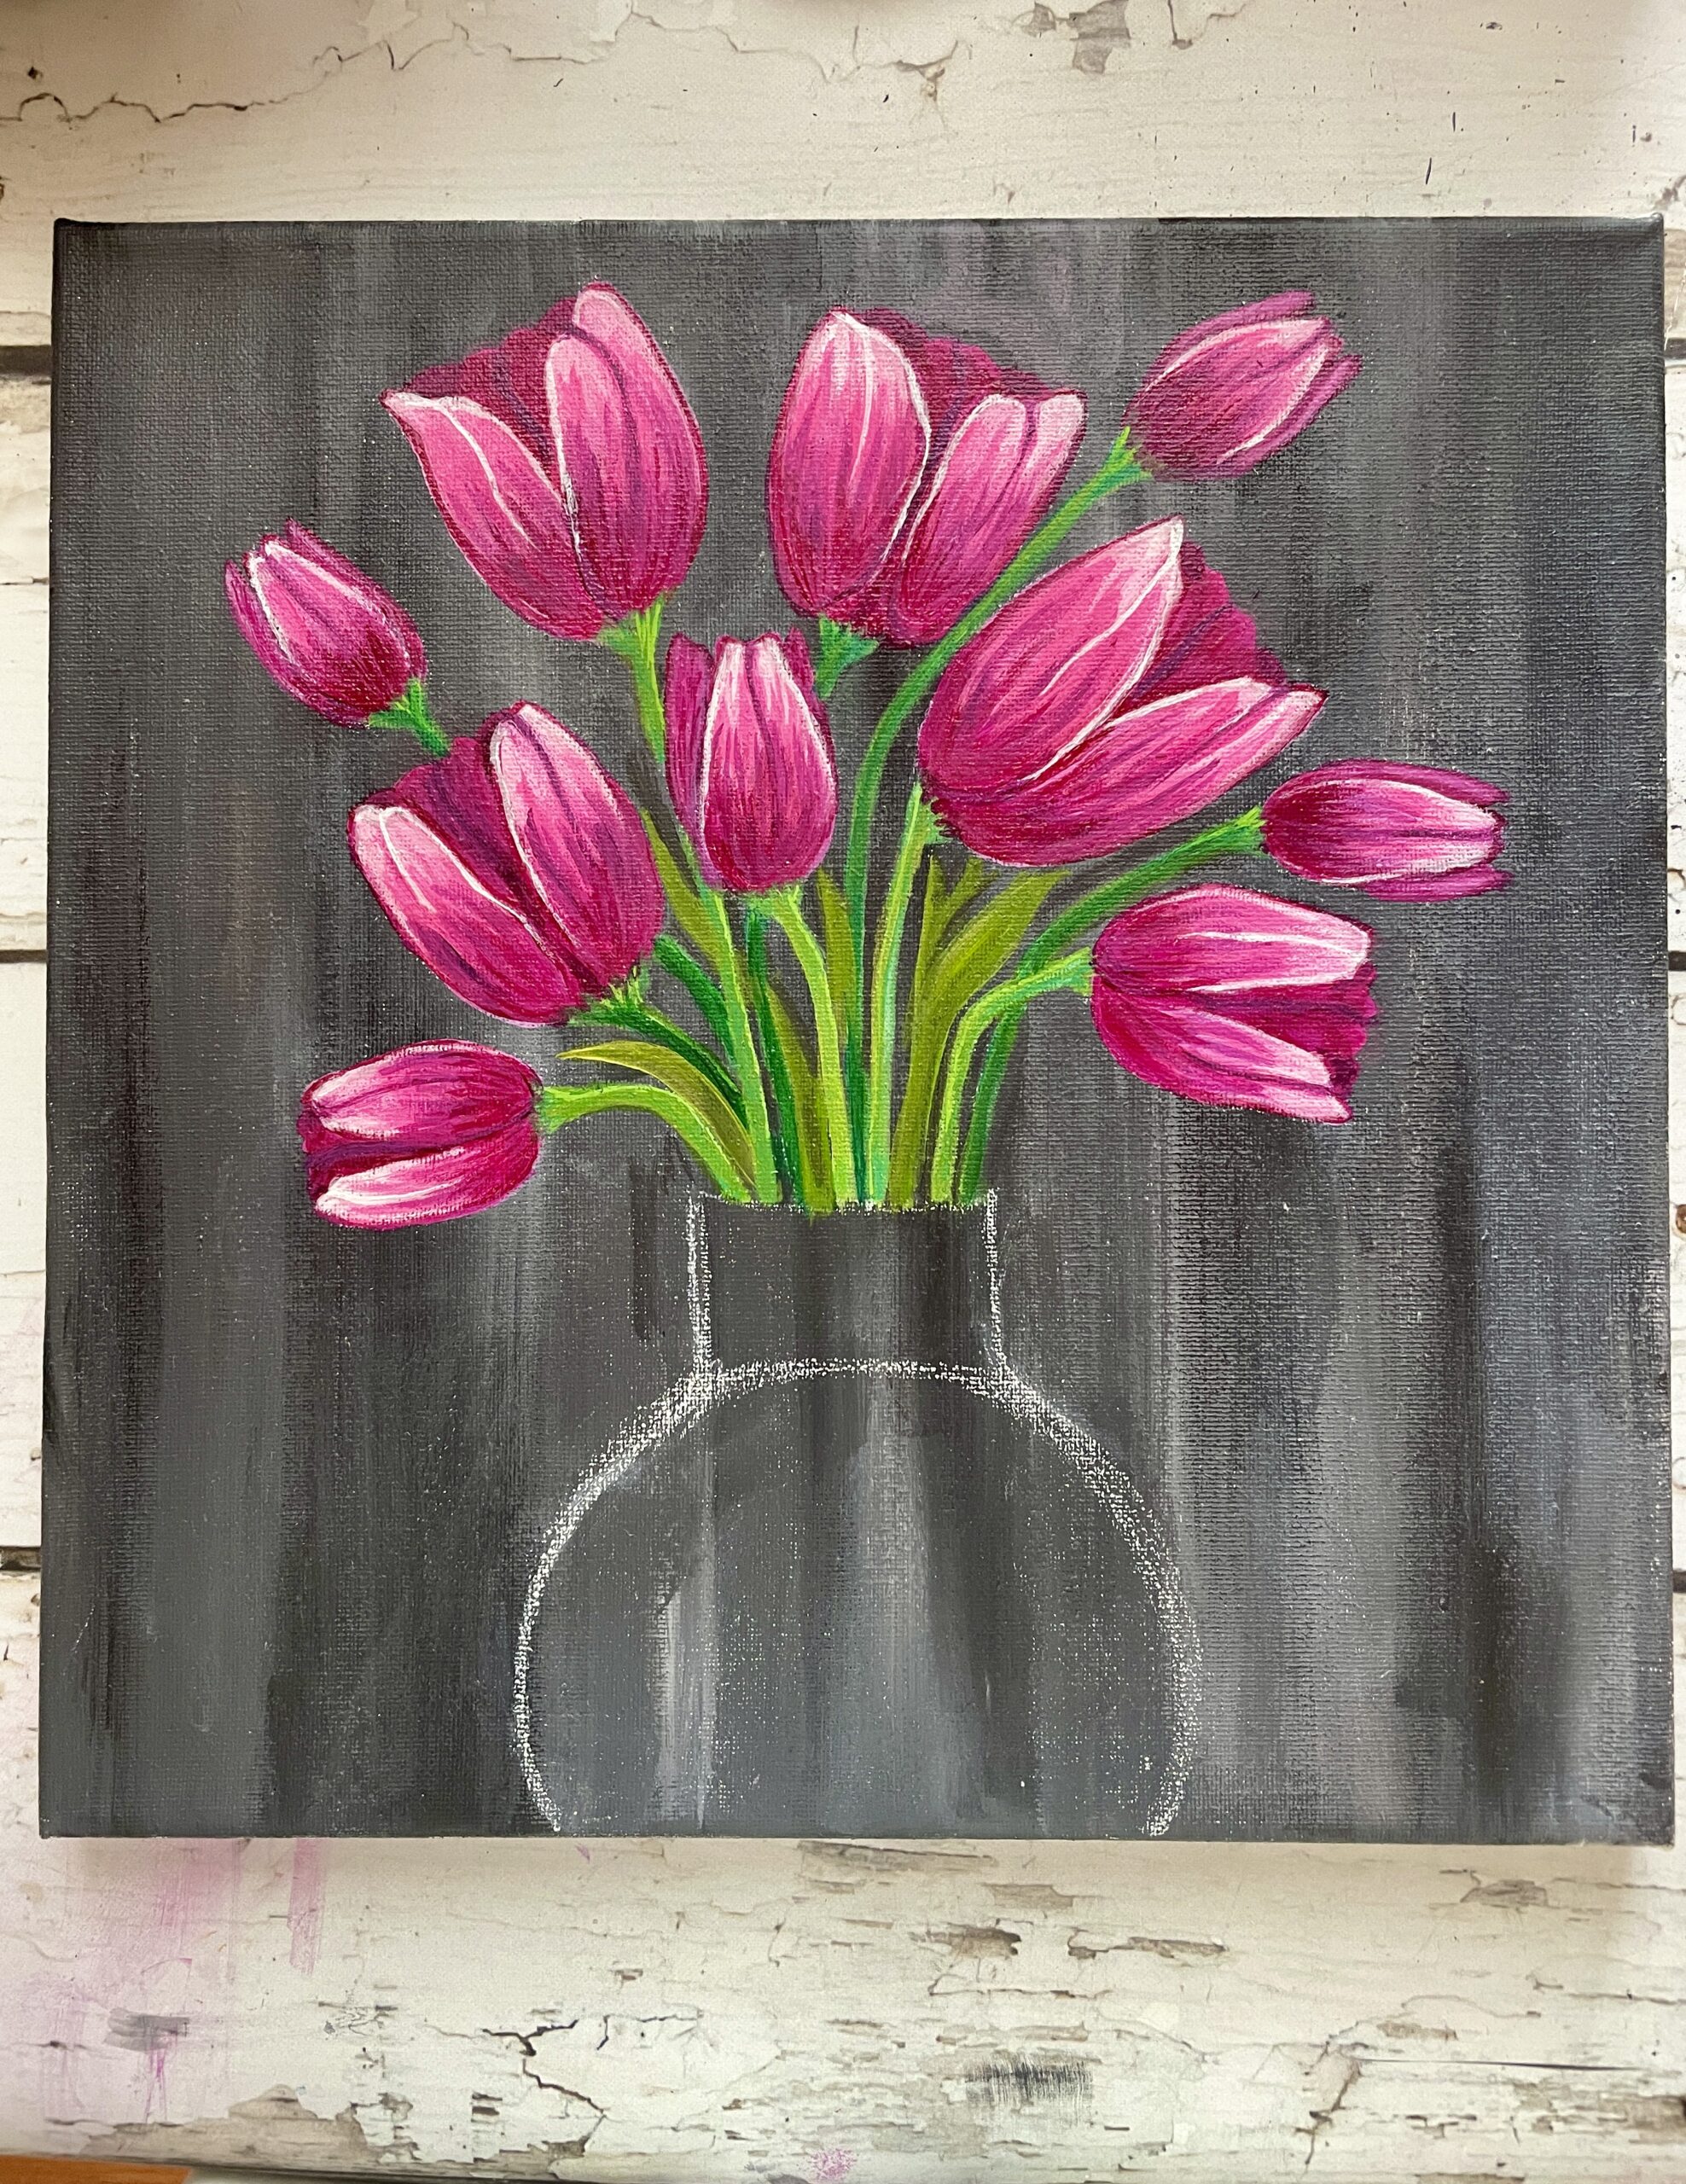


Completed Tulip Painting Pictures


Quick behind-the-scenes scoop: Nailed the shape and colors of this tulip painting on try number three! Just a reminder that even us seasoned painters need some practice—it's not always as smooth as it looks! 🎨

If you found this tulip painting tutorial helpful, please pin it on Pinterest!