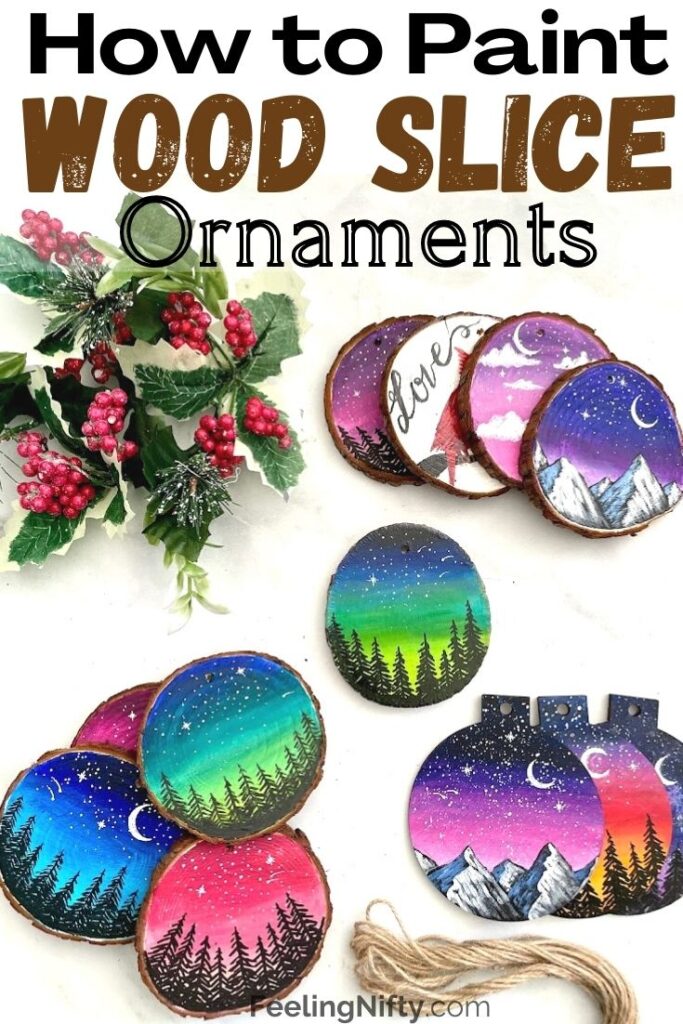
How To Paint Wood Slice Ornaments +10 Ideas To Get You Inspired
How To Paint Wood Slice Ornaments
If you've ever wondered how to paint wood slice ornaments, this post is going to be your ultimate guide. These wooden ornaments make great gift ideas, craft ideas with family and friends and also a great Christmas craft to sell online or at craft fairs.
Below you'll learn each step on how to paint wooden slice ornaments, from start to finish.
- Pick the right size wood slice ornaments
- Gather some supplies like acrylic paints, paint markers and small brushes
- Paint your wood slice with your paints(tutorial below)
- Seal your wood slice with varnish (tutorial below)
Looking for more magical holiday painting ideas that you and the kids can get festive with? Check out this 65+ Christmas painting ideas list that will inspire your inner artist! Or you can keep warm with these 65 easy winter painting ideas.
Types of Unfinished Wooden Ornaments to Paint
There are many different choices when it comes to wood ornaments. A popular trends that's emerged recently is painting on wood slices. There are many sizes to choose from but the ones I thought where the easiest to work with and look nice hung on a tree are these 3.5-4" wide wood slice ornaments.
Another option is to get wooden ornaments in different fun shapes that are also fun to paint, like these flat bauble wooden ornaments or this whimsical variety of unfinished wood Christmas ornaments.
Best paint for wooden ornaments
You can use many types of paint on wooden ornaments, but the one that's the best to use is acrylic paints.
Acrylic paints works great on wood and many other types of porous material without any extra preparation so they make an excellent choice for wooden ornaments.
In terms of brands and types, any will do. You can use the thinner acrylic craft paints in bottles, to the thicker heavy bodied acrylic paints in the tube. Whichever you have lying around home will be the best choice.
If you're looking to do some delicate hand lettering or paint on smaller ornaments and need to get really fine details, then paint markers will be your best friend.
I love using my Posca paint markers for my fine details (like my tree silhouettes). I also recently found this Posca Brush Pen, which is one of my most favorite discoveries lately.
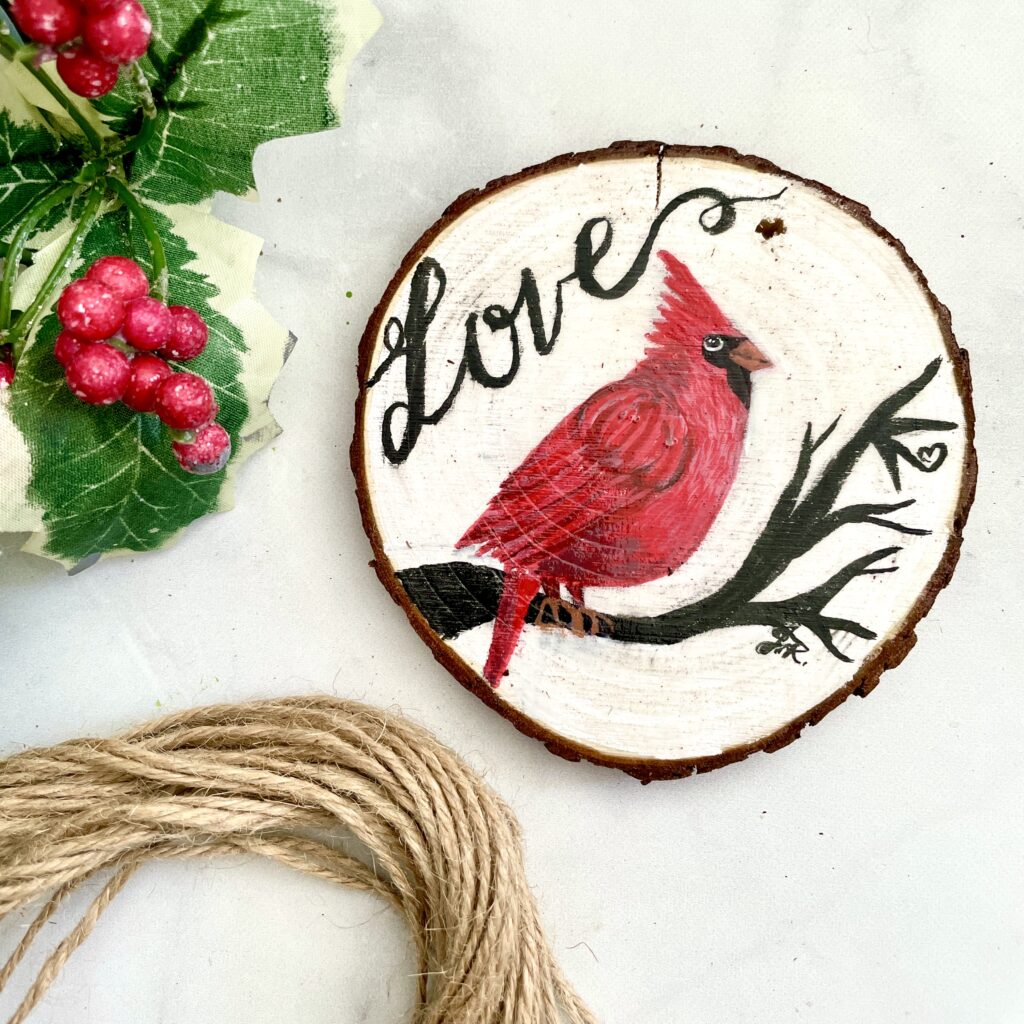
If you've used brush pens in the past, then this Posca brush pen is like those, but with acrylic paint instead of the ink. I found the ink was tricky to work with mixed media and acrylics since it would sometimes reactivate when anything wet touched it. So this Posca paint brush pen solved that problem for me and I love it! I used it to get the "Love" lettering in my cardinal ornament below.

How to seal wood slice ornaments?
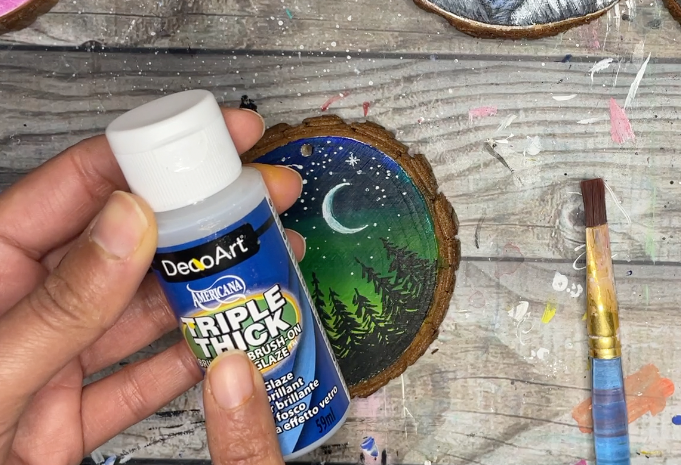
Your artwork on wood slices will last longer, avoid chipping & peeling if you apply sealer on top of the paint. Another benefit of sealing wood slice ornaments is that the colors will be brighter and more vivid if you choose a sealer with a gloss.
Take a look at the difference between an un-sealed ornament (right) versus one thats been sealed (left). I used the exact same colors on both ornaments, but the ornament on the left (sealed with Triple Thick) the colors look more vibrants and even the black look deeper and richer.

The brands of varnish I've used on my wood slices are this Liquitex gloss varnish (which I've also used on my canvas painting). The varnish goes on very easily (it's very think in consistency) and dries in 2-3 hours.
Another good option is getting these small 2oz bottles of Triple Thick Brush on Gloss. The triple thick varnish only needs 1 coat and you're done, while the other sealers you'll need to do multiple coats. This sealer is a bit thicker than the gloss so its not as easy to spread bu it still works like a charm!
Another tip is to wait 24 hours (overnight at the least) for your paint to fully dry and cure before sealing your wood slices. I've noticed that if I apply varnish too soon (even though it seems dry to the touch), the acrylic paint underneath reactivates and starts to smudge with the varnish over top.

Watch Wood Slice Painting Video Tutorial
How To Paint Wood Slice Ornaments
Learn how to paint on wood slice ornaments in this step by step tutorial.
Materials
- Wood slice ornaments (or any Christmas wooden ornaments) 4" wide
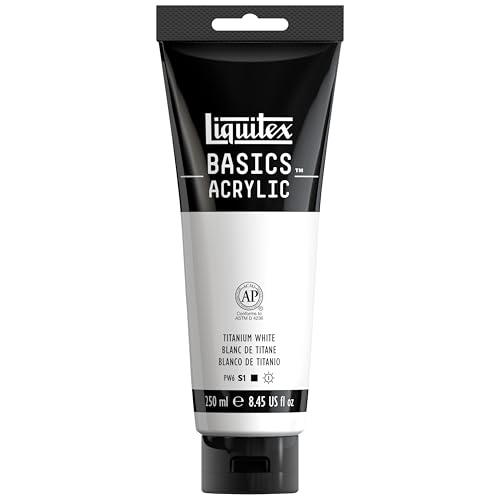
- Titanium white
- Ultramarine Blue
- Phthalo Green
- Cadmium Yellow Medium Hue
- Mars Black
- ¼" flat brush
- 2/0 detail brush (round)
- Posca Paint Marker (Black) OPTIONAL
- White Gel Pen (OPTIONAL)
- Varnish/Sealer (See section above)
Instructions
- Watch the Youtube Video Tutorial
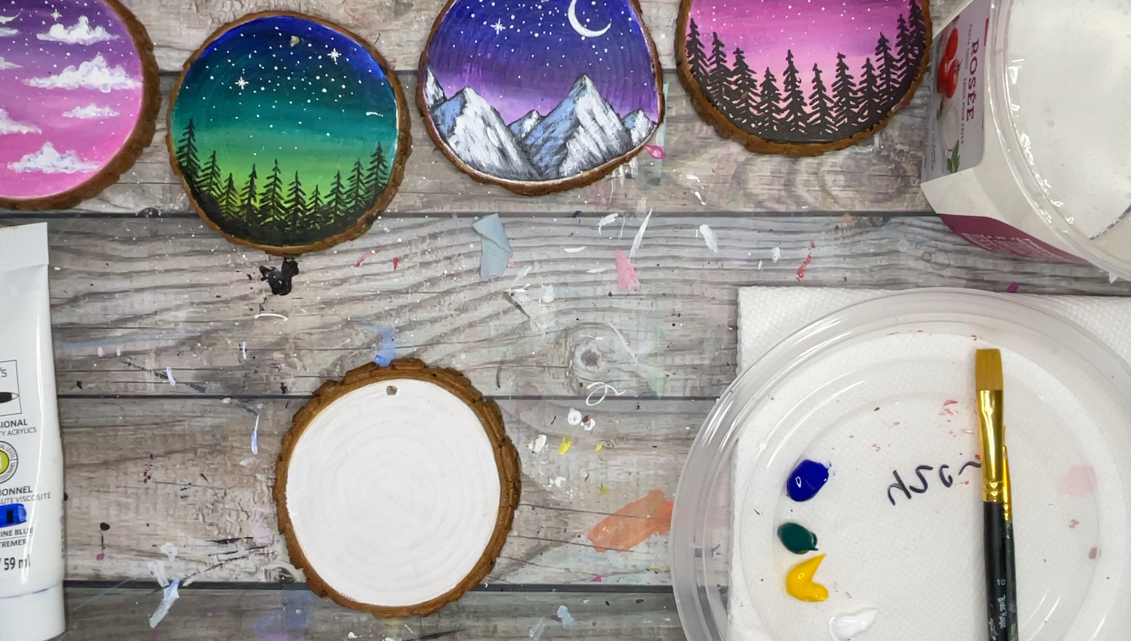
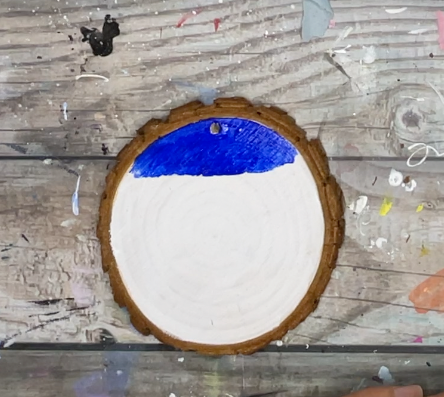
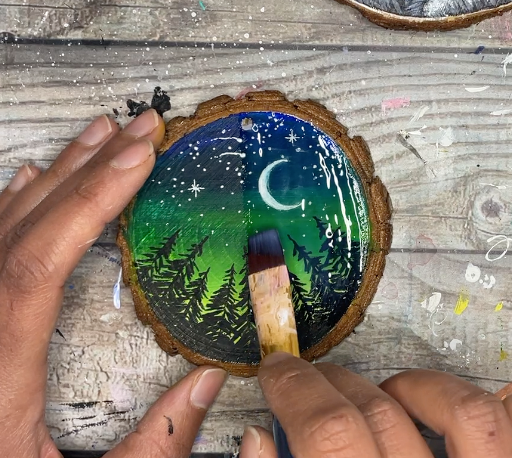
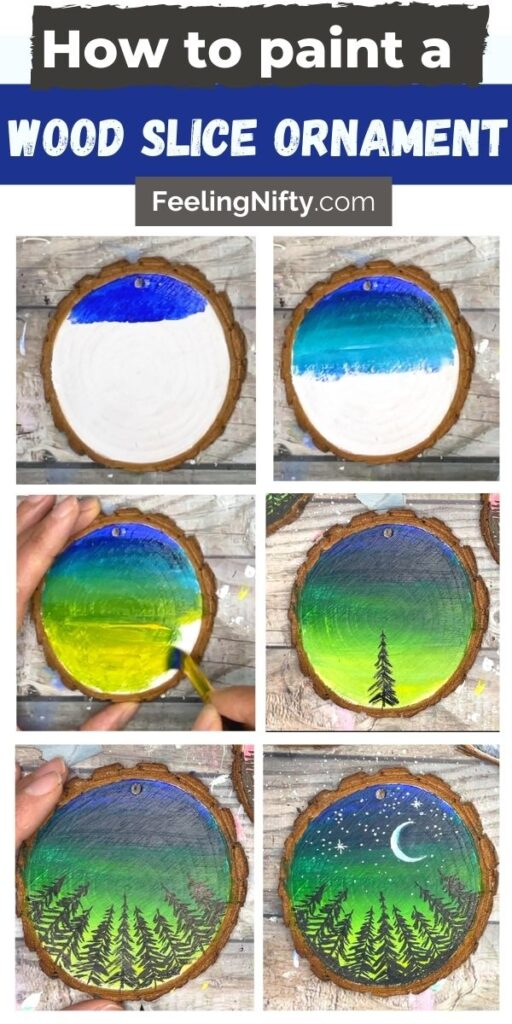
- Add a layer of white paint as your base coat and leave to dry completely (overnight if possible)

- Add some ultramarine blue to the top of the ornament using your flat brush.

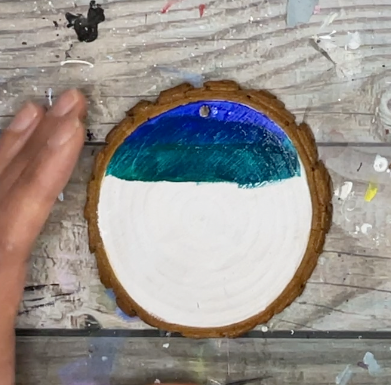
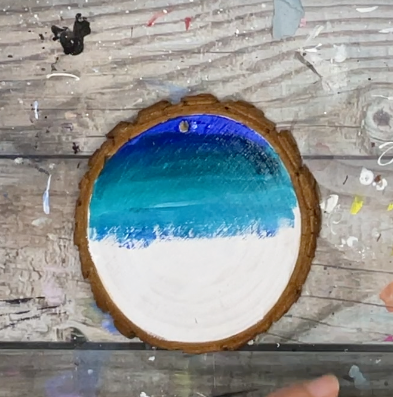
- Without cleaning off your brush pick up some phthalo green and add below the blue. Blend the blue/green where the 2 colors meet using small horizontal back and forth strokes.

- Pick up some titanium white and add it below the phthalo green (without cleaning off your brush). Use small back and forth horizontal strokes to blend paint if possible.

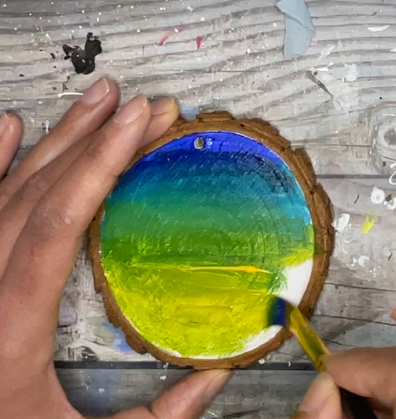
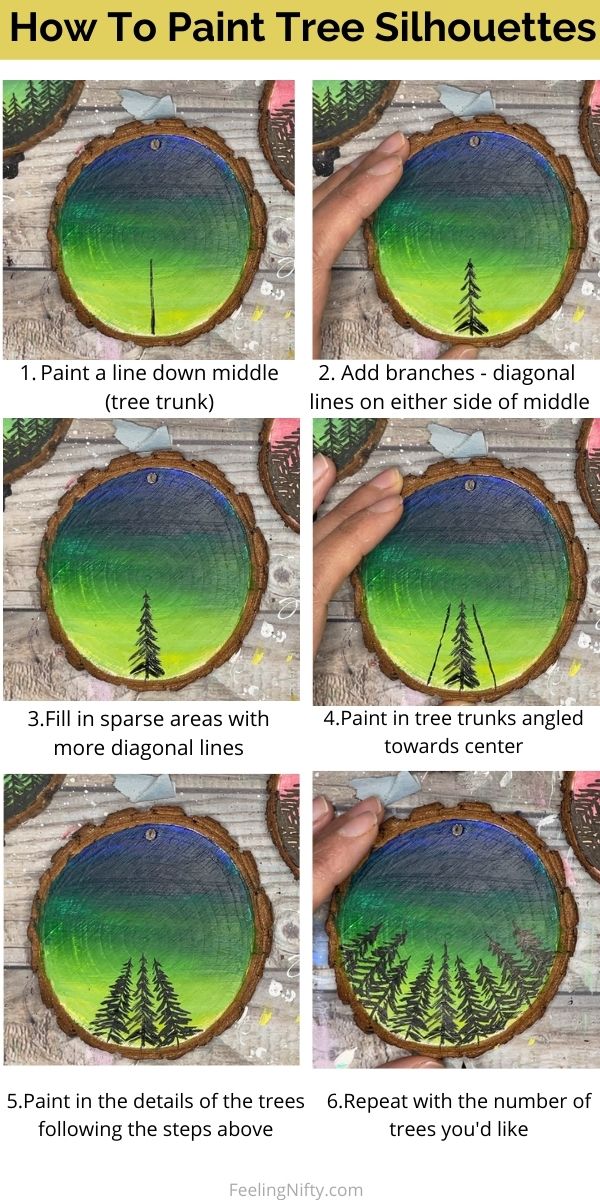
- Now grab some yellow on your brush and add it below the light green above (without cleaning off your brush). The lightest part of the ornament should be at the bottom, so that when we add the dark tree silhouettes in the later step they will "pop" against the light color. It also helps to add a small amount of white and blend that out at the very bottom of the ornament, so that the yellow transitions into a pale yellow light at the very bottom.


- Wait for 5-7 minutes until the aurora borealis night sky background is dry to the touch
- Use your black paint marker (or thinned down black paint and your detail brush) to paint in your tree silhouettes at the bottom of the ornament.You can either make the trees straight across (each of them parallel to the other), or you can make them slightly angled towards the centre so it appears you're looking up from the ground into the sky.

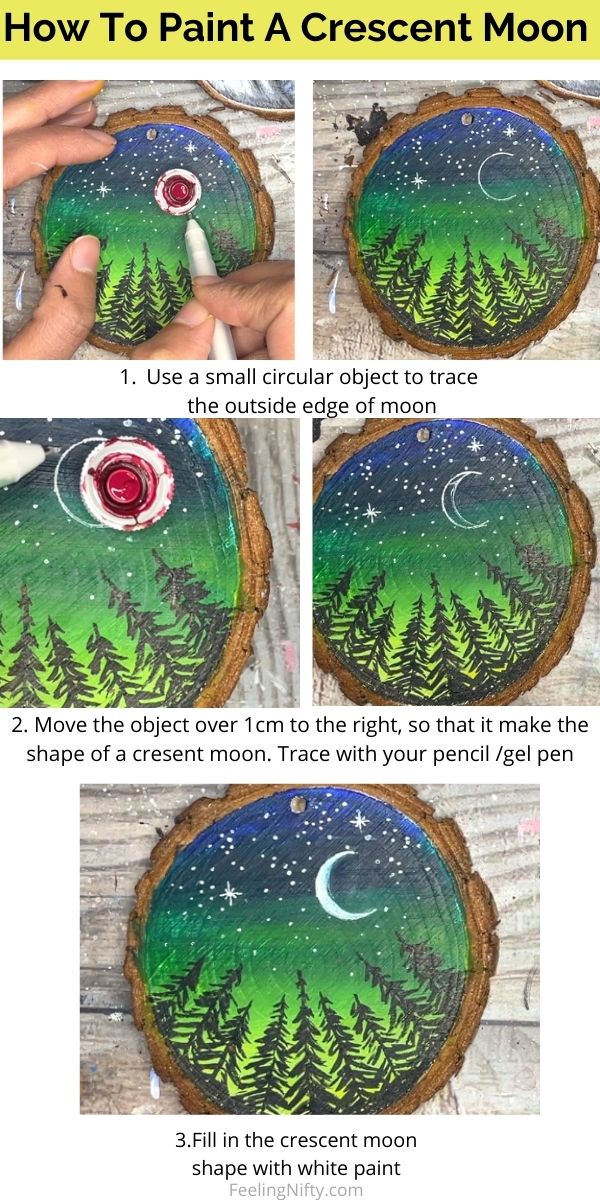
- Paint in the stars using thinned down white paint and your detail brush, or a white gel pen/paint marker. You can add some sparkly stars and also some shootings stars too

- Paint your crescent moon using your white gel pen or thinned down white paint. Use the infographic below to guide you through an easy way to paint a crescent moon on a small object.
- If sealing your ornament wait 24 hours for the paint to fully cure before sealing otherwise paint can bleed and smudge with the sealer.
- Seal or Varnish your wood slice ornament using a brush on varnish /gloss (see above) or a spray on sealer

 .
. - Wait fro 2-3 hours for the sealer to dry and your ornament is done!

 .
.Recommended Products
As an Amazon Associate and member of other affiliate programs, I earn from qualifying purchases.
-
 Detail Paint Brush Set, Fine Miniature Brushes, Detailing Painting Brush for Acrylic, Watercolor, Oil, Face, Nails, Line Drawing, 9PCS (Black)
 -
Liquitex BASICS Acrylic Paint, 8.45-oz tube, Mars Black
-
Liquitex BASICS Acrylic Paint, 4-oz tube, Cadmium Yellow Medium Hue
-
Liquitex BASICS Acrylic Paint, 8.45-Oz Tube, Titanium White
-
Liquitex 1046317 BASICS Acrylic Paint, 4-oz tube, Phthalocyanine Green
-
Liquitex BASICS Acrylic Paint, 4-oz tube, Ultramarine Blue
-
DecoArt TG01-9 Triple Thick Gloss Glaze, 8-Ounce Triple Thick Gloss Glaze
-
Liquitex Professional Gloss Varnish, 16-oz (6216)
-
Sakura 57452 Gelly Roll Classic 05 (Fine Pt.) 3pk Pen, White
-
Posca Acrylic Paint Marker, Brush, Black
-
5ARTH Natural Wood Slices - 30 Pcs 3.5-4 inches Craft Unfinished Wood kit Predrilled with Hole Wooden Circles for Arts Wood Slices Christmas Ornaments DIY Crafts


Wood Slice Ornament Ideas
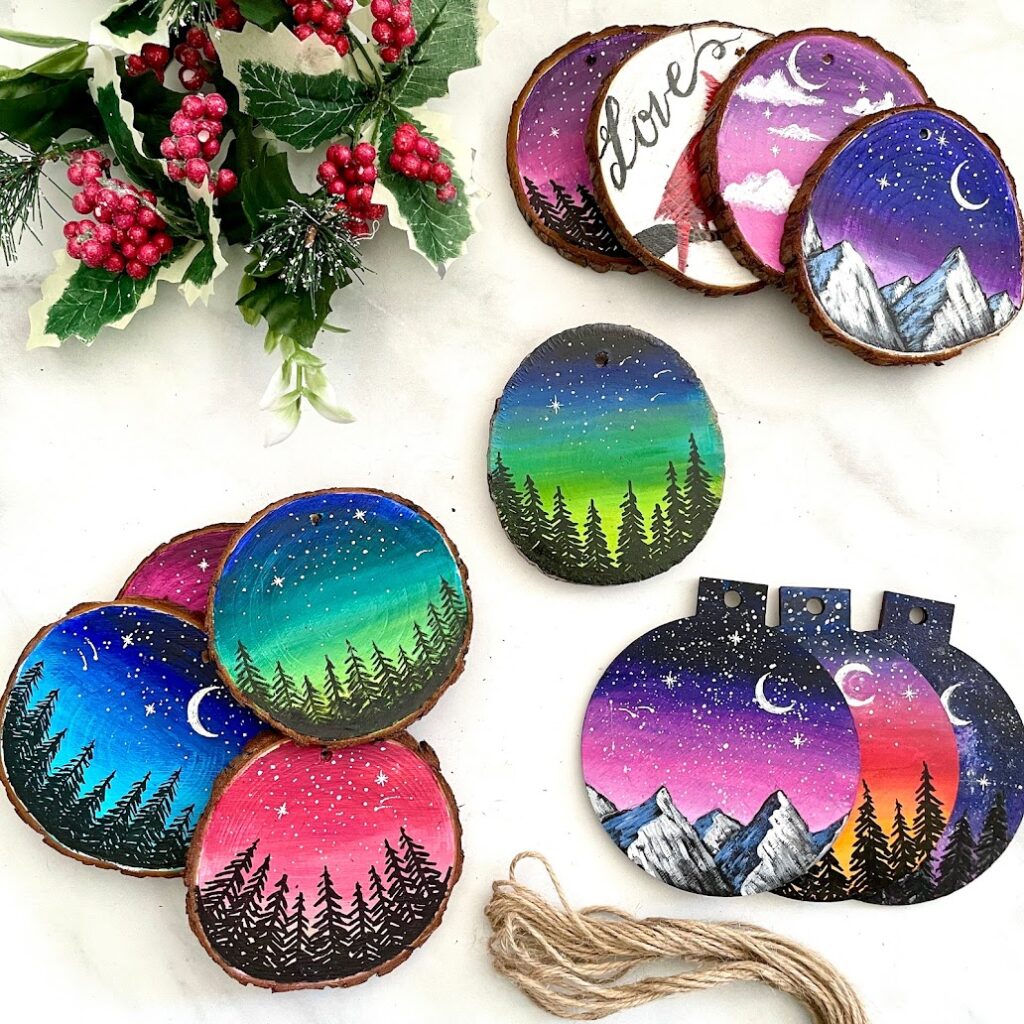
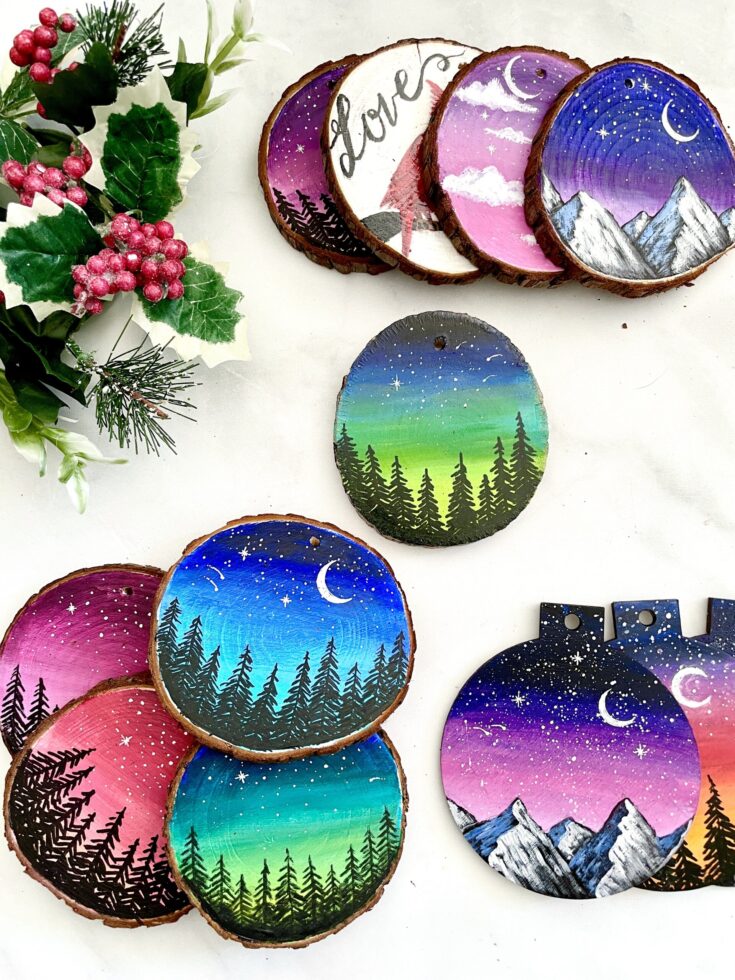
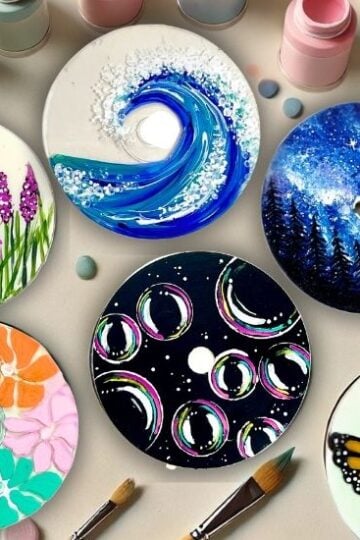
The sky is the limit (pun intended) for what you can paint on these wood slice ornaments. Here are some of the ideas I painted this season.
For more ideas you can do with wood slices with paint and other craftiness ( kid friendly included), check out this wood slice idea post.
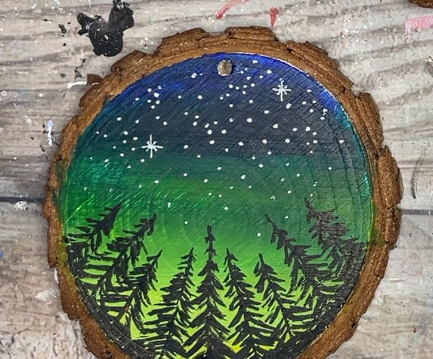
1. Galaxy/Night Sky with Tree Silhouettes
You can have fun with different color combinations in galaxy /night sky ornaments. From punchy pinks, brilliant blues/purples to the stunning lime greens of the aurora borealis, you can have fun painting in your night sky. Add in shooting stars, a couple of twinkling stars and a crescent moon for a breathtaking galaxy night sky scene.

2. Winter Bird -Cardinal
Paint your favorite winter bird on the woos slices for a perfect Christmas and winter themed ornament. Check out the how to paint a cardinal tutorial to learn how to paint this beautiful red cardinal
3. Paint A Sunset
Instead of a night sky you could paint a colorful sunset as your background. Check out how to paint a sunset tutorial and learn the colors you'll need and how to blend the paint in a sunset.

4. Paint Some Clouds
Add some whimsical clouds with a pink aesthetic background, for a fun wood slice ornament idea. These make cute gifts and a fun activity for teens and kids. Learn how to paint these clouds and your punchy pink/purple sunset sky.

5. Milky Way Galaxy Night Sky
Why not capture the beauty of the milky way on a wood slice? Learn how to paint the galaxy/milky way in this tutorial.

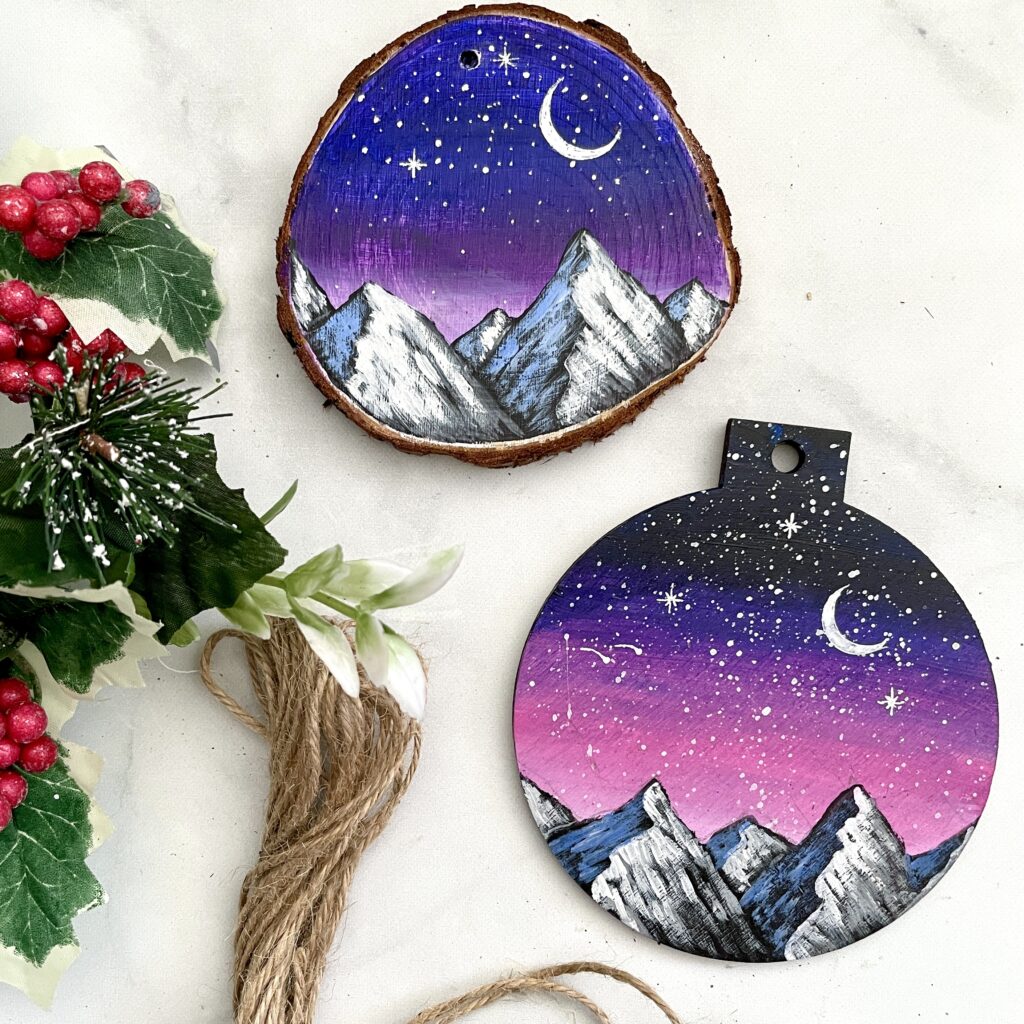
6. Mountain Scene
Instead of a tree silhouette why not paint a crisp and breathtaking mountain scene at the bottom of the ornament. This how to paint a mountain tutorial will take you through each step.
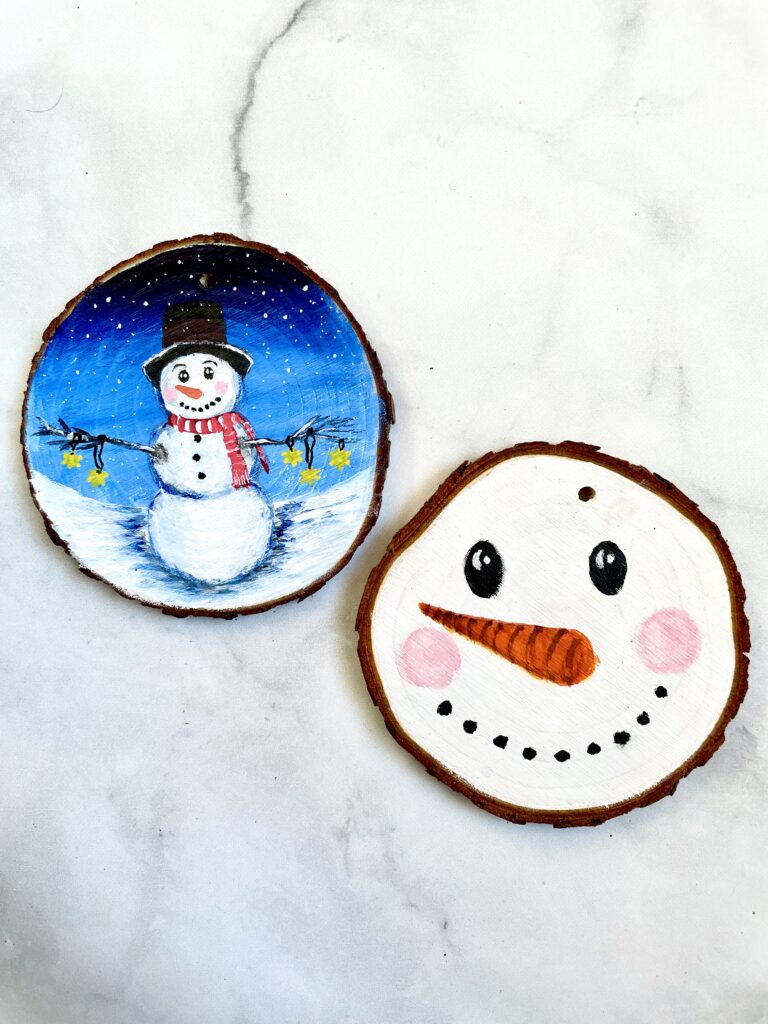
7. Paint a Snowman on Wood
Learn to how to paint cute snowman on your wood slice or pick a kid-friendly version and simply paint it white with an easy snowman face. Either ways this snowman ornament is easy and lots of wintery-fun for all ages!


If you liked this DIY wood ornament painting tutorial please pin on Pinterest!


What spray on sealer would you recommend for these? My kindergarten class is making these for their parents for Christmas
Hey Kellie,
You could use a spray on sealer like this Krylon Clear Glaze Aerosol Spray which is a high gloss finish. They also have other finishes like satin, matte, gloss, semi-gloss, etc. Hope that helps and enjoy making the ornaments with your class, what a wonderful idea! Enjoy 🙂
Cheers,
Jasmine