DIY Clear Sticker Labels made with Packing Tape
Learn how to make cheap and easy DIY clear labels for jars with packing tape! I'll also give you some ideas on how to use these labels / stickers around your home.
I'm so excited to share with you a nifty image transfer technique that uses packing tape to create these gorgeous clear labels for jars! If you're looking to get more organized in your home, then you'll love these DIY clear labels with tape.
They not only help you get more organized, but you can use them to turn any plain jar/canister/ container into a gorgeous showcase piece in your kitchen decor & home decor.
That's what did with these plain white jars I bought from a local thrift store (the Dollarstore would also be an awesome place to find plain jars!). I found some image transfer techniques and this one worked so well I had to share it with you!
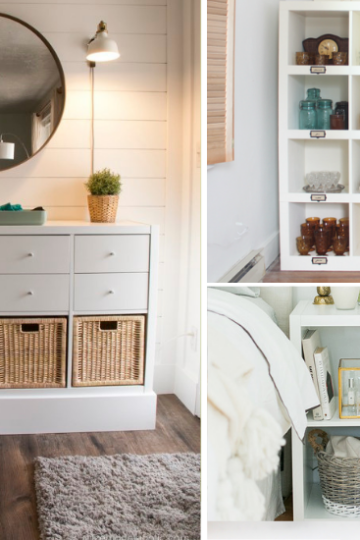
Here are some other ideas on how you can use these DIY clear label stickers
- pantry labels on pantry jars
- kitchen canisters for dried goods (think (sugar, flour, coffee/tea)
- spice containers
- ceramic jars
- candle jars (DIY gifts)
- colorful stickers for mason jar
- laundry room labels
- gift tags
- fabric storage boxes
- plastic storage containers and boxes
- family command center labels
- wood decorative objects
- metal containers and object
I've only done black ink with this project, but you can use a color printout of your design and it should work too!
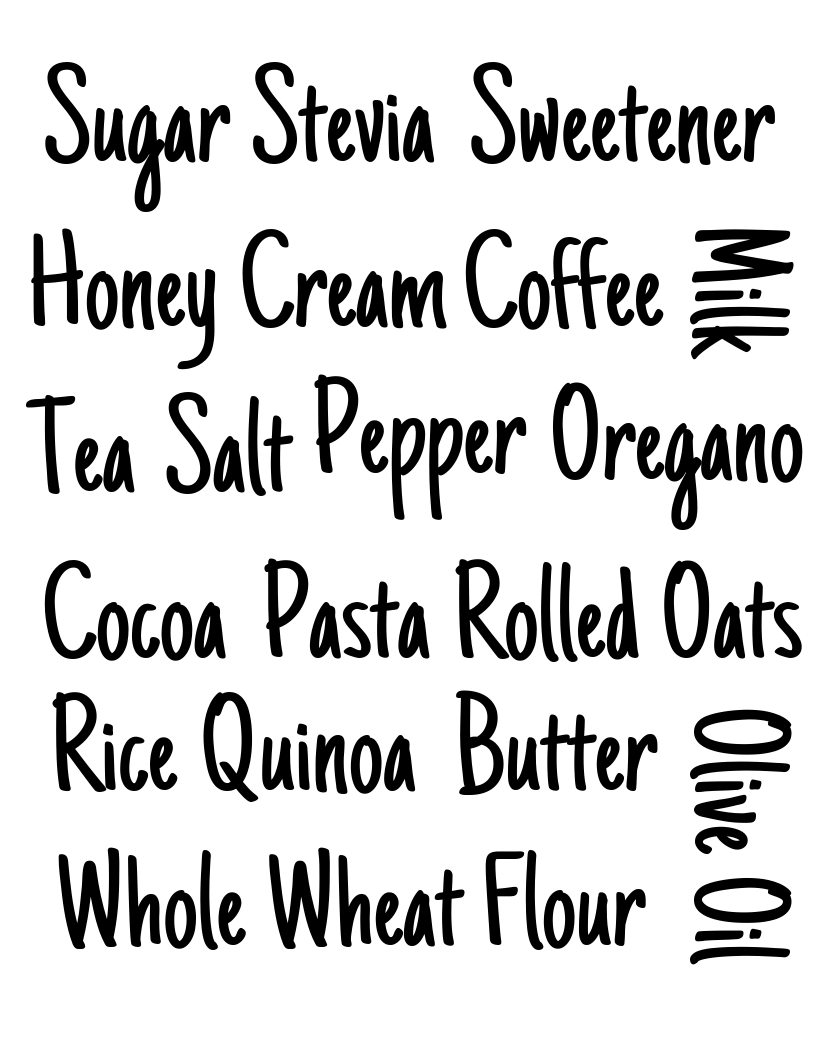
I've included some free printable pantry label templates (at the end of this post) for various kitchen organization related labels you can print out yourself. I used a fun pantry label font to make them look decorative, so you can use them a part of your decor if you wanted.
How to make DIY Clear Labels for Jars with Tape
Materials
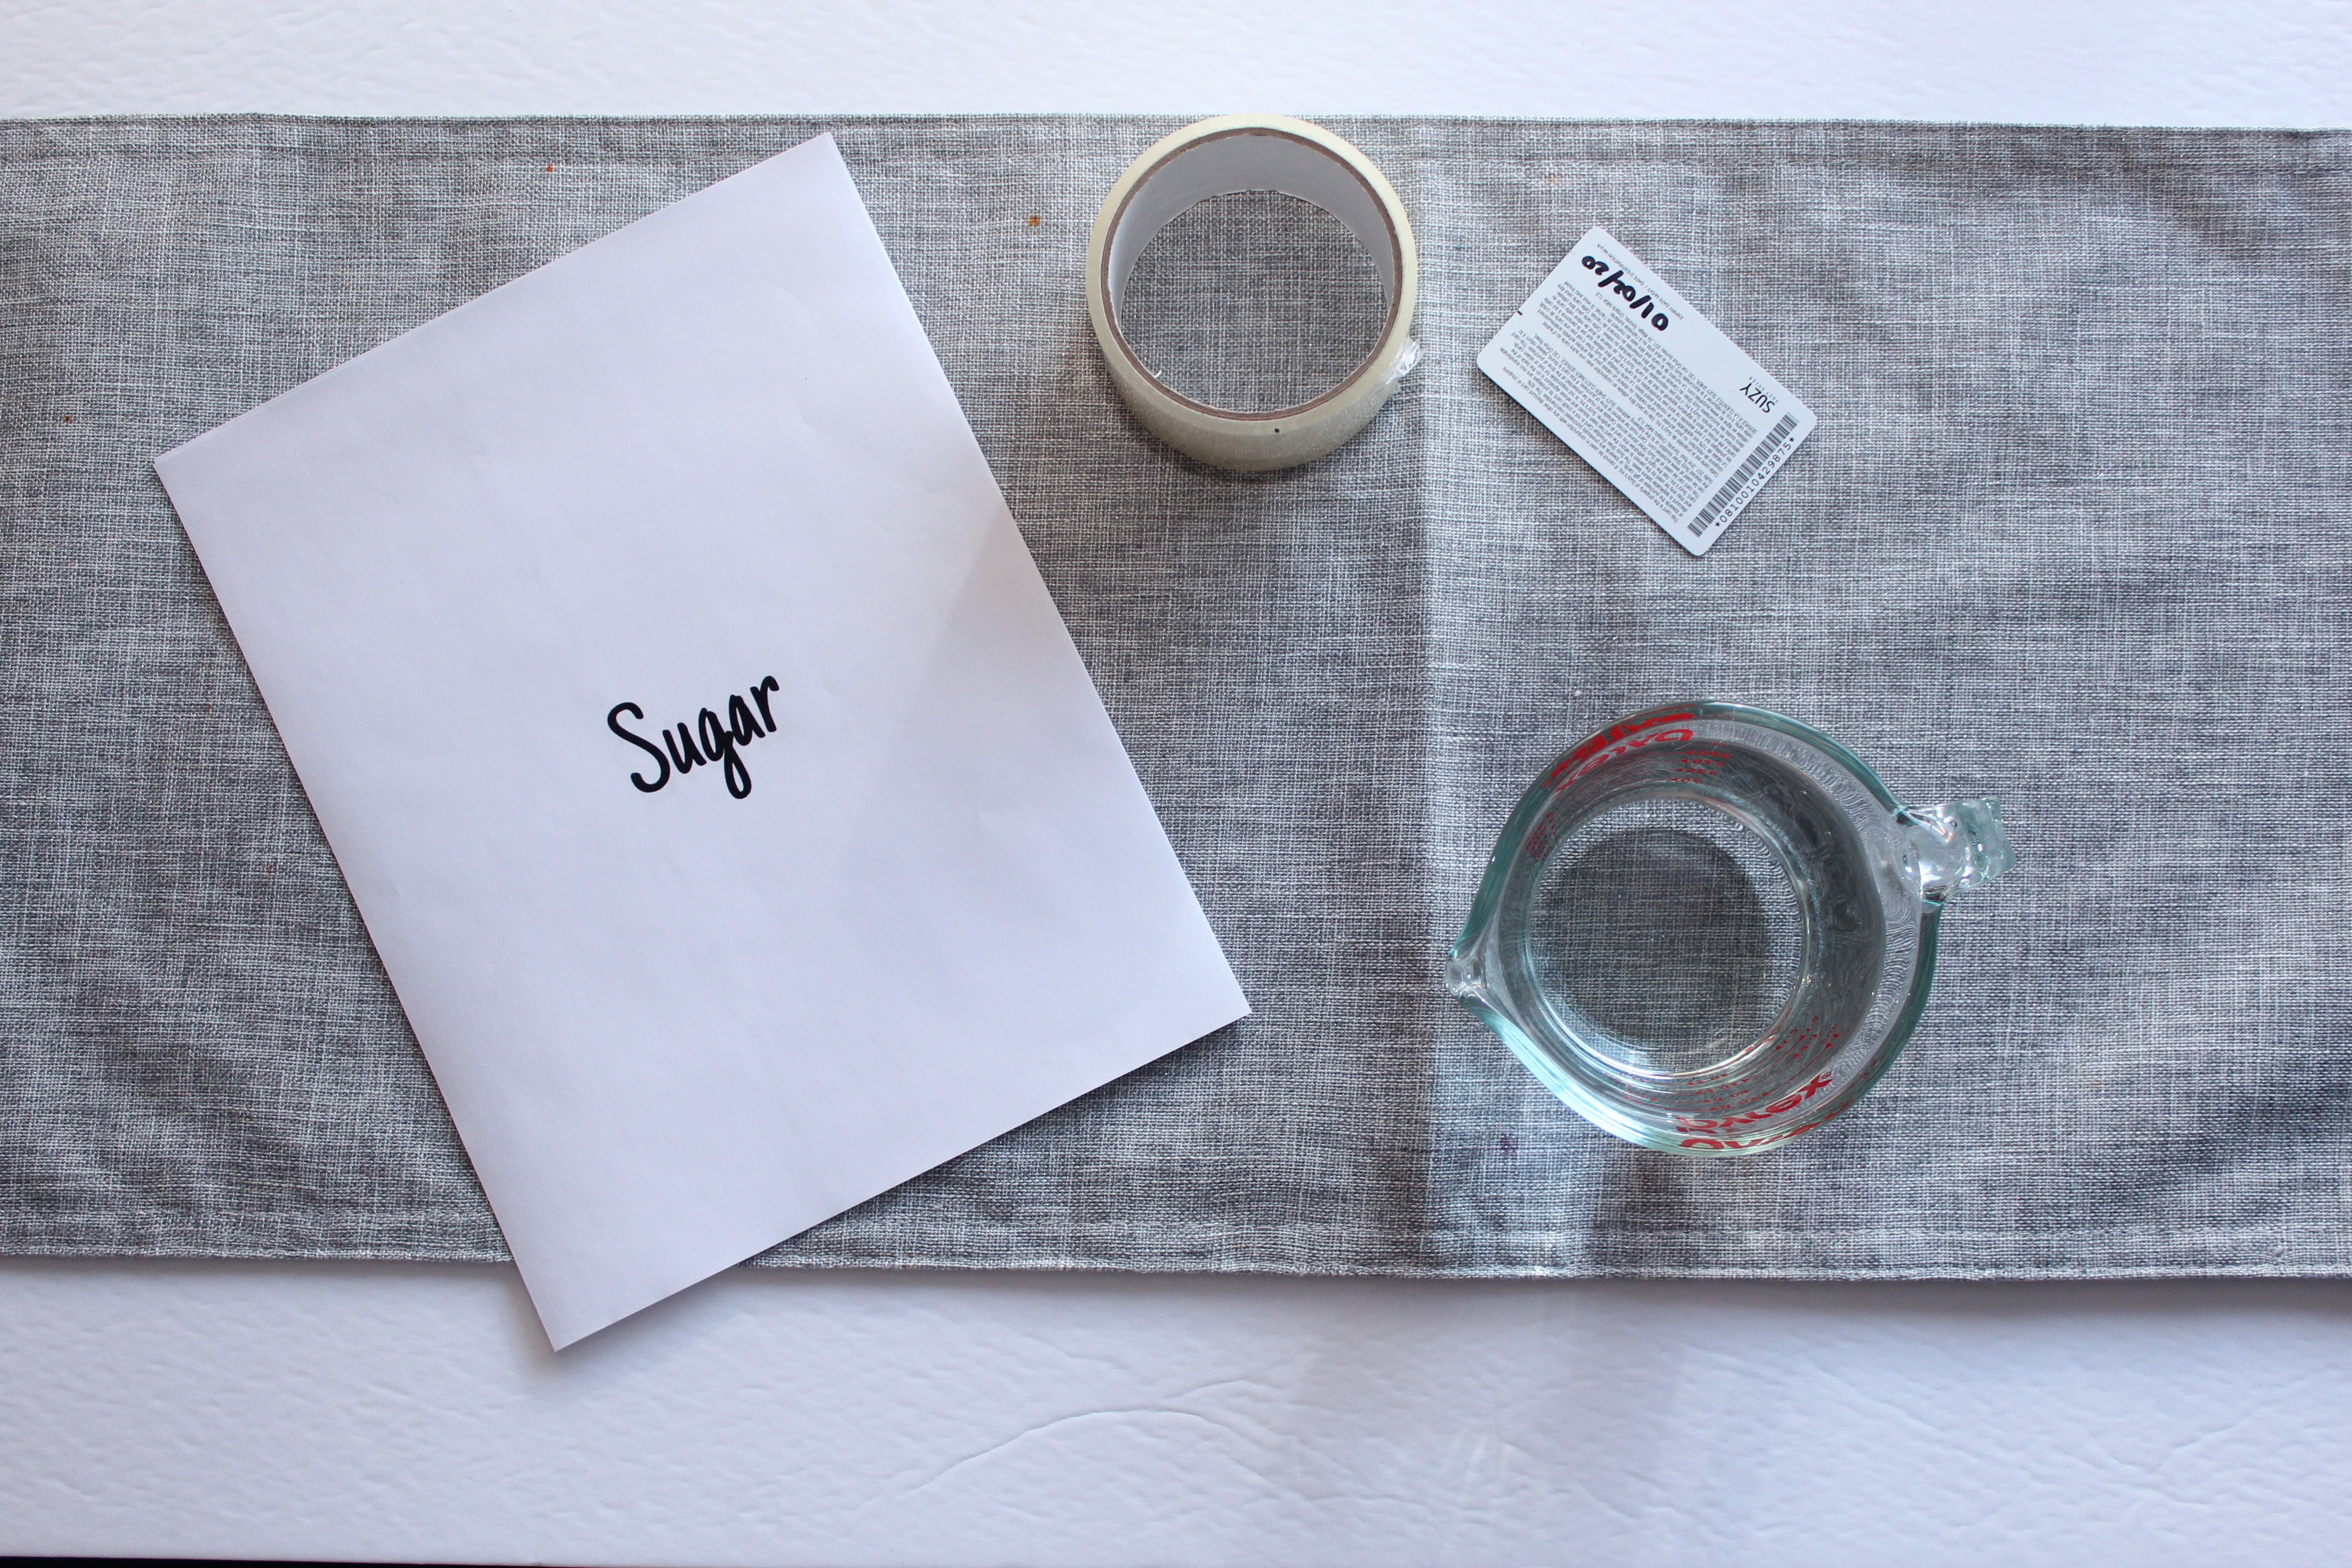
- Printout on normal printing paper (use a laser printer )
- Packing tape (the better quality ones work best)
- water
- credit card or spoon
DIY Image transfer Techniques Tutorial
Step 1
Print your label or design on a printer. Cut out your label


Step 2
Take your packing tape, and tape the cutout label onto the sticky part of the packing tape
Step 3
Cut off the packing tape/label from the tape roll
Step 4
Cut the excess tape around the label so that there is no longer any sticky tape exposed. Now you can lay your label down on a flat firm surface and start the burnishing step.
Using your credit card or the back of a spoon, burnish the label. You do this by firmly applying pressure to the front side of the taped label. Slide your credit card firmly across the label a few times.
IMPORTANT: The more pressure you can apply to the label, the better the results you'll get. This removes any air bubbles and prepares the design to transfer to the tape
Step 5
Put your label(s) into a bowl of water. Leave in the water for about 5 minutes, to loosen up the white paper for easier removal.
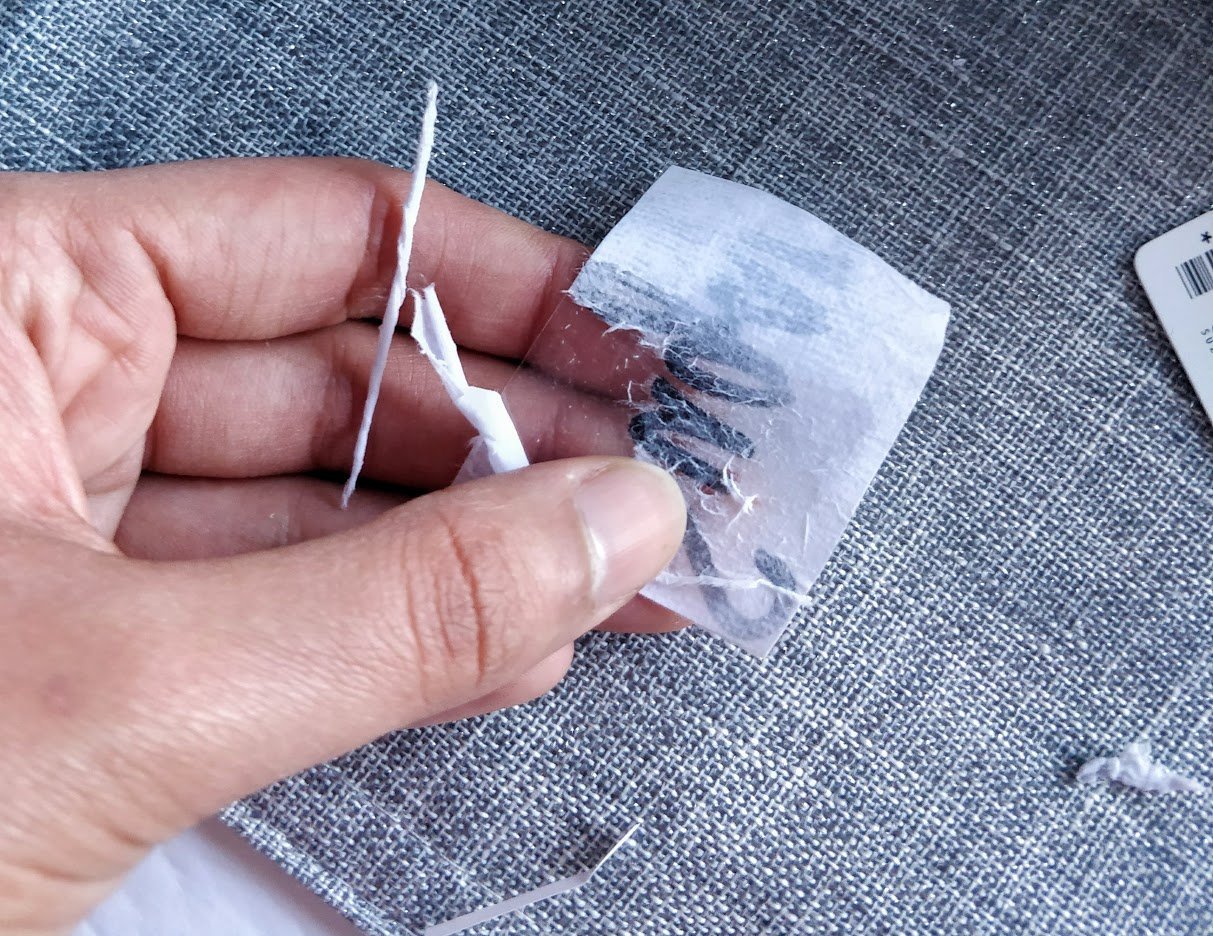
Step 6
Take your label out of the water and gently rub the white paper. You will notice that the white paper rubs of pretty easy, while the design is now "stuck" or transferred to the tape. Don't rub too hard, as it might start lifting your design off the tape.
If you find there are small pieces of white paper that won't come off near the end, put the label back to soak in the water for a couple of ore minutes - then retry rubbing it off. Don't worry this will NOT affect the stickiness of the tape!
Step 7
Once all the white paper is rubbed off it should look like this. Lay your sticker down (sticky side up) on any surface and let it dry.
Step 8
Once dry, you can now stick your clear label to any jar, pantry canister, the container you wish!

You're done! I hope you enjoyed these nifty image transfer techniques to make your own gorgeous DIY clear labels for jars, with simple packing tape! Happy organizing! If you're looking for the free printable pantry label templates, scroll to the end of this post.
Here are some more pictures of the "After" of these thrift store jars
Free Printable Pantry Label Templates
If you're interested in the free printable pantry label templates to make your own DIY labels with tape, here they are! Simply click on the image below, and then save the image to your computer and print as-is (its formatted to be printed on standard printer paper). Enjoy!
Tip: If you need to make some more labels on your own, you can use Canva (a free online) to create some more. They have a new service just for stickers too, check it out here.There are many types of pantry label fonts on Canva, but one of my favorites (and the one I used in this project) is "Just Another Hand" font.

I love this idea, and thanks for the printable.
I get that the stickiness of the packing tape will be okay after the water soaking, but how do you burnish it without putting something firm behind the tape? Won’t that affect the tape’s stickiness? The picture looked like you put it on fabric. I’m missing something.
I'm glad you loved the idea and great question!
Before you can burnish you need to stick your cut out paper label( step 2 in tutorial) to your tape. That way the sticky part of the tape is covered by the paper.
Then you can cut this piece of tape around the label so that there is no longer any sticky tape exposed. You are safe to burnish you label at this point. Also, make sure you apply the pressure to the tape side of the label ( not the paper side). Hope that answered the question. Let me know if you need any more clarifications, happy to help 🙂
Jasmine
@Lee, the paper you printed on is behind the sticky part of the tape. Anything else you already cut away. For burnishing, use any counter, tabletop, desk.
Hi Jasmine,
Thank you for the idea, but it did not work for me. I followed the steps but nothing sticks or get transferred on the tape. I used Duramax sticky tape for this, which I got from dollar store. Should I buy a different one? Please help!
Thanks,
Kashmira
Hi Kashmira,
Did you do the burnishing step? Basically after paper is stuck to the tape, take a credit card or back of a spoon and press firmly back and forth, so the words on your label "stick" better to the tape, after that you can place it in water for at least 5 minutes. I also used Duramax tape, so the brand should work fine. If you did do the burnishing step and it still doesn't work let me know via email (contact@feelingnifty.com) and we will troubleshoot further.
Thank you,
Jasmine
Are the labels washable by hand or dishwasher?
Great question Jean! I would say hand washing is OK ( I just handwashed mine lately), but the tape might melt or warp in the dishwasher, so I would avoid that.
I’ve tried this a few times and it won’t work for me. Not sure what I’m doing wrong
Hi Kristi, sorry to hear they haven't worked so far. One important step is to burnish them. If you don't burnish it enough it won't work as nicely. Are you scratching the tape( with a credit card or coin), so that the design sticks super well onto the tape- before placing it in water?
@Kristi, it doesn't work for me either I clicked on it multiple times and nothing happened
It doesn't work if you print it on inkjet printers 🙁
Hi Ela,
Some have mentioned it does work on Inkjet, I haven't personally tried though.
Cheers,
Jasmine
I followed your steps exactly butt when I rubbed the paper, all the printing came off and I am left with a blank tag.
What did I do wrong?
Hi Carol,
Sorry to hear the DIY labels didn't work as expected. I find the most important step is burnishing the paper to the tape, with firm pressure (firm pressure is super important). Not doing this step properly can cause the ink from the printout not adhering well to the tape. If you did that step, then I would try to leave your label in warm water for and extra 5-10 minutes and then rubbing the paper off slowly and gently- and seeing if that helps. Lastly, make sure you use a laser printer, which is what I used for this project. I have heard Inkjet printers might not work.
Hope these tips help, and let me know if you have any other questions
Cheers,
Jasmine
Your idea worked great for me & I even used red ink for some of my labels. I did find that when you're rubbing the paper off, it works better if you try to do it underwater if you can. The paper comes off easier if it's kept wet. Thanks.
Thats great to hear Gillian and thank you very much for your tip!! I'm sure this will help others as well.
Cheers,
Jasmine
I’m also having trouble getting the image to transfer. I don’t think the problem is the burnishing step for me. I’m using an inkjet printer. Could this be it? I’ve seen videos of both laser and inkjet working.
Hi Justin,
If it's not the burnishing step, then I'm not quite sure. I used a laser printer but it could work on inkjet if others have done it successfully. One thing to try would be getting it printed on laser printer ( maybe a local Staples or office supply store would have one). Goodluck!
Cheers,
Jasmine
I love this idea, thanks for posting. 🙂
Most welcome Joy, glad you liked it!!😄
Is there a way to make white labels to be placed on a black background afterwards?
Hi Susan, good question! I'm not aware of any way to do this easily as most printers print black or in color and this technique requires the ink of the printer to work, unfortunately. My next suggestion is using a cutting machine like the Cricut or if you don't have access to one, there are shops on Etsy that can custom make white vinyl labels for reasonable prices.
Hope that helps!
Cheers,
Jasmine
I did not work for me at all. I did exactly as you mentioned. NOTHING!! the wet paper peeled off the packing tape (soaked it for 5 minutes), blank tape and the paper had the printing on it. Do you have to put the tape immediately? as soon as it is printed, so while the ink is still wet?
Curious to know why it works for some and not for others.
Hi Aparna,
Sorry to hear the sticker didn't work for you. Many people do have issues with the burnishing step which is the most important steps for ensuring the words get transffered over to the tape. And no you don't need to put the tape on the paper while ink is wet (this might actually smudge the design). For burnishing, you need to use firm downwards pressure with a back of a spoon or a large coin to "scratch" the design so the words on the paper transfer to the tape. This can take a few minutes so take your time here. Hope that helps!
Cheers,
Jasmine
Works great! So glad to have this simple DIY way to make labels!
That's great to hear Jan! 🙂
Hi,
I really like this idea but just wondering could you use any other clear tape besides packing tape or does it have to be packing tape only.
Hi Anne,
You could try any clear tape to see how it works out (the clearer the better, opposed to the frosty ones). I personally haven't tried anything other than the packing tape though so not 100% sure how it will turn out. I hope it works for you, goodluck!
Cheers,
Jasmine
Hi! Are the stickers reusable? Thanks!
Hi Mel,
The stickers should be reusable, but oncs the stickiness of the tape wears off you might have to resort to glue or another adhesive.
Cheers,
Jasmine
Thank you so much for this well-written tutorial, Jasmine! It was thoughtful of you to share which font you used because I love it but knew I’d need WAY more than just the downloadable ones. 🙂 Just went to Canva, made my first batch, and am now waiting for the sticky part to dry so I can put them on containers. I’m so excited! Really appreciate your clear directions. ~Shannon (www.twigandfeather.com)
Thank you for your kind words Shannon, really appreciate it! And that's so great you created your own labels in Canva, so happy to hear that - love that app 🙂 Enjoy making your labels and organizing your things!
Cheers,
Jasmine
@Jasmine Khinda,
Hello! I saw in the comments above from Shannon that you shared what font you used but I cannot find it in your post. I really like it & would like to use it as well. Are you willing to share the font that you used?
Thank you,
Karen
Hi Karen,
I just checked in Canva and its called "Just Another Hand". Hope you can find it. I'll also update the post to include the font, thank you for mentioning that. Goodluck and enjoy!
Cheers,
Jasmine
Worked wonderfully for me. I passed it on to two of my daughters. Thanks.
Hi Laurie,
So glad it worked well for you 🙂 Thank you for letting me know!
Cheers,
Jasmine
So I’m a bit confused. When you say laser printer, do you mean a printer that uses toner instead of ink? Or, are you talking about a laser jet printer that uses ink cartridges?
Hi Heather,
Thank you for your question! In terms of printer I was referring to, it’s the one with the toner instead of ink. Hope that helps!
Cheers,
Jasmine
Would the label stick to a smooth wood surface?
Hi Kathy,
I’m not sure, In theory it should stick since it’s a smooth surface like ceramic. Hope that helps!
Cheers,
Jasmine
I tried it but the paper slides off and the black part did not stay on the tape just a shadow of the print.
Hi Diane,
Sorry to hear the transfer didn’t work. What type of printer did you use? It works best with a laser printer, as the inkjet might not work as effectively. Also the burnishing step is very important- using firm pressure to make sure the text is firmly stuck to the tape ( you can use a credit card or the back of a spoon to help). The other thing you can try is to leave the label in water for an extra 5-10 minutes ( sometimes the paper needs extra time to get an easy peel). Not sure if this helped but I used the Duramax packing tape. Hope that helps!
Cheers,
Jasmine
Love this idea, it’s great
Thanks so much Christine!! Glad you love the clear sticker idea, you can do so many things with them 🙂
Cheers,
Jasmine
Author Edit: Under Step 6: change “but” to “put”. Currently reads, “… but the label back to soak”.
Woopsies- thank you for the heads up!! Update complete!
Cheers,
Jasmine