Neat Ikea Craft Table Hack {counter height} On A Budget
Ikea Craft Table Hack
Looking for an inexpensive craft table that's counter height and adjustable? This Ikea craft table hack is an easy and cheap way to get the space you need without breaking the bank. And you can have fun with customizing the look of your tabletop too!
If you don’t have time to go through the this whole article right now, you can save it on Pinterest here, for later!
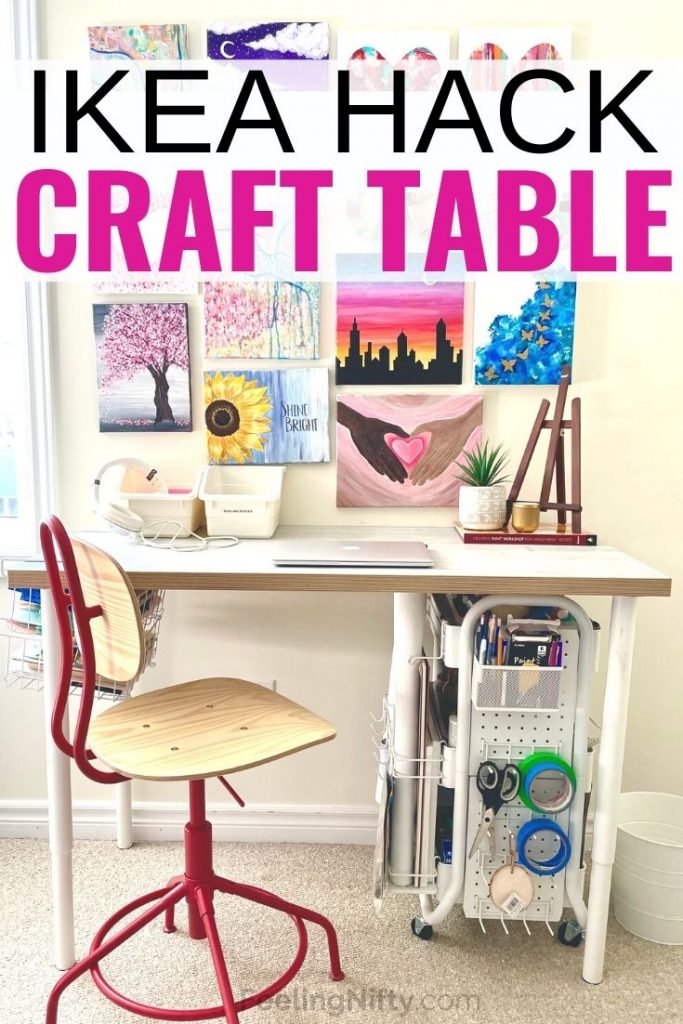
Counter-Height Craft Table Hack for $100
This is my second Ikea craft table hack.
My first one was this slim IKEA craft table for small spaces that used the Ikea Trofast system. I still have it in my basement and I use it for storage space for my gazillion craft supplies. But since I'm using my craft area more often, I decided to get something with more desk/work space.
And a table that's adjustable in height (or counter height) was another thing I was hoping for. That way I could sit or stand when crafting and painting. My husband noticed I tend to stand a lot when I'm painting, so I thought it would be a good option to get something where I could be free to stand when needed.
Affordability was another need. I was hoping to do it within a $100 budget.
If any place can make all that happen, it's IKEA.
I love that place!
Adjustable Ikea Olov Table Legs
I went shopping with my husband and he pointed out the cheap IKEA Olov adjustable legs for $15 a pop.
The nice thing with the Olov legs is they adjust your table top height to range between 23⅝-35⅜ inches high. This allows you to go from a standard sitting height to a counter height table. The counter height works nicely if you want to stand and craft/work - or use a bar stool.
You can adjust the height by simply turning the inner leg clockwise (higher height) and counter-clockwise (lower height).

The other benefit with a raised table top is you can fit a removable shelf/ craft carts underneath. This helps with extra craft storage space.
Which is what I wanted to do. More on that a bit later.
I picked up 4 Olov legs in a white color (they also come in black and silver). For a total of $60.
Legs done! Now for the table top.
The area I had to work with was around 3 feet by 5 feet so I wanted to find something a tad smaller. That way I had room to add a stool if needed.
The Ikea Linnmon table top measured roughly 2ft x 4ft (47 ¼x23 ⅝ " exactly) so it was the perfect size for my space.
And the Linnmon table top was only $30.
YAY!
The total cost of the desk ended up $100 on the dot.
Insert happy dance!
Ikea Craft Desk Hack: Table Top
And now for the hack!
The only Linnmon table color at my local Ikea(at the time) was the dark brown. I was hoping for a lighter color desk top, but decided to buy it anyways and figure out that challenge later.

I remembered a few brilliant desk hacks in my Ikea Desk Hacks blog post that used cheap vinyl wrap to change the look of their table tops. It's basically a long roll of a thick vinyl sticker.
I went to the dollar store (Dollarama in Canada) and found 2 nice patterns. A gorgeous white- grey wood grained pattern and a nice white marbled pattern. I ended up choosing the wood grain because I figured the pattern would be more forgiving with overlapping edges. The roll measured 18" x 98" and was more than enough to cover my desk.
If you can't find one in store, here's a similar white wood grain vinyl sticker on Amazon

Since the width of the vinyl sticker was smaller than my desk, I ended up cutting and adding a back piece with the same roll. And you can't even see the seam, since the wood pattern helps hide it!
Gotta love function and beauty!
Ikea Desk Hack: Vinyl Wrap
I'm going to explain a bit more about how I applied the vinyl wrap sticker with some tips I learned in the tutorial at the end of this post.
I've included step-by-step instructions and pictures in the tutorial to help explain how I applied the vinyl wrap.
It's easy to do, and even easier with the tips in the tutorial (at end of post).

Ikea Craft Room Hacks
I'm going to share with you some craft storage ideas I made to go along with my new Ikea craft table (since it doesn't come with storage out of the box).
Rolling Cart for Craft Storage
I love the space and adjustable height I get with the Linnmon/Olov leg configuration. But there is no storage drawers/shelfs that come with it so you have to improvise with storage space.
I've seen some pretty cool hacks where people use the Ikea Raskog cart for their craft supplies.
I really liked this idea.
And the fact that this cart had wheels made it very portable and easy to store anywhere.
I was close to buying the Ikea Raskog. But I searched online before buying it and found a similar one which had extra features I liked.
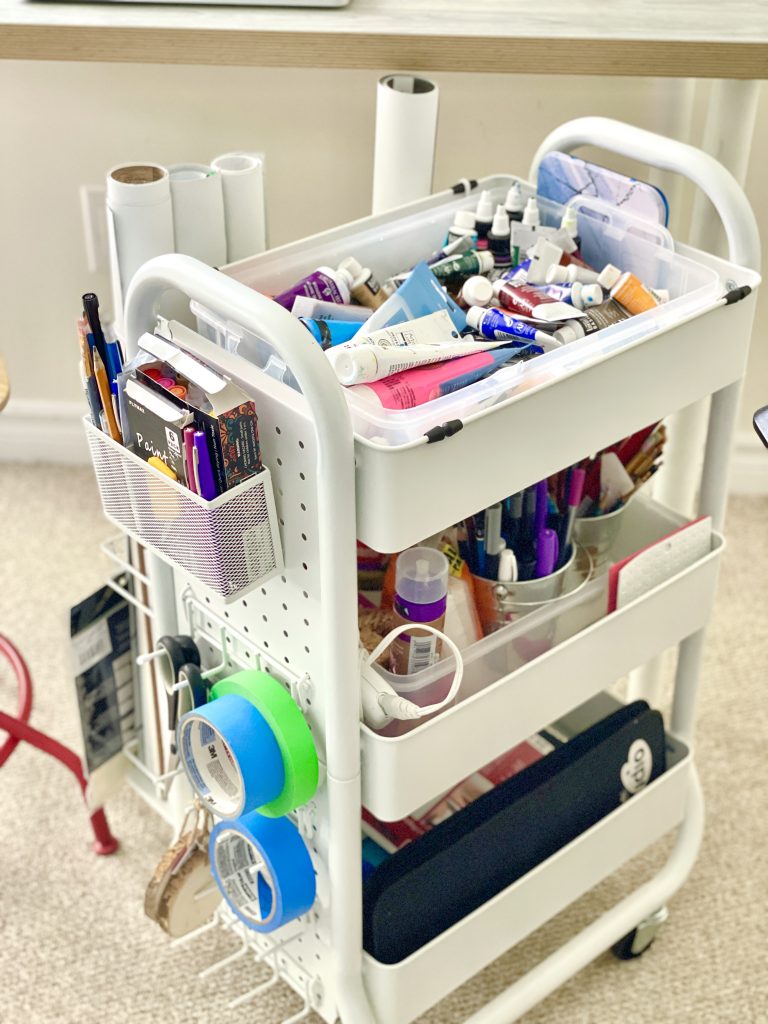
This Recollections craft cart (sold at Michaels) had all the features of the Raskog. In addition, it has a handy mini pegboard (with accessories), wire dispenser for ribbon and wrapping paper, and a vertical rack to store longer items like rolls of vinyl, wrapping paper. And a pair of useful handlebars at the top which make it easier to roll around.
But the downside was the price.
At was almost double the price of the Raskog. So it was something to think about.
I ended going with the Micheals Recollections cart. I have long rolls of vinyl backgrounds that I use for my photography and I find them awkward to store. They ended up fitting perfectly in the cart.
This roll organizer (see picture below) would work well with wrapping paper and also the vinyl rolls that come with Cricut or Silhoutte's cutting machines.

Craft Cart Storage for Paint Supplies
In terms of craft storage, I used the top tray to store my acrylic paints. Now I can easily find and grab them as I paint.

The second tier of the cart holds my water jars, paint brushes, speciality pens/markers and my glue gun supplies.

The bottom tier is more my bigger canvases, disposable palette, tracing paper, art journals pads and rulers. Each tier drawer is 11.5" x 15.5" so it can hold any size canvas, journal, sketchbook, papers that size or smaller. It's the same size as the Raskog.
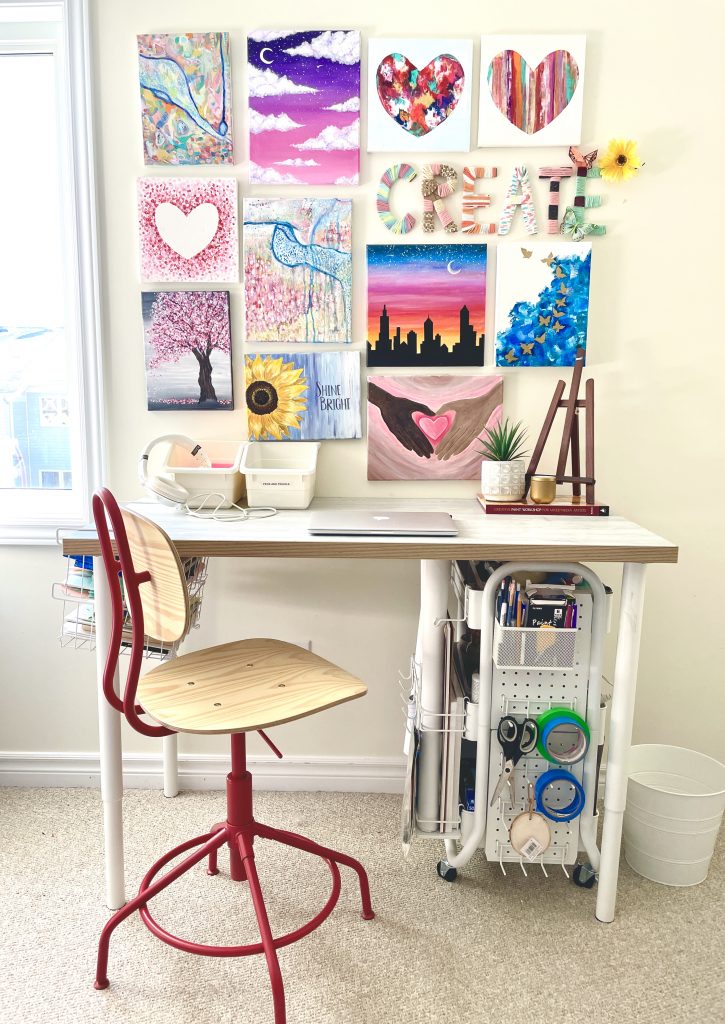
I was hoping to store my cart under the table since I'm tight on space. The height adjustable legs really came in handy here. I was able to fit my cart perfectly underneath when I raised the height to counter-height.

Desktop Storage Bins
I used a couple of inexpensive Ikea Sockerbit storage bins ($4 each) for some extra desktop storage.

Love these bins!
They're cheap and small enough to fit nicely on a desktop. And the slanted front makes it easier to see what's inside. You can add labels to them if you want to be super organized.
I also used them in my den to store my kids craft supplies on our Ikea Billy shelf. You can read about that in my 7 Ikea organization organization hacks I use in my home.
Removable Under Desk Wire Shelf
These little wire selfs are very handy. They easily slip over the edge of any desk and give you some extra shelves to store things in. I used them to store extra canvases, art papers /journals, and small paintings.
These didn't come from Ikea though. My husband bought them a few years ago from our local Dollar store (Dollarama in Canada). Here are some similar ones you can get on amazon.

Ikea Counter Height Adjustable Chair
As we were approaching the cash area, my husband spotted the Ikea KULLABERG chair on sale for 50% off. Besides the insane deal, I loved the fact it was height adjustable (would work with counter height), had a footrest and also swivels. So needless to say, I picked one right up.

Craft Room Wall Decor
I made this "Create" inspired lettering a while back. After cutting out the letters with cardboard, I wrapped each letter in different colored yarn and ribbon.
Some of my paintings (from my DIY painting tutorials) were hung around the "create". I love how colorful and happy this space looks.
So I didn't put a million holes in my wall, I used these Command picture hanging strips to hang the paintings and the "create sign".


On the other corner of this desk, I have my computer workstation where I work on everything post craft/painting. It's the smaller IKEA Linnmon tabletop ($9) with the black ADILS legs ($4/each).
And just incase you're wondering, that gorgeous resin/geode painting that's on my desk is from talented abstract artist Faiza Ashraf, you can find her on Etsy. Check out her work, it's absolutely stunning!!

And that's a wrap folks!
Ikea Craft Table Hack: Vinyl Wrap

Customize your Ikea Desktop using an inexpensive Dollarstore vinyl wrap sticker for a rustic faux wood desktop.
Materials
- 1 Ikea Linnmon Tabletop black/plywood47 ¼x23 ⅝ "
- 4 Ikea Olov Legs, adjustable, white
- 1 Roll of Adhesive Vinyl Wrap (approx. 18" x 98")
- A large hardcover book or a large piece of wood / cardboard
Instructions
- Assemble your Ikea Linnmon Table top with the Olov legs as per Ikea instructions.
- Peel off about an inch of vinyl wrap sticker and stick it down. Make sure it aligns up with the edge of your desk (width wise).
- Slowly unroll your vinyl wrap (about 2 inches at a time) and peel off the backing. Using a large hardcover book/ large piece of cardboard apply heavy downward pressure (like your scraping the table towards the roll) to stick the vinyl to the desk. Remove air bubbles as you go. If you notice any air bubbles that won't smooth out or creases that form, simply pull back sticker and re-stick. Working slowly with and inch or two at a time makes it easier to fix any mistakes as you go.

- Repeat step 2 until you get to the other edge of your table. When you get to the edge, use a crafting cutting knife to cut the vinyl wrap exactly along the table's edge.
- If your vinyl roll is not wide enough to cover whole desk, take another piece and cover the rest with the same steps (1-3). Making sure to align both edges of vinyl. Tip: Having a wooden pattern made the seam pretty much invisible. In the picture below you can't see where the seam is because of the pattern.


 Repeat step 2 until you get to the other edge of your table. When you get to the edge, use a

Recommended Products
As an Amazon Associate and member of other affiliate programs, I earn from qualifying purchases.
-
 118''x17.7'' White Wood Peel and Stick Wallpaper White Shiplap White Wood Contact Paper White Wood Wallpaper White Wood Removable Wall Paper White Wood Plank Self Adhesive Wallpaper Shelf Drawer Liner
 -
X-Acto No 1 Precision Knife | Z-Series, Craft Knife, with Safety Cap, #11 Fine Point Blade, Easy-Change Blade System


If you liked this project please pin it!