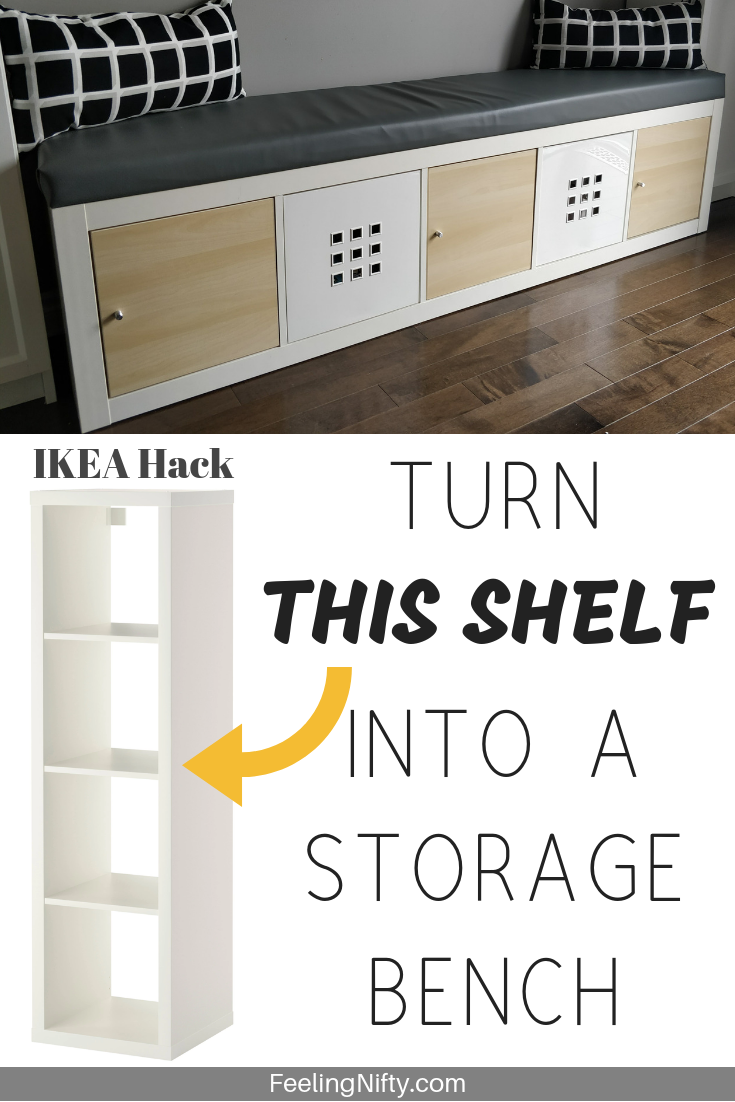
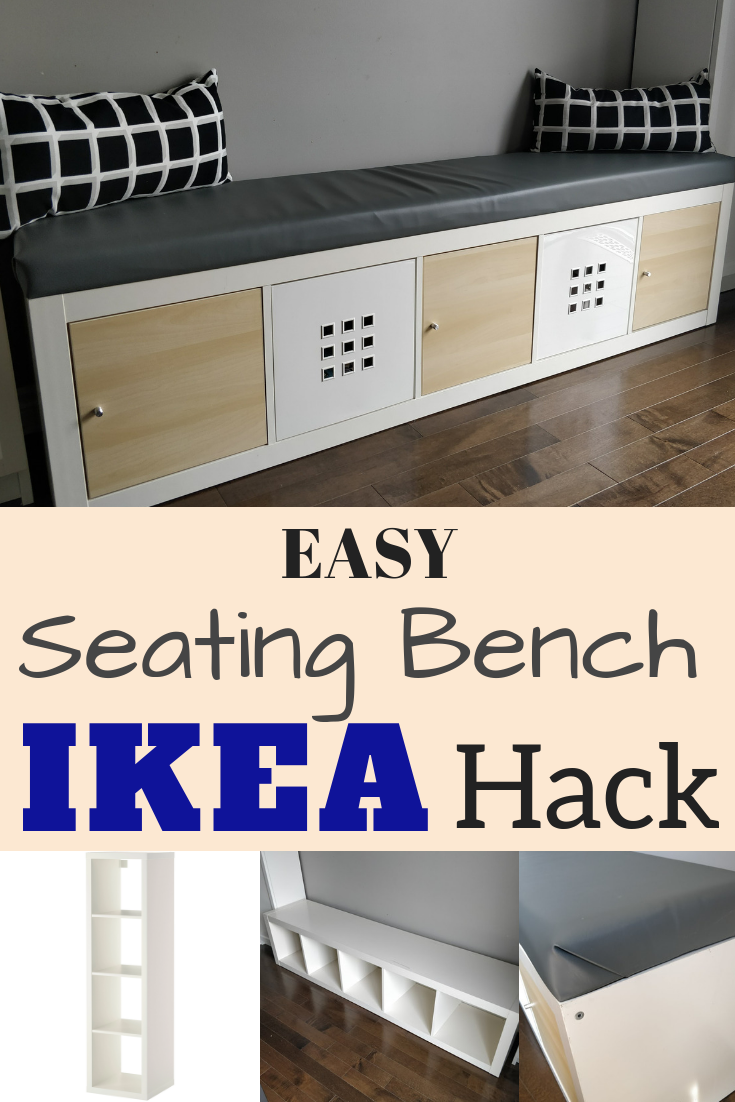
Turn this popular bookshelf into a functional and stylish Ikea seating bench with storage. This Ikea hack is an easy and affordable way to create more seating in any area of the house, with bonus storage. No sewing required!
This Ikea kallax hack is a super easy project for anyone- even if its your first one.
You can use this bench in a kitchen, mudroom, entryway or any other space that could use extra seating. The best part is you’ll be super proud that you put it together – YOURSELF!
No fancy tools or carpenters required.
You’ve probably seen banquette seating benches on social media or Pinterest. They look great, but they cost a fortune to hire someone to make a built in version.
If you want to have one of these functional storage benches in your space, but don’t want to spend a lot, then this project is for you!
It’s easy too.
If you can put a piece of Ikea furniture together, then you can do this hack. You don’t even need to sew anything!
In the tutorial below I will show you, step-by-step, how to recreate this Ikea Kallax Hack.
I’ll also share tips and advice on how to pick cushion material, along with some “hack” advice on how to put this bench together the cheapest way and with the least effort.
Getting Started
This bench is so versatile it can go anywhere in your home- from kitchen, mudroom, toy room, hallway to even a nifty window seat. The possibilities are endless.
The first thing to do before starting this Ikea Kallax hack, is to measure the area you want your seating bench to go. You want to make sure the bench will fit before you buy it.
The measurements for the Kallax are 17″ x 58 “
As long as your opening is minimum 58″ wide, you should be fine.
In my home, I chose to put it between my 2 Ikea Billy bookshelves in my kitchen eating area. As promised, I finally wrote a post on my DIY Kitchen Pantry with Ikea Billy Bookcases, check it out!
Now back to the Kallax hack. I ended up finding the older version of the Kallax -the Expedit – which is a little longer and fit perfectly in my space.
Ikea no longer sells the Expedit, but the Kallax is the exact same except its shorter.
 This post contains affiliate links. For more information, see my disclaimer
Buying your Shelf – Tips and Tricks
Now that you’ve measured your area, it’s time to buy one. Of course, if you have an Ikea close by, then you can pick one up there – make sure to check out the As-Is section first!
BUT if you don’t have an Ikea close by OR the time to get to one, there’s another option.
Amazon sells a similar version of the Kallax for a similar price! It’s called the Better Homes and Garden bookcase, and because its on amazon you get the luxury of home delivery!
I know this defeats the purpose of an IKEA hack, but it’s an alternative option. Especially if your looking to save time and want more convenience.
Another option, if you’re not in a rush, is to look for one used.
Kijiji or even Facebook Marketplace are great places to find the Kallax shelf, often at a bargain price!
A bonus to getting one used: it will come pre-assembled. Some more time + money saved!
How Much Weight Can Kallax Hold
A common question when making this Kallax into a shelf is “how much weight can Kallax hold?”. The official weight limit (used vertically) for the 4 shelved Kallax is 25 kg/ 55 lbs on top of the shelf (vertical load per shelf). Ikea doesn’t mention the weight limit when using the shelf horizontally though, for example as a bench. So that is at the discretion of the user.
From purely personal experience though, I’ve sat on the bench (average adult weight) and haven’t had any issues with stability.
Tips for Finding the Kallax on Kijiji
If you don’t want to spend your entire day checking Kijiji or FB, you can set up some saved searches for your shelf.
The benefit of save searches is they will notify you right away when your Ikea shelf becomes available.
The Ikea Kallax and Ikea Expedit (especially) tend to go really fast on Kijiji, so setting up a saved search will really help you score one in the least possible time.
I don’t want to ramble on too much about saved searches on Kijiji, but if you want to learn more about this, send me a message or comment below and I can tell you how to set one up.
I did the above and was able to get one within 2 days, and a bargain at $25!
It was also super relieving it fit between by 2 pantries, I was a bit nervous!
I think I had less than an inch on either side. Talk about cutting it close, phewf! The good news is that it looks more like a built in bench.

How to Choose Material for your Bench Cushion
Once you’ve got you shelf, you are half way to completing your Ikea storage bench seat!
The one big decision you will have to make is the type of material you want to choose for the seat of your bench. If you have kids or pets then a nice vinyl material will be easy to wipe clean. I chose the vinyl since I have kids.
UPDATE: I’ve had this Ikea bench hack in my kitchen for almost 6 months now, and it still looks new, even after some spills. I’m super glad I chose the vinyl!
The only downside is that most vinyl materials come is solid colors.
If your heart is set on a nice pattern to give your room a pop, then you won’t find a big selection of patterned vinyl out there. Let me know if there is!
If you’re looking for fabric to cover your cushion with, it’s very important to make sure you buy a thick material -almost canvas like- material or even upholstery grade material.
The thin generic cotton fabric, when used in a project like this, will start to wear and possibly rip. This is because the seat portion of the benches tend to get lots of use, and all that wear can be harsh on thinner cotton fabrics.
You can do a quick search on ‘Upholstery material’ on amazon or google to find some online upholstery textiles.
If you want to see your material before you buy, can check out your local material/textiles store.
Ikea has Textiles!
If you’re already heading out to Ikea to buy your Kallax, you can checkout their Ikea textiles section.
I was impressed with their selection and even more with their quality of fabric!
I chose a nice “thick” material to cover a bench cushion for my Trofast bench hack for my kids craft area.
Loved the colorful and whimsical patterns in their textile selection!

UPDATE: I wish I had used a vinyl fabric for this craft bench too. Let’s just say kids crating/painting near fabric that has white in it, is not the best idea….Duh!
How to Find Cheap Foam for your Bench Cushion
For the seating top part of your bench, you will need to make a cushion. I’ll explain how in a bit. And don’t worry you won’t have to sew anything together.
No needles or thread involved.
To make the plushy soft seating cushion you’ll need some type of high density foam.
And if you’ve ever searched for high density foam in your typical craft boutique, it isn’t cheap. It’s very high quality, for sure, but it also comes at a high price!
I’m guessing, like me, you don’t want to spend a fortune on this step, so I’ll give you an awesome hack.
The hack is to use camping foam sleeping pads!
You can find them at your local outdoor store, Walmart or even on the web. I found mine at a Canadian Tire store in Canada for a decent price.
If you’re not in Canada then this high density foam on Amazon was almost the same in price and the cheapest I’ve found online, yet!
If I find anything cheaper in the future I will update this post.
Foam Thickness Matters!
You”ll also notice foam comes in different thicknesses. From 0.5 inches thick to 3 or 4 inches thick. Basically the higher the thickness the more expensive it will be. BUT not by very much.
If you want your seating bench to be comfortable to sit on and look more polished, I would recommend 3 inch thickness or even 4 inches.
The minimum I would go is 2 inches thick. The one I chose in this Ikea hack is 3 inches.
Cutting your MDF Board with No Tools
You will need a piece of MDF or thin plywood board for the bottom part of your cushion, and it will need to be cut in the exact measurements of your bench top.
If you don’t own a saw (or even if you do), you can get it cut perfectly and the best part is it’s FREE!
How?
If you buy your MDF from Lowes or Home Depot, they provide the first 3 cuts for FREE! Just ask a sales rep and they will guide you to the place they make the cuts. That’s it.
That’s one of the best tips I’ve learned in my Ikea Hacking experiences. Makes this project so much more do-able for anyone.
I hope you’re now armed with all the tips to make this awesome functional Ikea seating bench hack.
Here’s the step-by-step instructions on how to put it all together.
Happy Hacking!
IKEA Storage Bench Tutorial
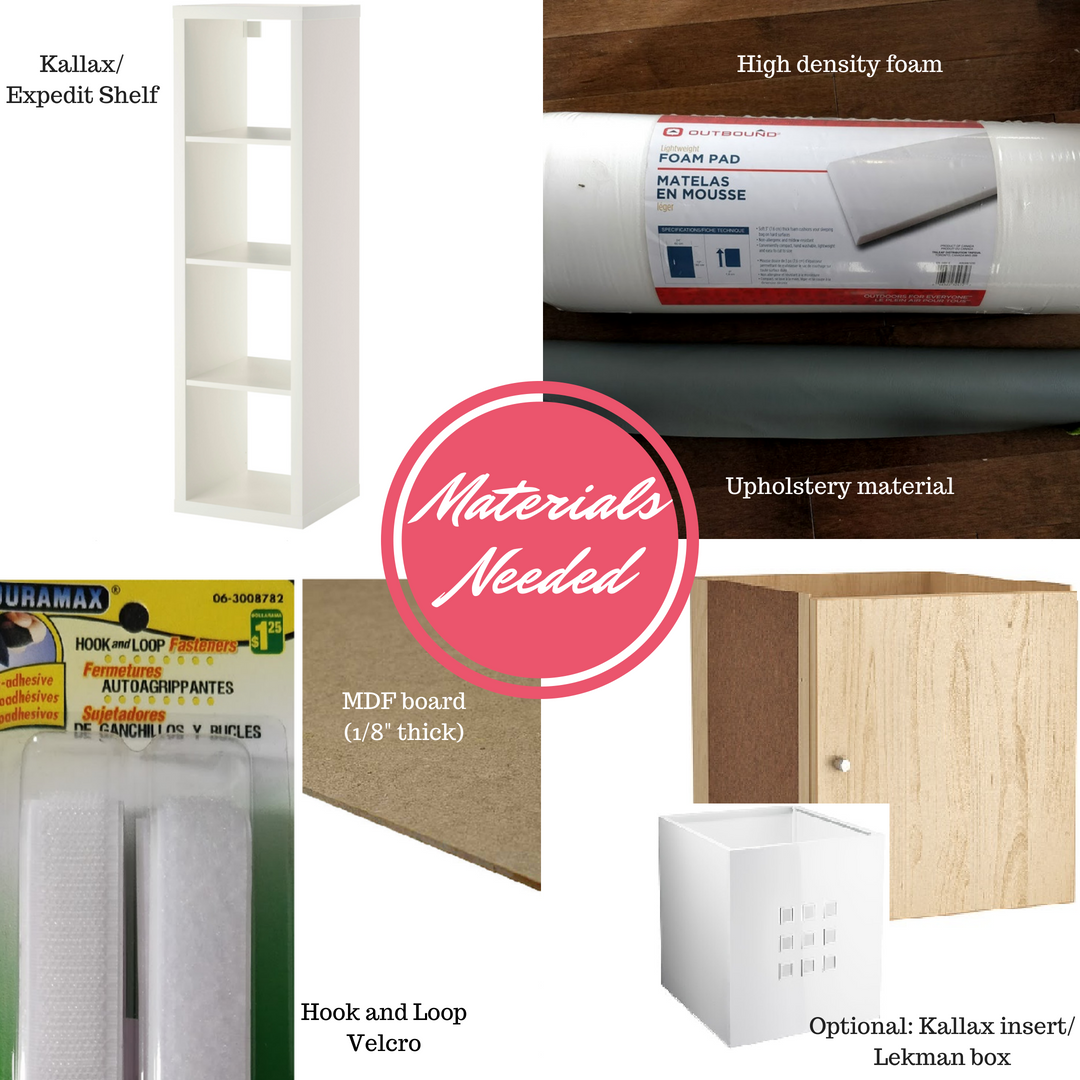
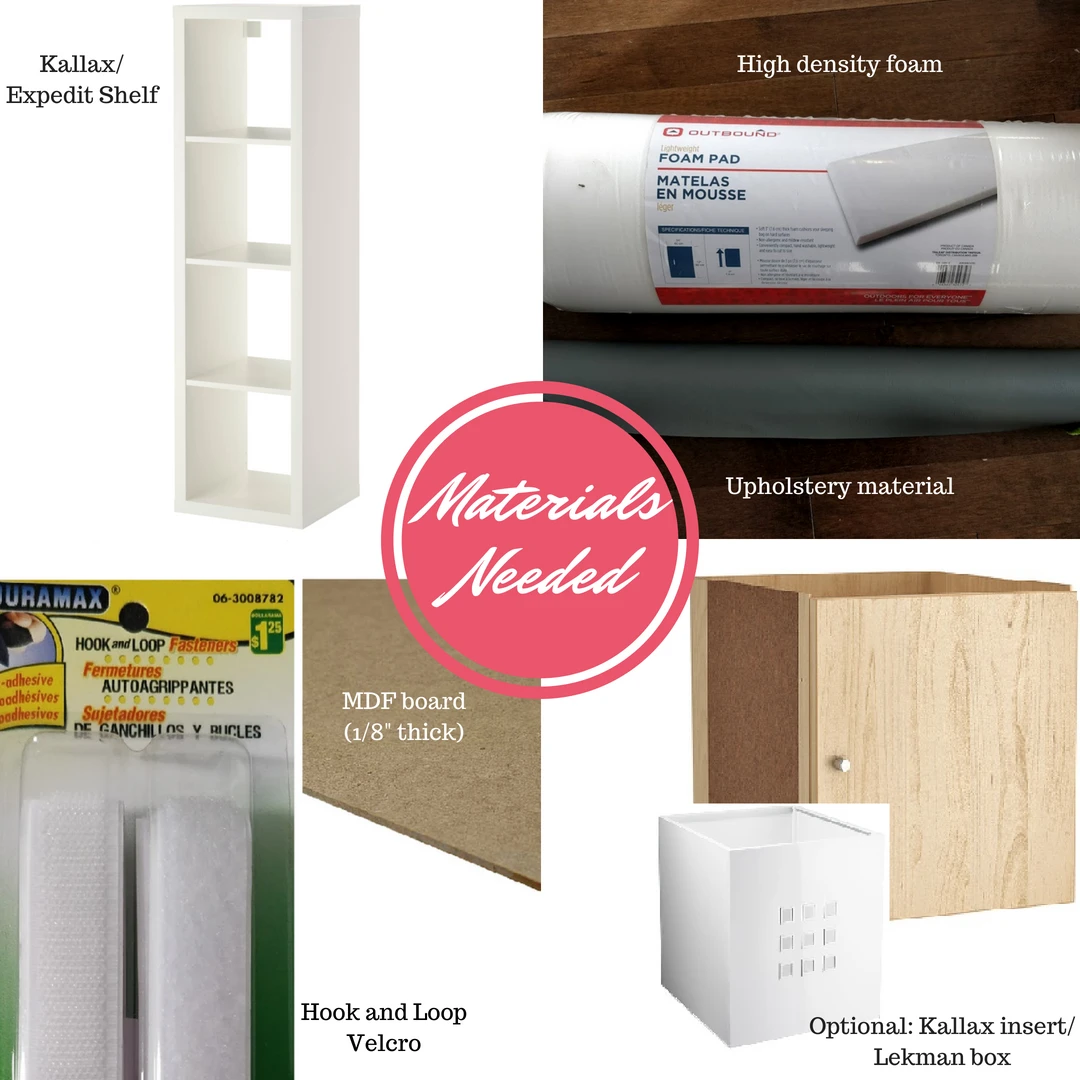
Materials
- Ikea Kallax/Expedit shelves, or this one on amazon
- High density foam
- MDF/Plywood board cut to your shelf’s measurements . TIP:Home Depot will cut it for free.
- Upholstery material (I used vinyl that can be wiped clean).
- Hook and Loop Velcro strips.
- Spray Adhesive Glue
- Staple Gun
- Optional: Ikea Kallax inserts and/or Lekman boxes
Ikea Kallax Hack Step-by-Step Guide
Step 1
Using a spray adhesive, glue the MDF board to the foam. In the picture below, I was using scrap pieces of foam leftover from another project, which also works- just make sure that the foam is glued securely to the MDF.

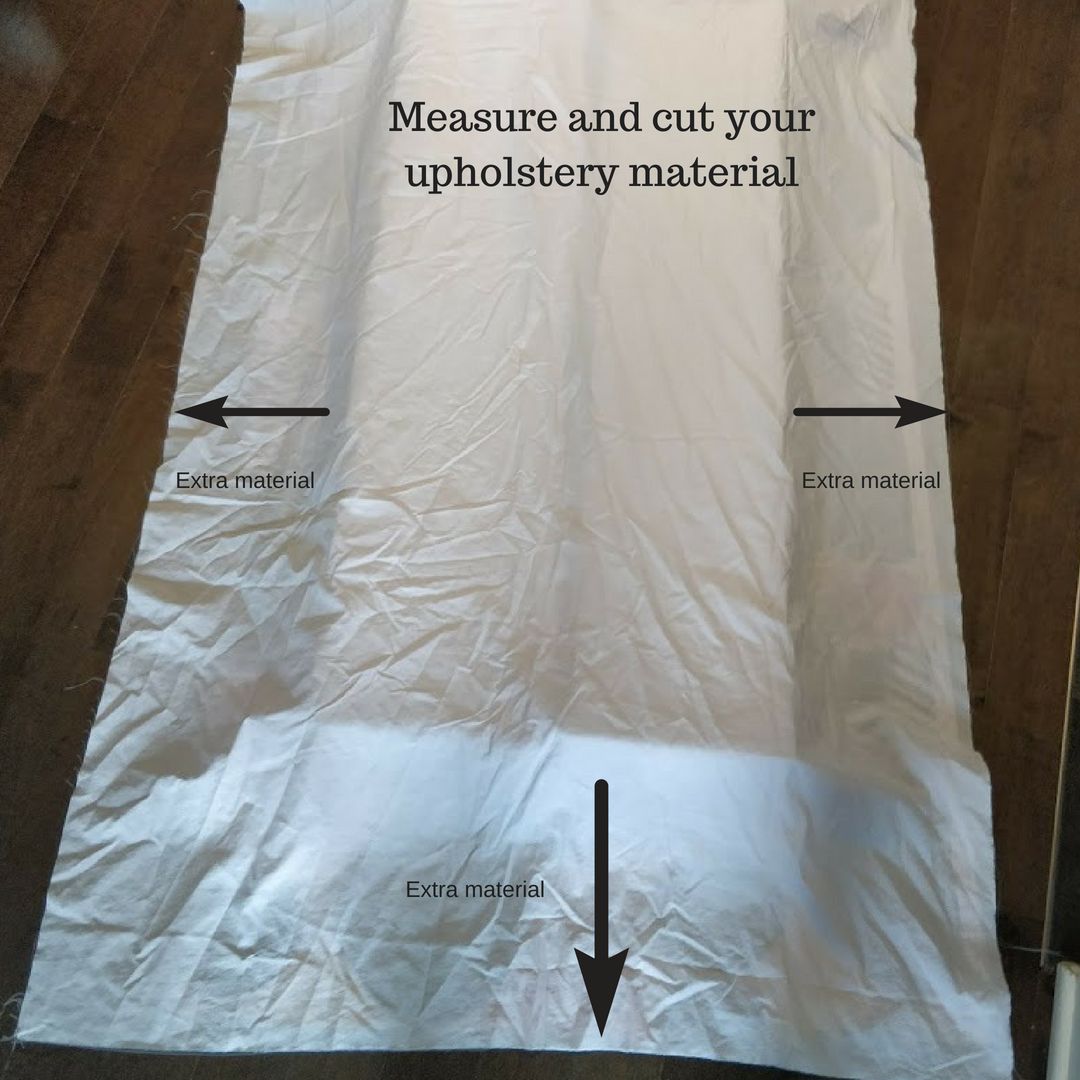
Step 2
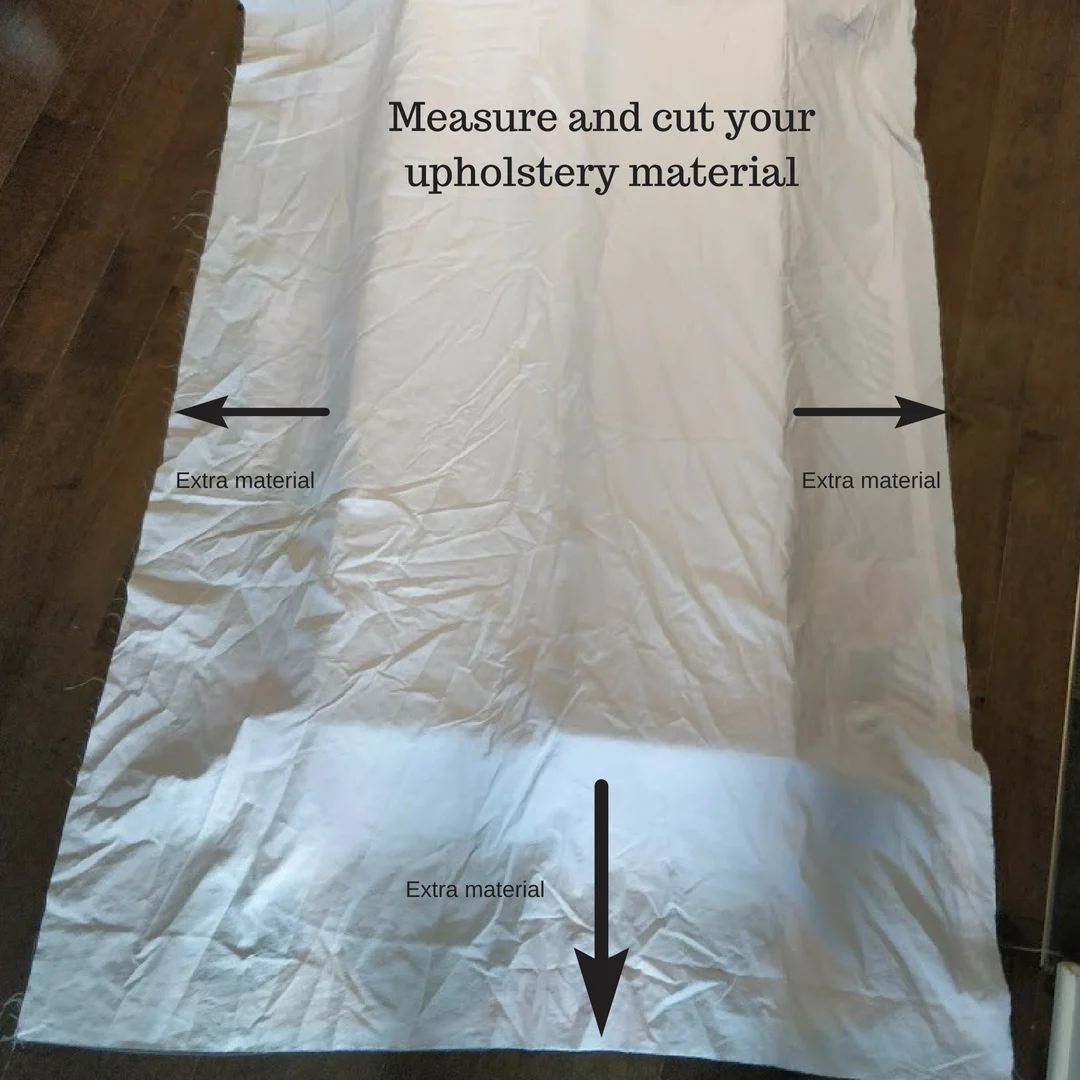
Measure and cut your upholstery material. For good measure, make sure there is approximately 5-6 inches of extra material on all sides- since you’ll be wrapping it around the foam board and stapling.
OPTIONAL: you can add a sheet of cotton batting or an old cotton bed sheet under your upholstery material- this adds breath-ability and a smoother finish to your seating.
Step 3
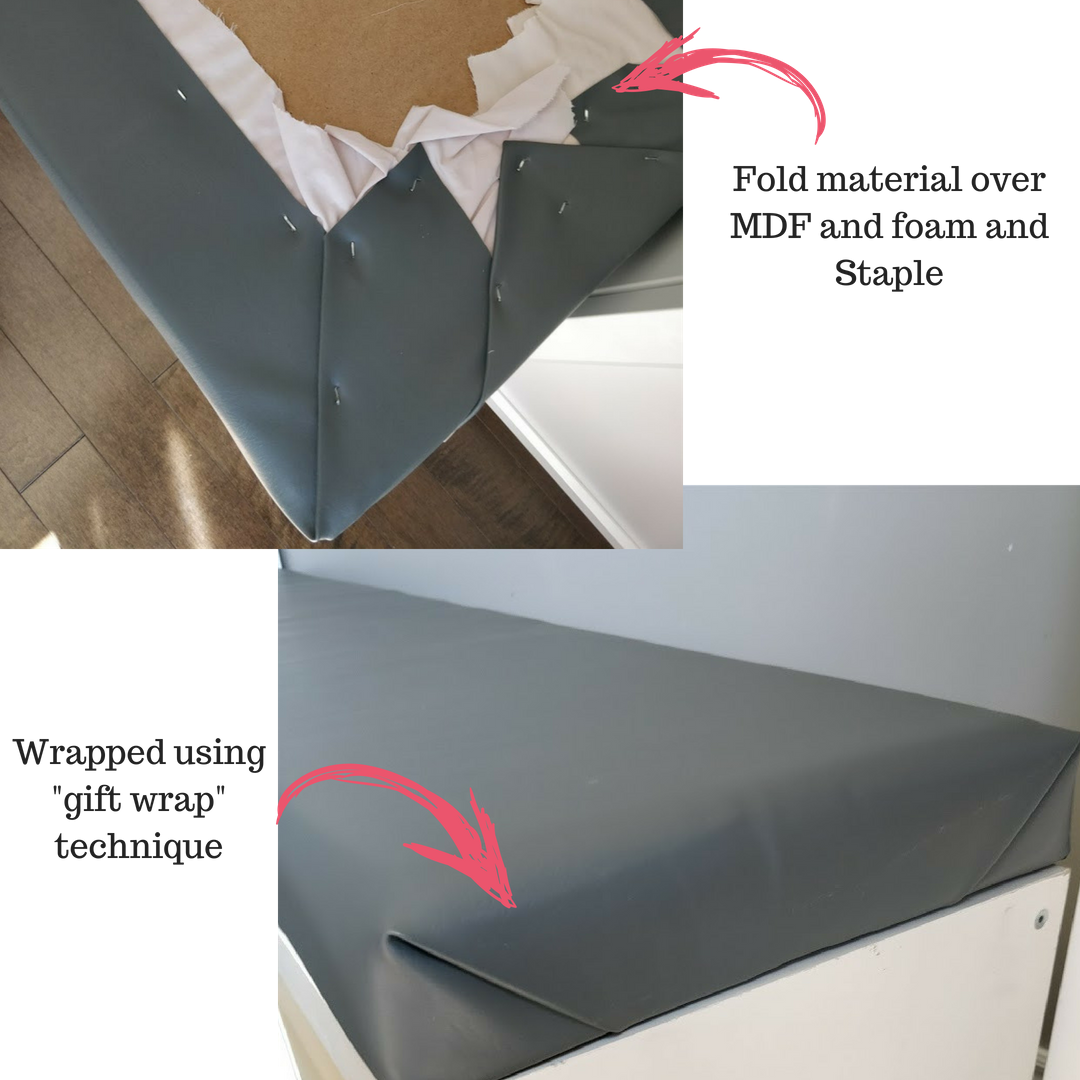
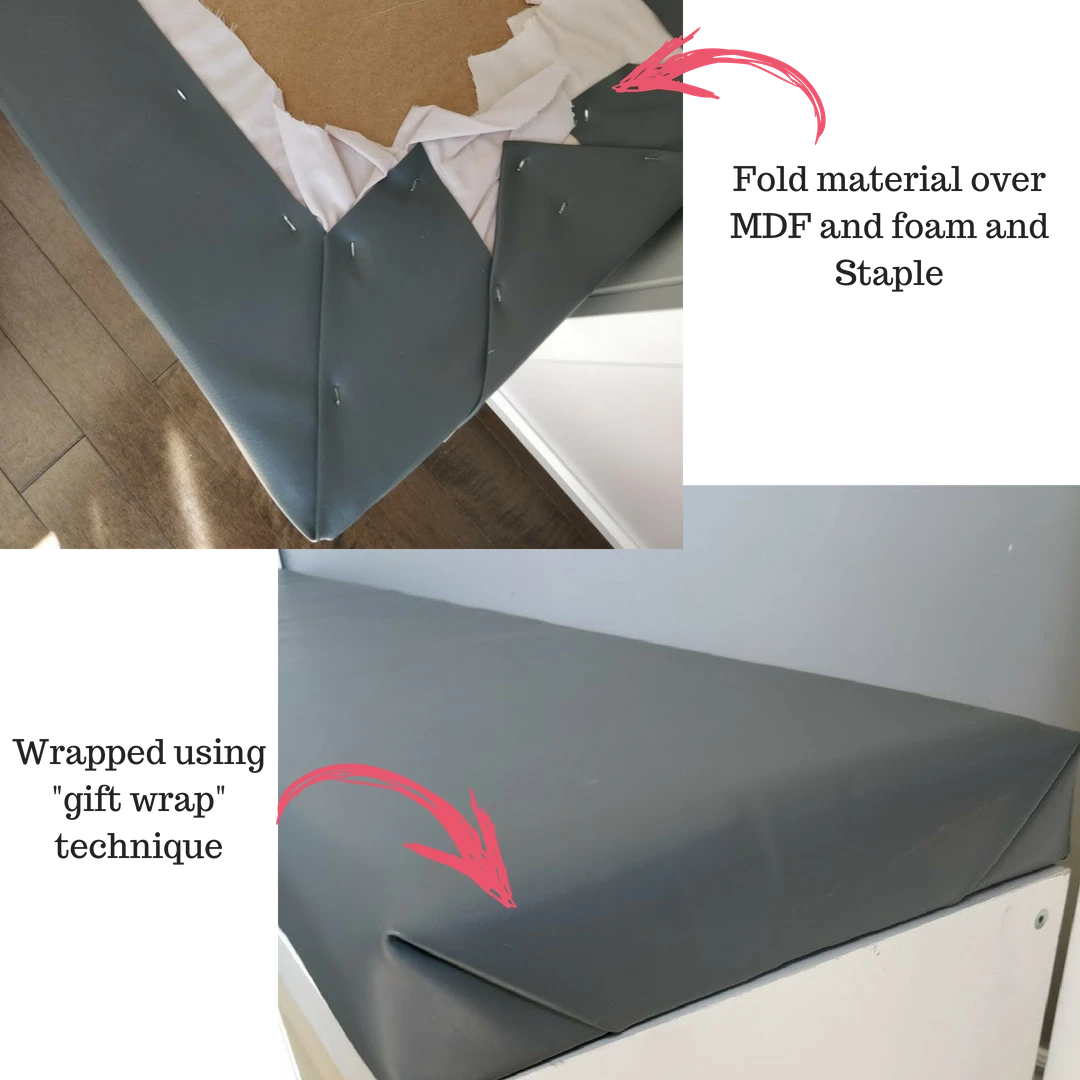
Pick a technique to wrap your upholstery material. The technique I used was in the same way you would wrap a gift. I find this gives smoother lines and looks less “bunched up”.
Once you have the folds ready you can start stapling. This part usually requires 2 people.
One person to hold the material tight and taught and the other person does the stapling. As you can see it doesn’t have to look perfect. The staples will be hidden when placed on the shelf in a later step.
Step 4
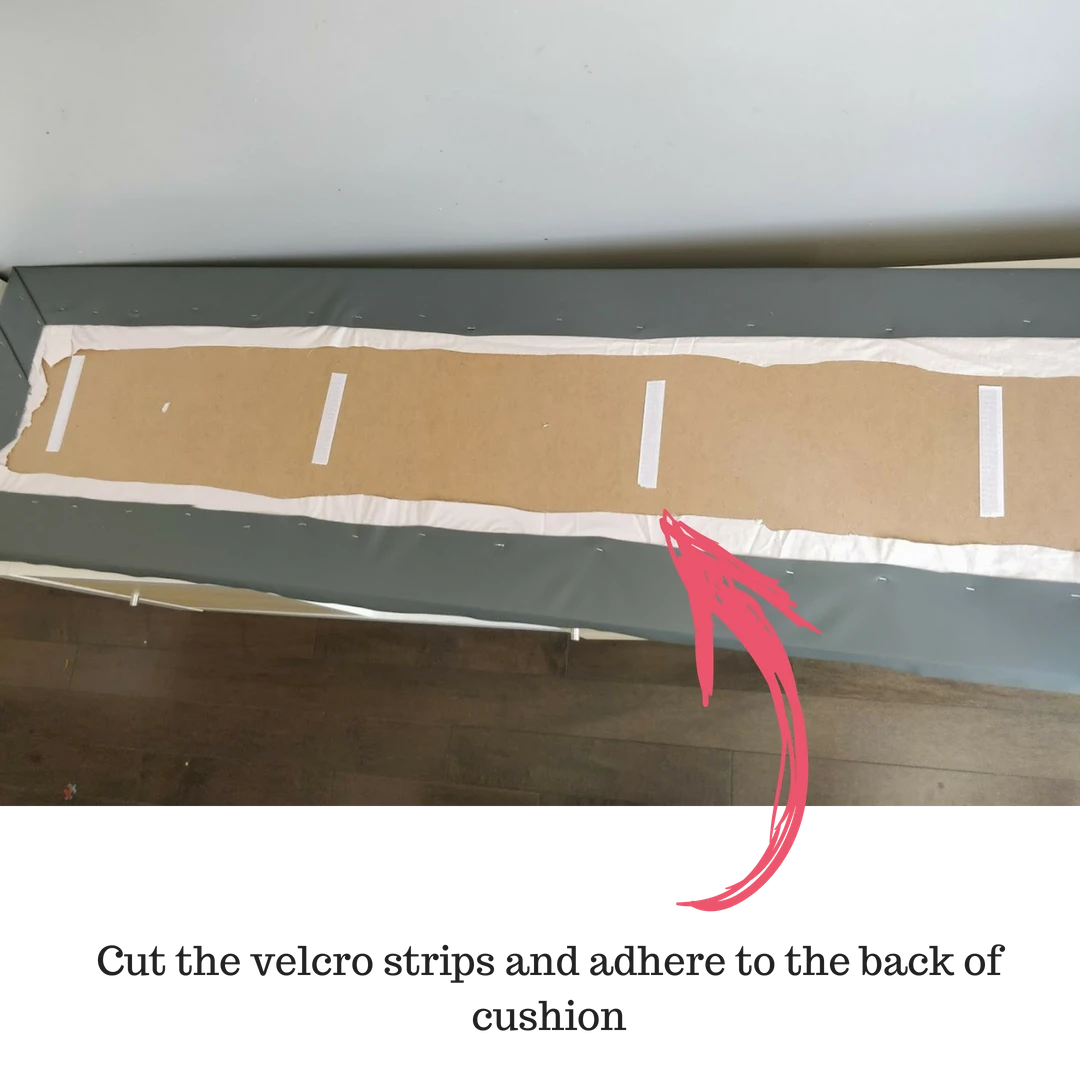
The last part is to stick the cushion to the shelf so that it doesn’t move when people sit down.
You could flip the shelf over and screw it in, which is a good option if you want a permanent solution. However you will forever have holes in your bench and makes it harder to remove the seat cushion if you ever need too.
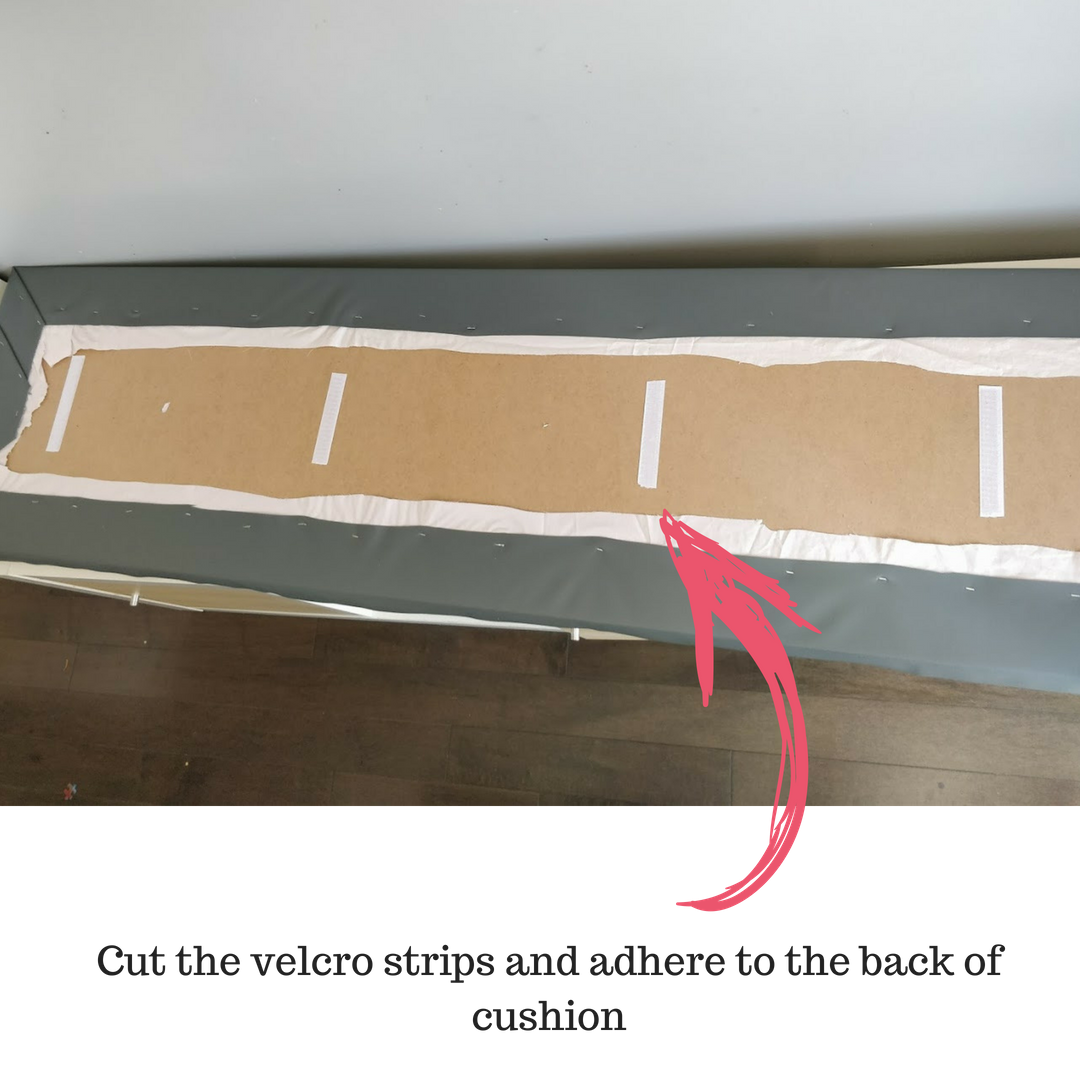
I chose a less permanent solution, which still prevents the cushion from sliding.
I used hook and loop velcro strips. This way, you can easily take the bench cushion off for whatever reason, like cleaning, moving, re-upholstering, etc…
You can find hook and loop velcro at most stores, like the Dollarstore, Walmart, Target, etc. Just look in the hardware section or ask a sales rep.
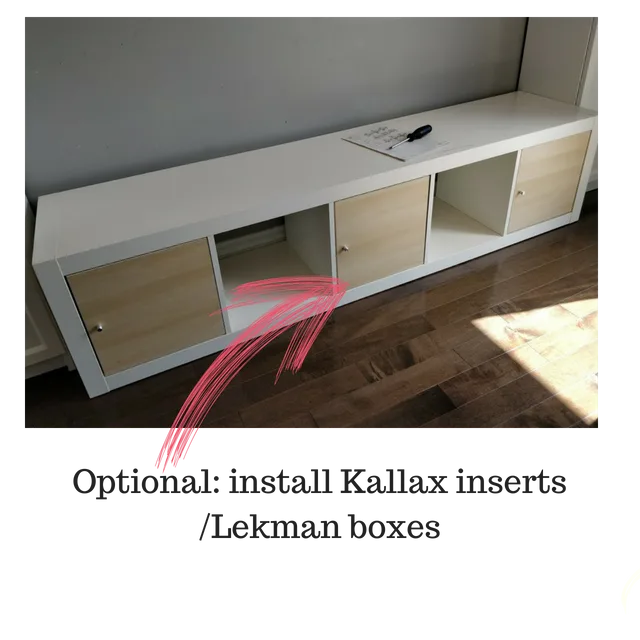
Step 5 (OPTIONAL)
At this point you can choose to keep the cubbies in the banquette open, or find baskets for storage.
I wanted to maximize the cubby space for extra storage so I chose the inserts made specifically for the Kallax/Expedit.
3 of them have doors that swing open (Kallax inserts) and the 2 others are durable plastic boxes (LEKMAN box) that slide out.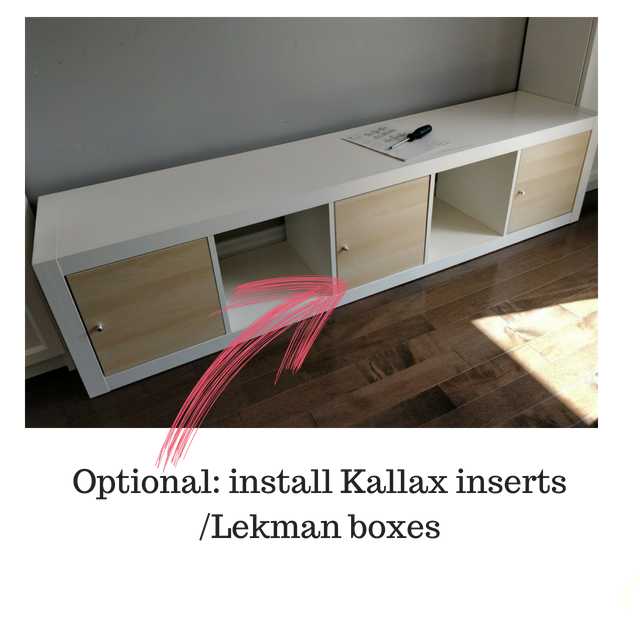
And voilà, a DIY Ikea storage bench you can make YOURSELF- and be proud of.
I hope you’re also armed with a bunch of tips on how to save time and money for this project.
And most importantly, I hope you feel empowered to make one yourself. You won’t regret it – it might even unleash the “Ikea Hack” beast in you- it totally did for me!
If you can’t get enough Ikea hacks for your home decor, like me, check out some of my other projects:
- DIY Kitchen Pantry made with Ikea Billy Bookcase
- 31+ Ikea Kallax Hacks
- DIY Family Command Center IKEA hack
- DIY small bench for small spaces {IKEA hack}
- 20+ Ikea Desk Hacks
- Ikea Lego table hack
- Crafting table with storage {IKEA hack}
- DIY Ikea Craft Room Pegboard Organization
Until next time..stay Nifty!
Here are some extra pictures of the Ikea Kallax Hack for inspiration…
Completed seat bench

All put together!

Side by side Before and After shots

If you liked this Ikea Kallax hack please pin it on PINTEREST


tala
Monday 4th of September 2023
Per Ikea website under measurements:
Max load/shelf: 13 kg (29 lb)
https://www.ikea.com/ca/en/p/kallax-shelf-unit-with-4-inserts-high-gloss-white-s89278301/#content
Suzanne
Saturday 28th of November 2020
Hi Jasmine, Thanks for such a well documented tutorial! I'm going to incorporate this into my son's room as toy storage and a seatinh area for him/us. Re the vinyl: I've used clear table vinyl covering cut to size to layer over a nice cotton print I wanted for a portable changing mat. It worked wonderfully and is totally wipe clean :) Also, Vilene do an iron on vinyl so you can transform any fabric into a waterproof one! It's only 45cm wide so not big enough for this, but perhaps there's another project it might come in useful? Thanks again for the awesome tutorial x
Jo
Wednesday 22nd of June 2022
@Jasmine K, is this still going strong?! It looks great, I'm thinking of making one for our living room window
Jasmine K
Tuesday 1st of December 2020
Thanks so much for your idea Suzanne! That's a really good option to make the fabric cushion waterproof with the fabric you like. I'm sure your son will love the bench too, it's such a great height for kids, ours love it!
Cheers,
Jasmine
Emily Hamilton
Tuesday 28th of July 2020
Hi Jasmine, this is a great idea and I'm really excited to try this project. How many yards of vinyl did you need for the cushion? Thanks!
Jasmine K
Friday 31st of July 2020
Hi Emily, 2.5 yards of material would be safe. You might have extra but its always to have more than less.
Hope you enjoy the project! Jasmine
annita
Tuesday 18th of February 2020
A friend of mine dd this hack and used patterned shower curtains for the cushion.
Jasmine K
Tuesday 18th of February 2020
That's so clever, love that idea! Thanks for sharing Annita!
Anne
Tuesday 19th of November 2019
Did you staple the cotton fabric and vinyl separately or did you staple them together? Thank you! I love this project and cannot wait to tackle it!
Feeling Nifty
Thursday 28th of November 2019
Hi Anne, I stapled them separately so each layer is taught, and there are no wrinkles. Hope you enjoy making this DIY and gluck!!
Feeling Nifty
Wednesday 20th of November 2019
Hi Anne, yes we did staple the fabric first followed by the vinyl - just to make sure everything was smooth and taught. Very happy you like the project and hope you enjoy making it!!